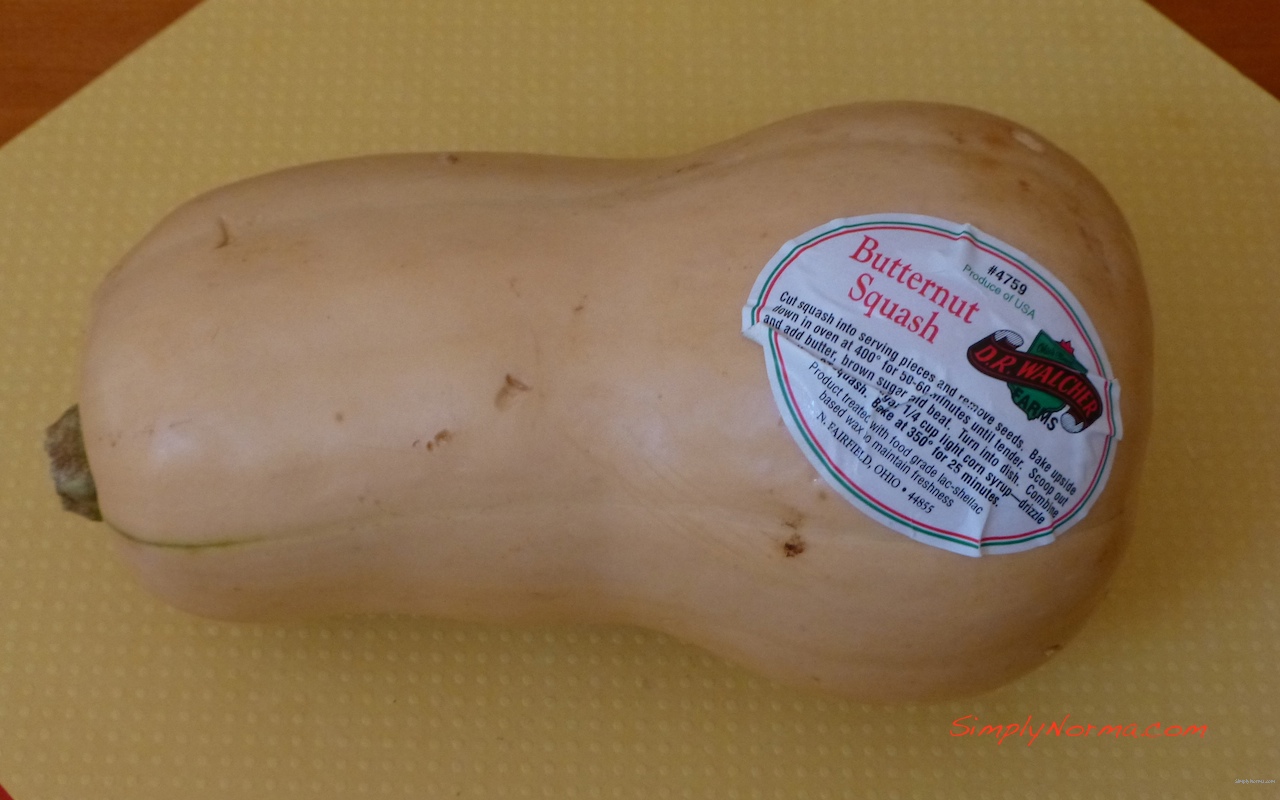
Ahhh … the overweight butternut squash. What to do with this heavy vegetable?
Butternut Squash
Fortunately, I found a recipe for Roasted Butternut Squash which is paleo and quite easy to make (although I did tweak the recipe a little). The squash is cumbersome to work with — uncomfortable for small hands when peeling it. But — what an awesome burst of flavor the squash gives you in every bite! I quite enjoy eating this vegetable.
Ingredients
2-3 tablespoons Coconut Oil (or olive oil)
1 Butternut Squash
1/2 teaspoon cinnamon
Salt
Pepper
Directions
Preheat the oven to 400°F.
Peel, seed, and chop the squash into 1 inch pieces and add them to a bowl.
Line a baking sheet with aluminum foil.
Melt 2 tablespoons of oil then add the oil to the squash and toss together.
Add cinnamon, salt and pepper to the squash and toss together.
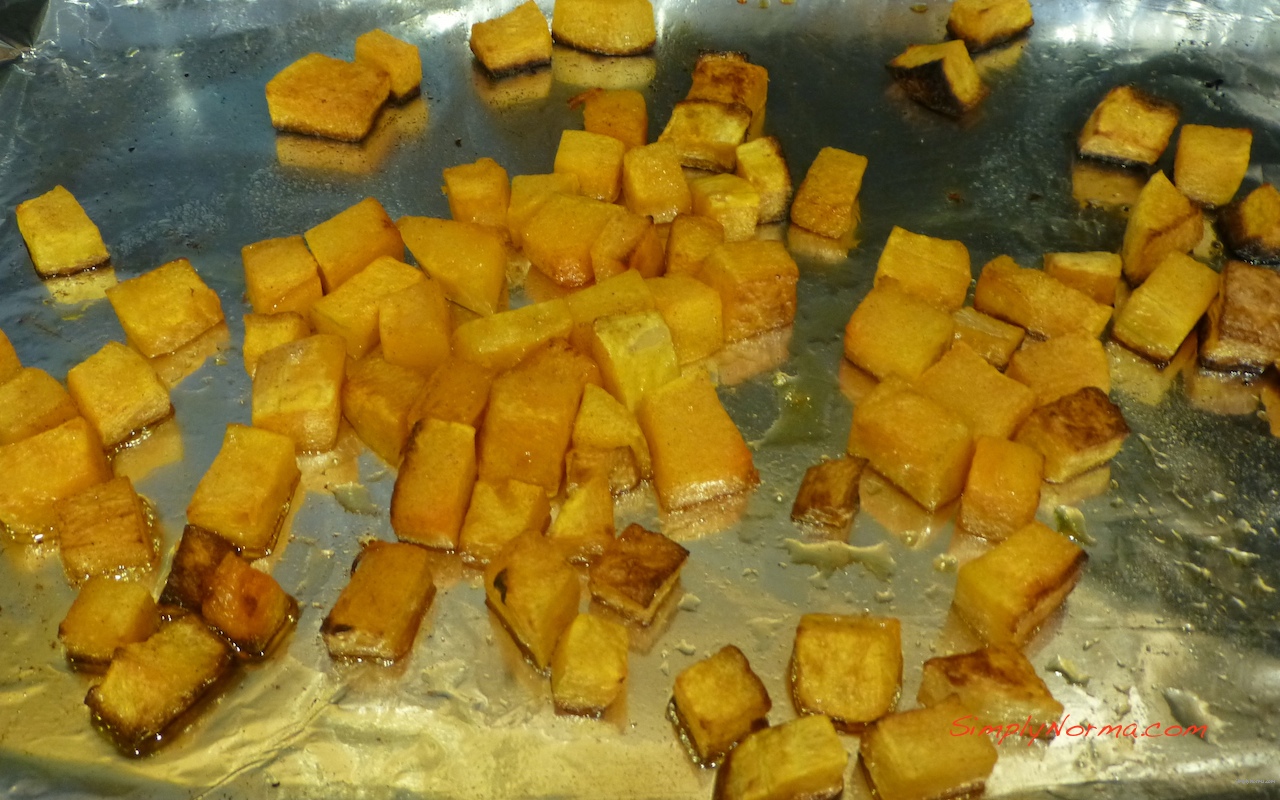
Roast the squash for approximately 35-40 minutes tossing every 15 minutes.
The squash is ready when soft — check by poking a fork through the squash to check for doneness.
Roast the Squash
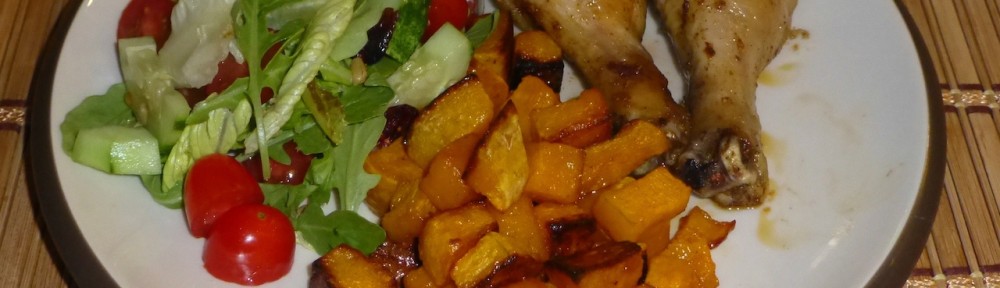
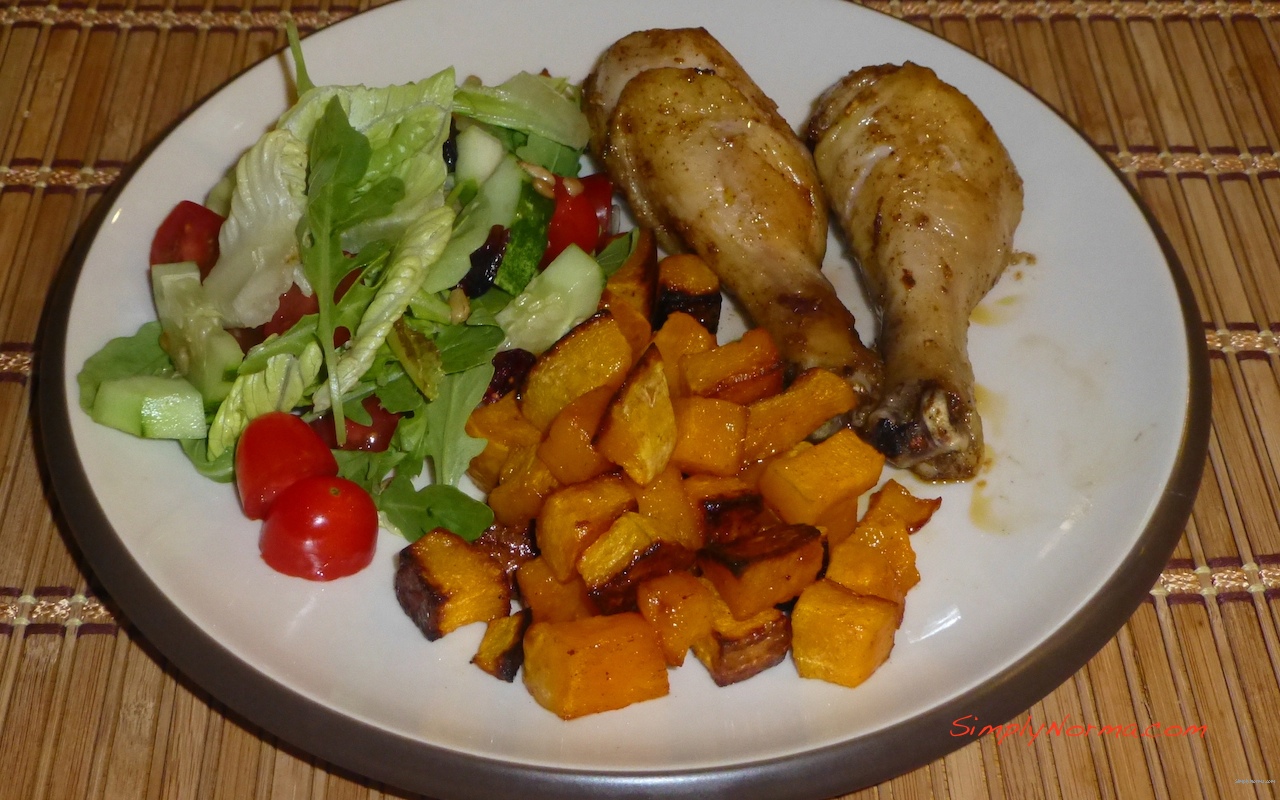
Pretty simple, no? I served the roasted butternut squash with a salad and drumstick chicken.
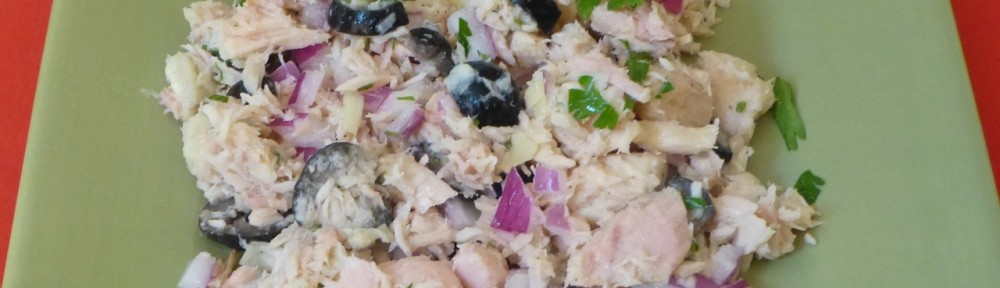
I made this paleo Tuna Salad because I wanted to try some new ingredients for my husband’s lunch — namely, artichokes. Â Blech! Â Or … so I thought. The original recipe has you putting the tuna salad in tomatoes but that wouldn’t work very well for a lunch so I changed it up a bit.
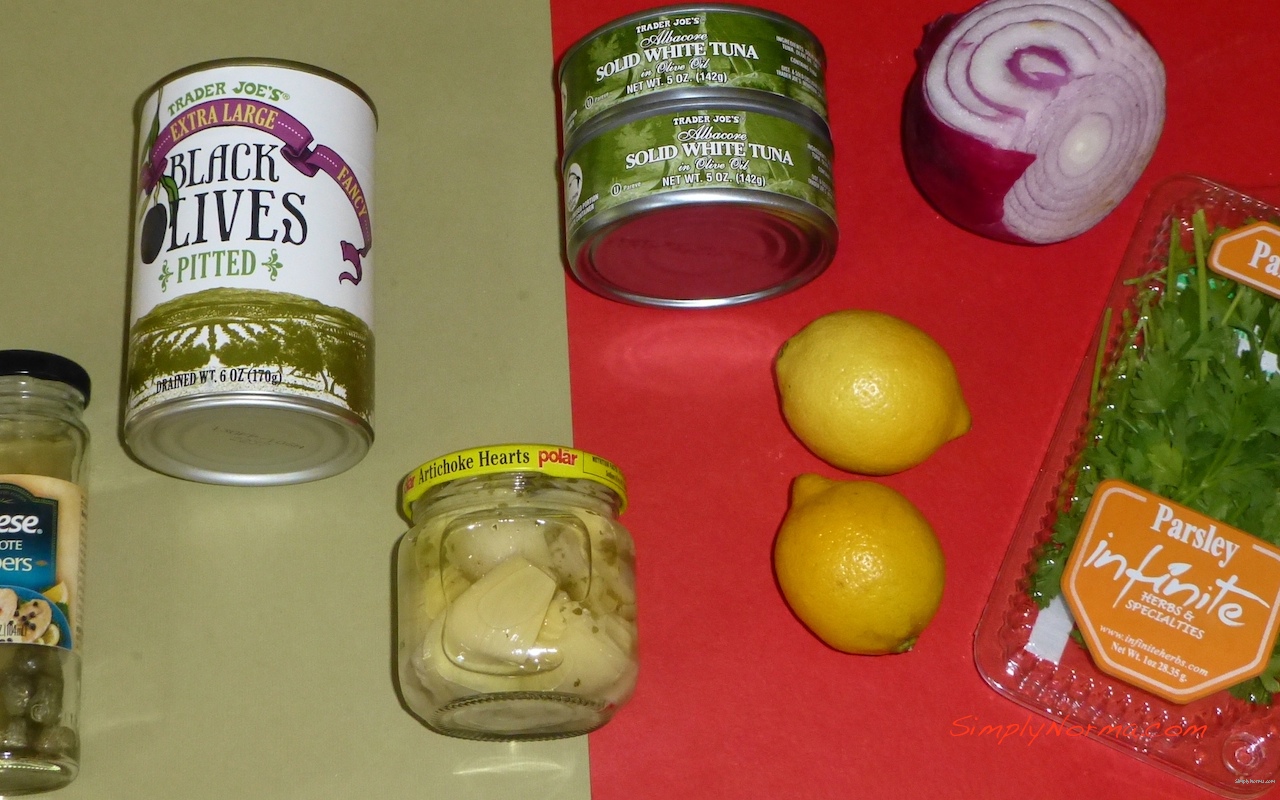
The recipe calls for 3 cans of tuna in oil — I reduced the amount to 2 since my husband usually takes other things for lunch in addition to a salad and I didn’t want this salad to go dry sitting in the refrigerator.
Here are the main ingredients … ooohh, the capers are almost off the photo.
Tuna Salad Ingredients (Olive Oil, Salt and Pepper not shown)
And … here’s the recipe for you with a few changes.
Ingredients
2 cans tuna in olive oil, drained
1/2Â cup artichokes, drained and chopped
1/4Â cup black olives, chopped
1/2Â small red onion, finely chopped
2Â tablespoons capers
2Â tablespoons flat leaf parsley, chopped
Salt and freshly ground black pepper
1Â tablespoon lemon juice (I used half a fresh lemon for this)
1 to 2Â tablespoons olive oil
Directions (pretty simple)
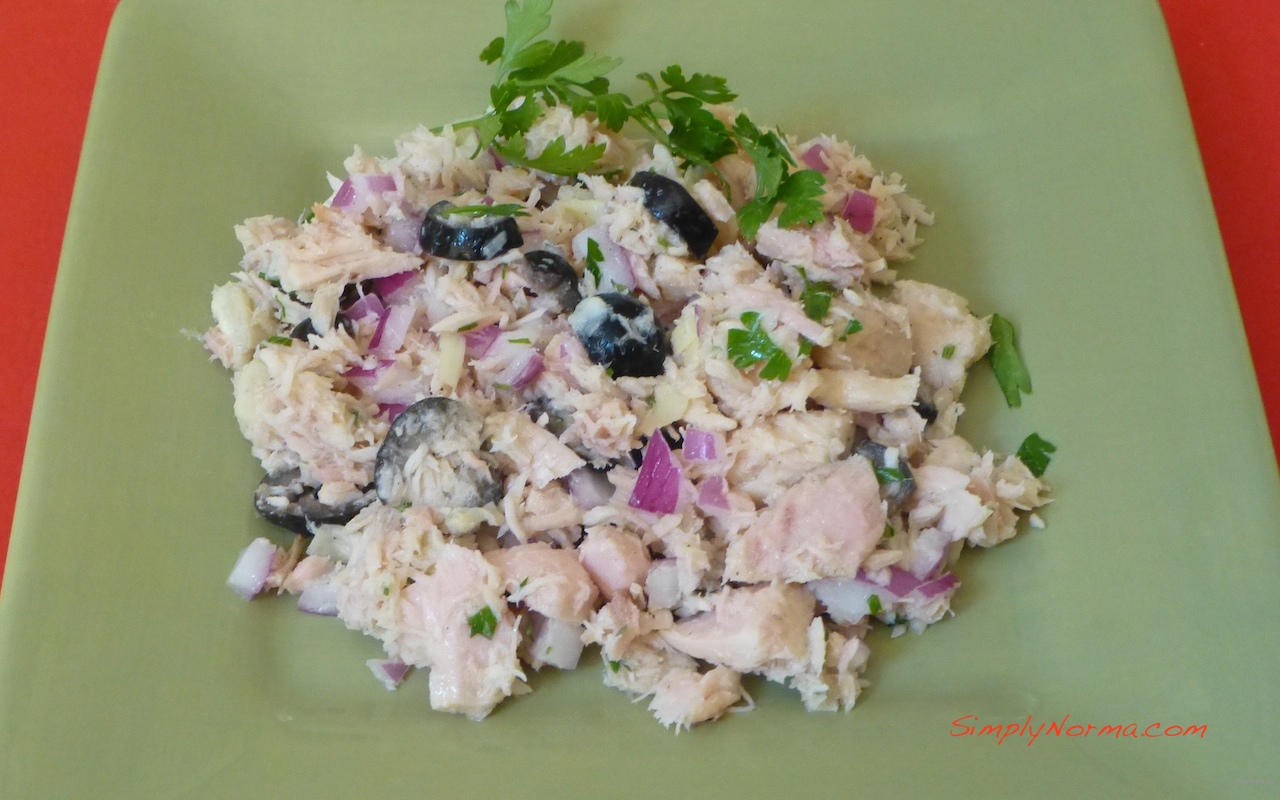
Mix all the ingredients in a bowl then season with salt and pepper.
And that — is pretty much it.
I am not a fan of artichokes but it tasted fine to me. My husband, whose the artichoke lover, told me that he couldn’t tasted the artichoke at all. Â Maybe that’s why it tasted fine to me. Â (laughing) Â I’m guessing that since the artichoke is chopped up, you don’t get the full flavor of the larger pieces.
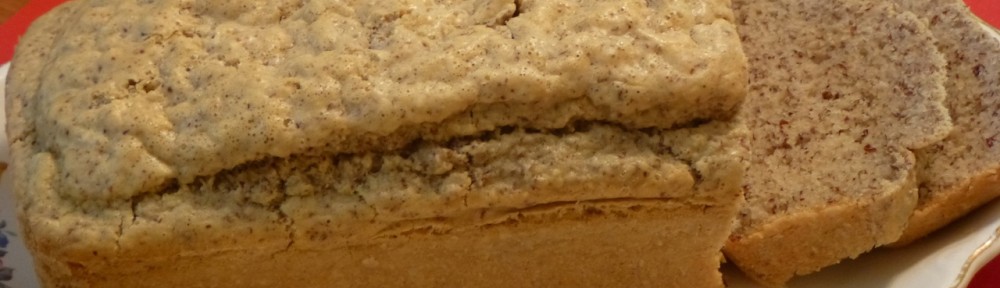
So … Meghan, at Paleo Effect, has outdone herself again. I recently tried a paleo bread recipe of hers and now she came up with a white fluffy gluten free paleo bread. Go Meghan!  I like trying her recipes because, so far, they have all been tried and true.
This recipe was really easy to make and it definitely will take the place of “real” bread. So, for those of you who are gluten free but long for bread, this recipe is for you.
Since we don’t normally have bread on a daily basis, I sliced my loaf and put 2 slices in plastic sealable bags so that I could grab them in the morning and toast them. Yum!
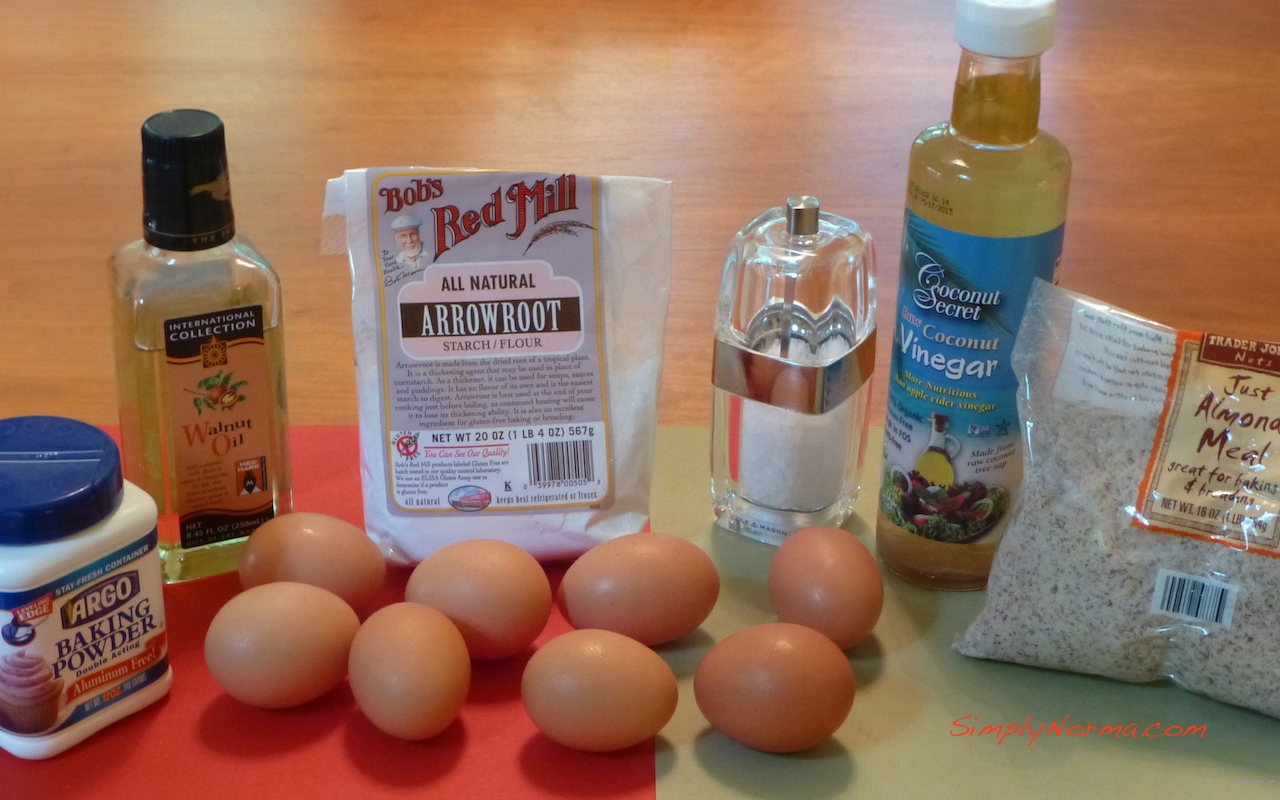
Here are the ingredients you’ll need to get started.
Ingredients
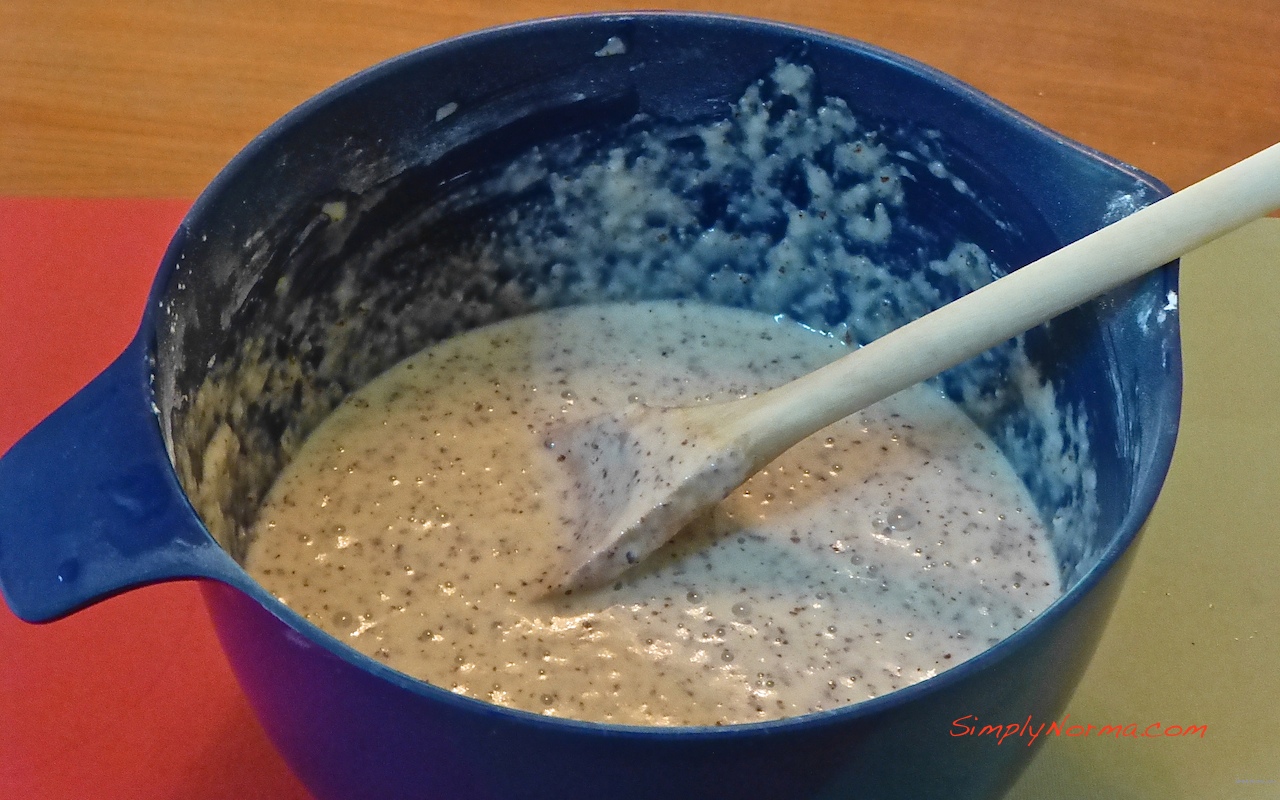
You’ll be combining all the ingredients together …
Mix Ingredients Together
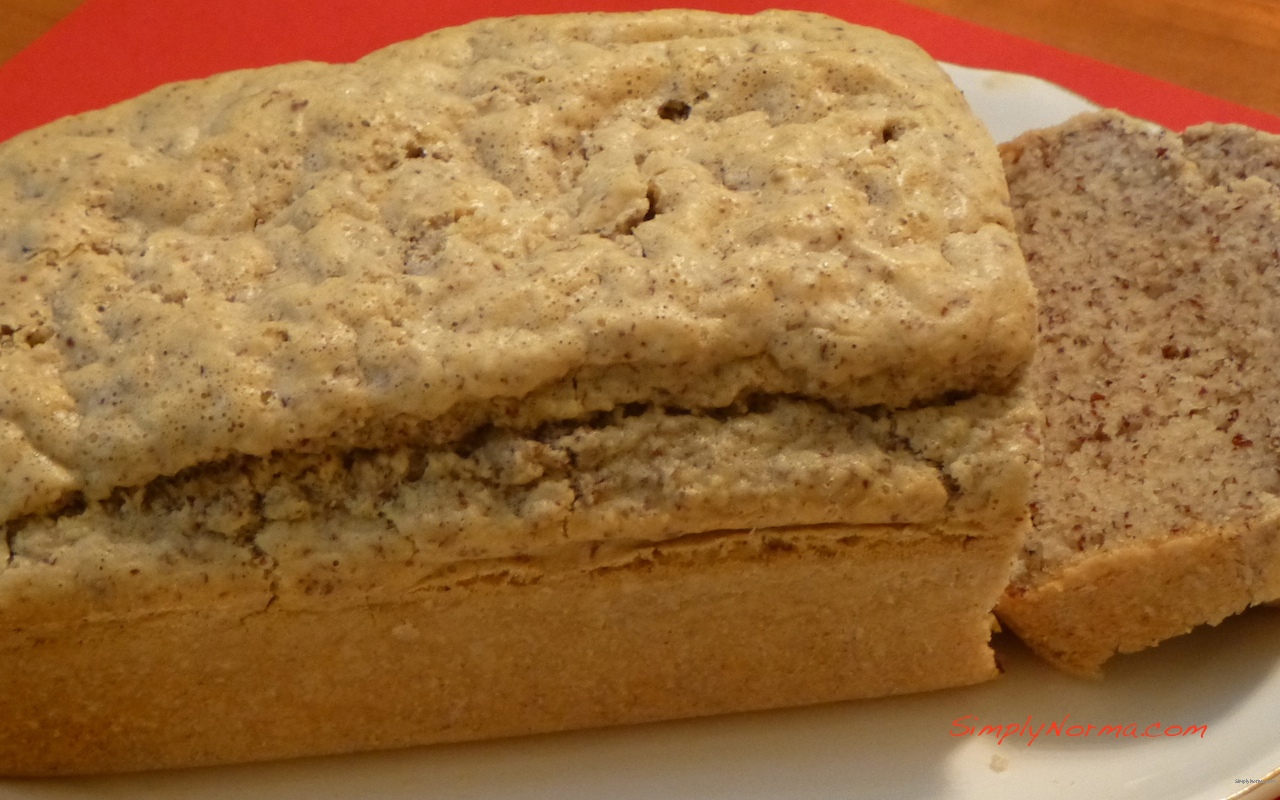
To get a beautiful white loaf …
White Paleo Bread
Ooh la la! Â You absolutely must try it!
Ingredients
1 ½ heaping cups Arrowroot Powder
1 heaping cup Almond Flour
4 Eggs, at room temperature
4 Egg Whites, at room temperature
4 Tablespoons Walnut Oil
½ Tablespoon Kosher Salt
1 ½ Tablespoons Baking Powder
2 teaspoons Coconut Vinegar
Olive Oil Spray for your loaf pan (the original recipe used Coconut Spray)
Directions (the easy part)
Preheat the oven to 350 degrees Fahrenheit.
Combine the dry ingredients together in a bowl.
Combine the wet ingredients together in a bowl.
Combine the wet and dry ingredients together in a large bowl.
Spray your loaf pan with the Olive Oil Spray.
Pour the mixture into the loaf pan and bake for approximately 40 minutes. (The original recipe says 30-35 but mine took longer. A toothpick inserted in the middle should come out clean.)
And that is pretty much it! Â The coconut vinegar is a tad expensive, however, since you don’t use a lot of it and you’ll be making this bread a lot, it’s well worth the money.
Hope you enjoy it! And check out Paleo Effect‘s website — I haven’t been disappointed yet.
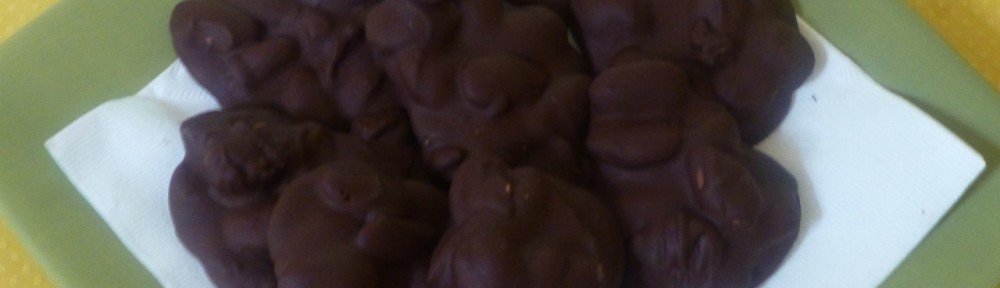
While visiting a friend recently, she made what appeared to be chocolate turtles. Have you ever had them? They’re not “real” turtles but a mix of caramel, chocolate and pecans. However, the ones my friend made had no caramel — only bittersweet chocolate and almonds.
I love people who can naturally cook, don’t you? No recipes needed. They just go to the cupboard, see what they have and make some wonderful recipe up as they go. That’s how my friend cooks. So — when I asked her for the recipe she laughed (as she usually does when I ask the question) and said “I don’t have a recipe.”
In talking with her, I’ve come up with a recipe for the homemade chocolate almond candy she made. I have to warn you — this is not a Paleo recipe as most Paleo-ites try to have no more than 85% cacao in their chocolate if they have chocolate at all. Â The one I used, which is from Trader Joe’s, has 72% cacao.
Still — I wanted to try it and it came out fine although the chocolate was a little soft after 3-4 hours. My friend told me they can take hours to harden depending on the weather and where you put them to cool. I forgot to ask her if they could be refrigerated to speed up the process. I’m guessing the answer would be yes.
Any type of nuts can be used but I chose whole almonds that I toasted in the oven. My friend has made this candy with hazelnuts also and they taste just as delicious. All you need are two ingredients … your dark chocolate and a nut of some kind.
Ingredients for Chocolate Almond Candy
I didn’t use a whole pound of chocolate. Temperance, temperance.
Anyway — here’s what I did and it came out beautifully. They can be addicting so I wouldn’t make them very often.
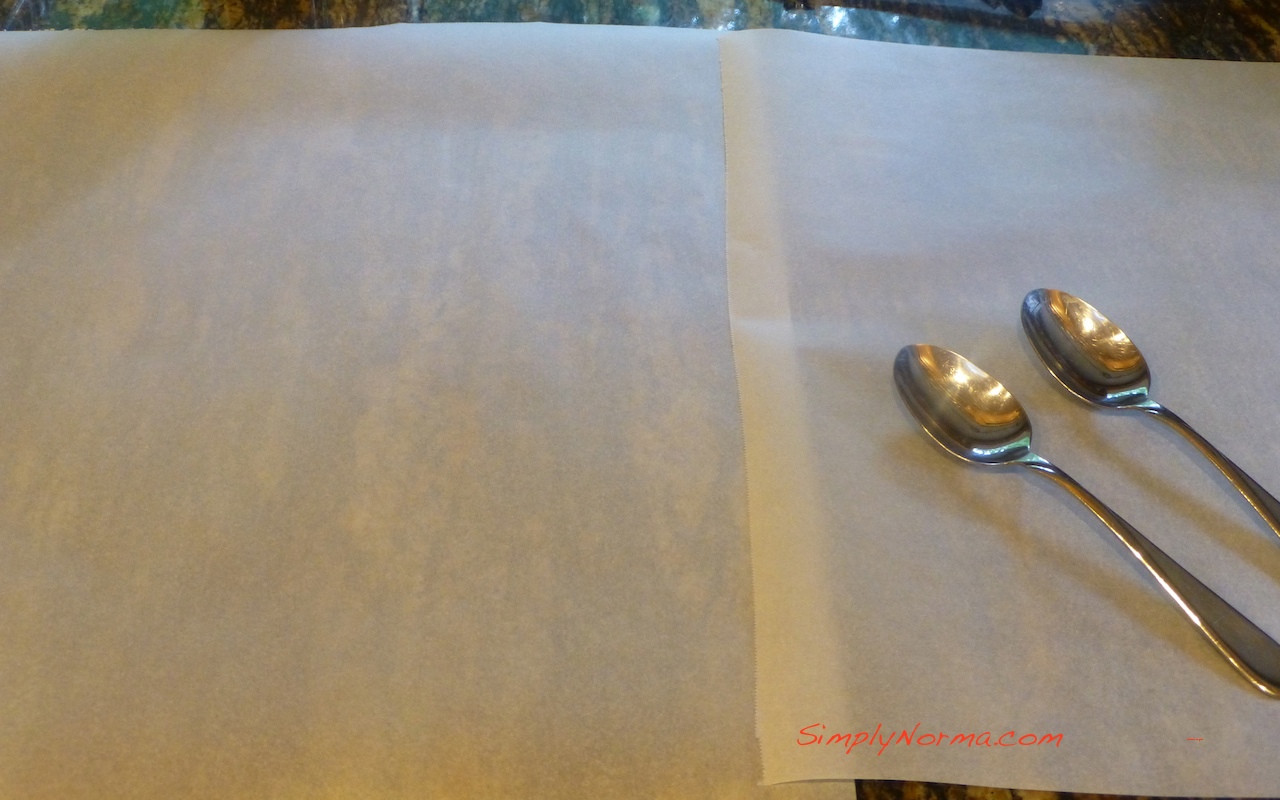
1) Put a large sheet of parchment paper and two spoons off to the side so you can have them ready to put your candy on. The size of the spoons will be determined by how large you want your candy pieces. The larger the spoons the larger the candy pieces.
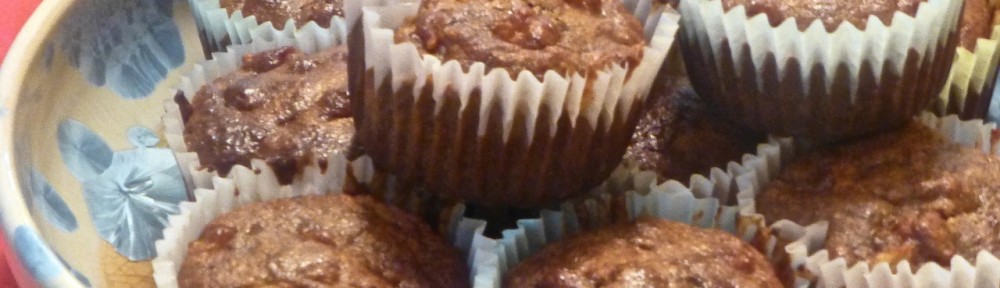
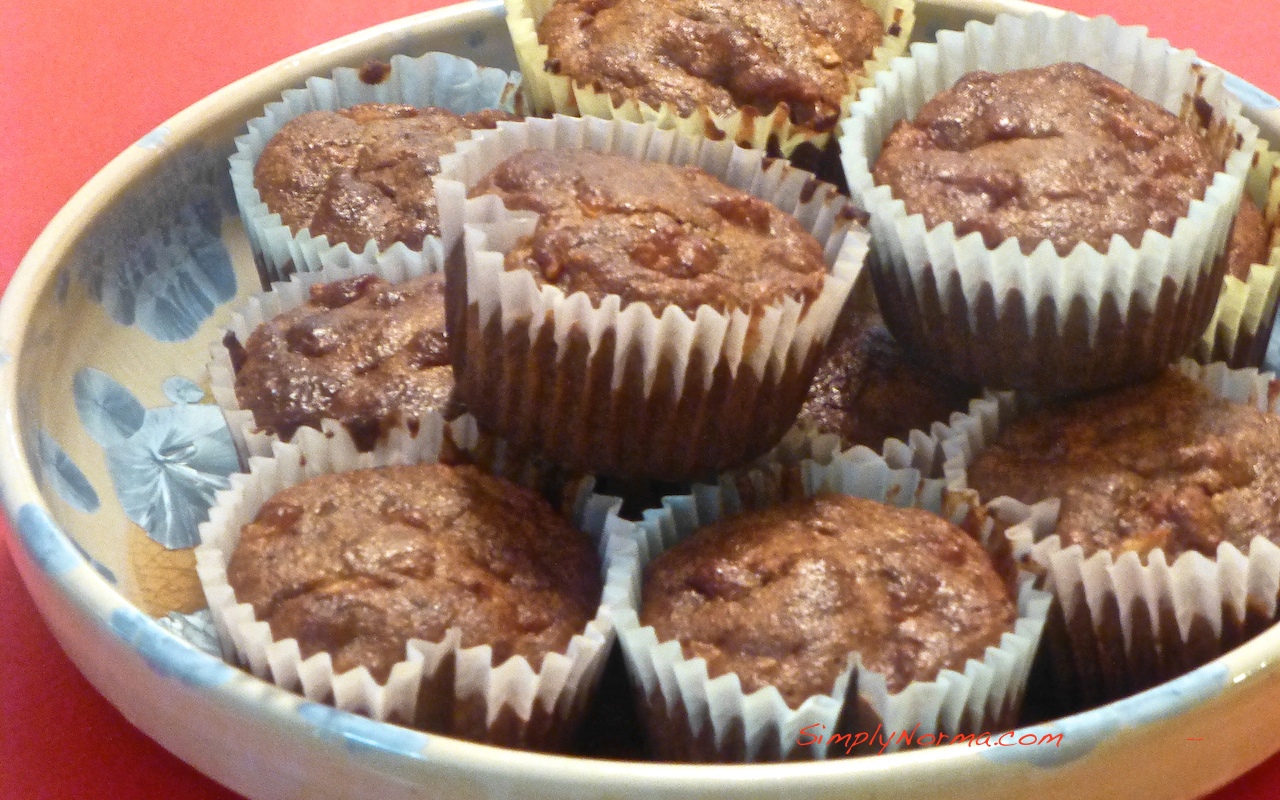
The search continues for good paleo muffins and this Apple Cinnamon Paleo recipe comes pretty close. The original recipe makes 9 regular sized muffins but I made 12 smaller ones. Next time I’ll make them larger as I think the taste might be a little better if they’re  not smaller.
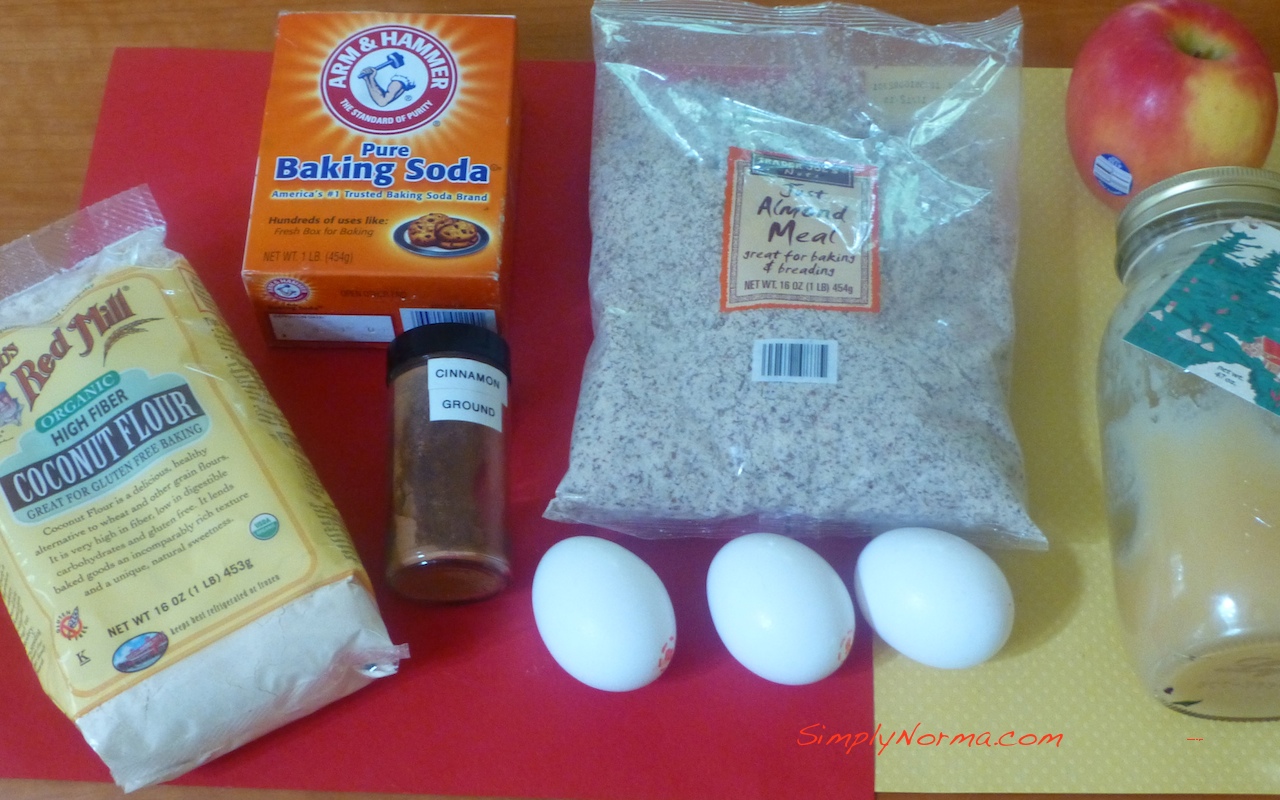
Few ingredients are needed for this recipe.
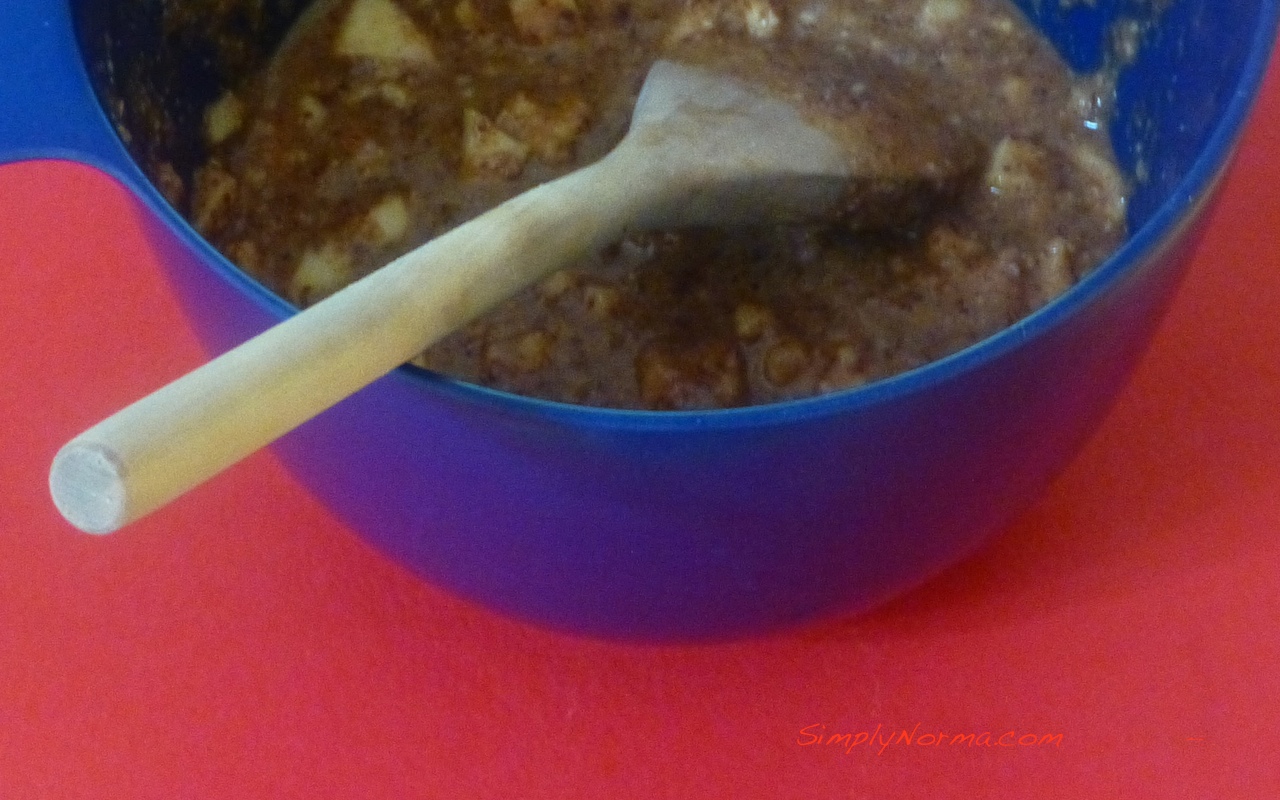
IngredientsMix Ingredients
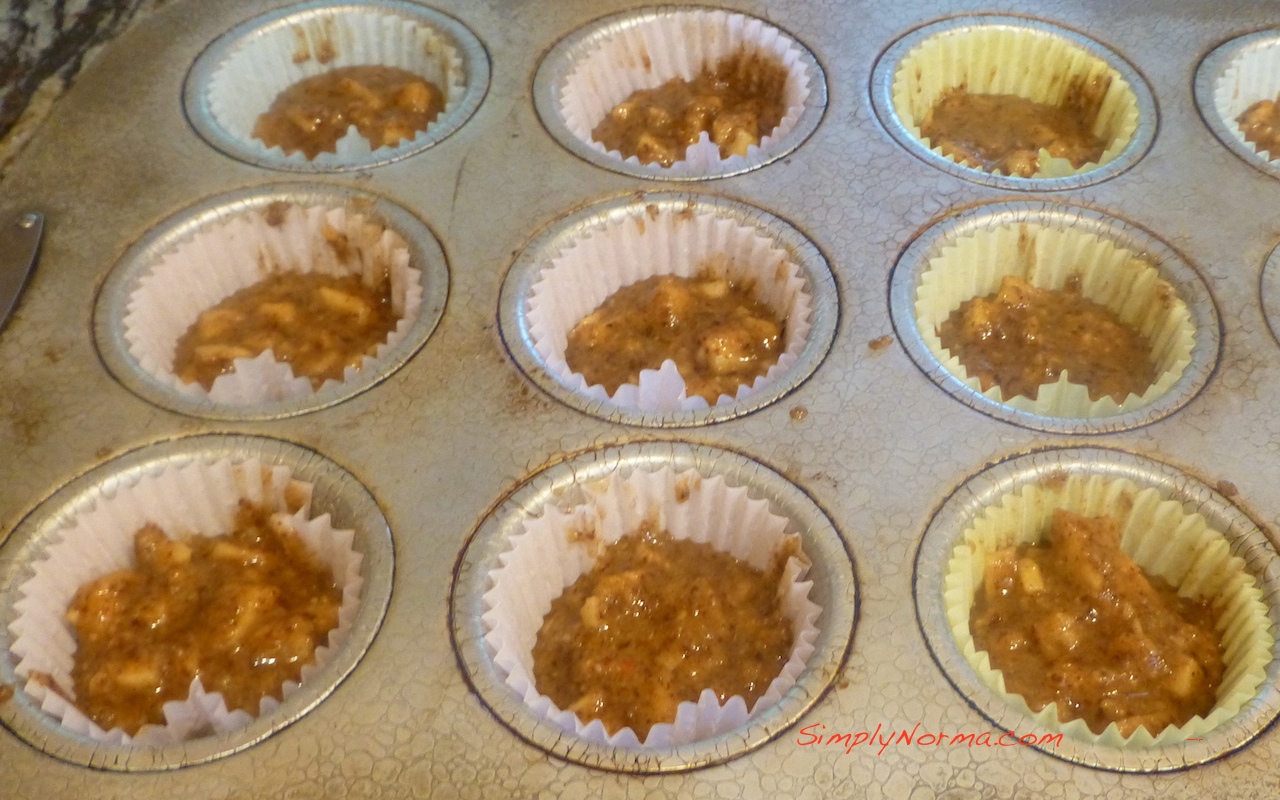
You’ll be putting the batter into a muffin tin. I’m guessing this can also be put in a loaf pan then sliced BUT I haven’t tried that yet.
Use Muffin Liners
Ready to try the recipe?
Ingredients
1Â apple, peeled, cored and diced
1Â cup almond flour/meal
3Â tablespoons coconut flour
3Â eggs, whisked and at room temperature
1/4Â cup coconut oil, melted
2Â tablespoons raw honey
1Â heaping tablespoon cinnamon
1/2Â teaspoon baking soda
pinch of salt
Directions
Preheat the oven to 350 degrees fahrenheit.
Add the almond flour, coconut flour, cinnamon, baking soda and salt to a large bowl then mix to blend it all together.
 Add the eggs, oil, honey, and diced apples to the dry mixture.
Combine everything thoroughly.
Line your muffin tins with muffin liners then, using a large spoon, pour a large spoonful of batter into each spot.
Bake for approximately 15 minutes if using a convection oven and smaller muffins or 25-30 minutes with larger muffins and in a non-convection oven.
Apple Cinnamon Muffins
That’s it! These were especially good!
Special thanks to PaleoOMG for this recipe. I encourage you to head over to her website as she has some pretty good recipes.
This paleo recipe for Garlic Beef Sausage is very very easy. I know you think I must say that a lot but that’s because I like trying recipes that are both tasty and easy to make. I mean, who wants to be in the kitchen all day, right? Occasionally I’ll make two or three different recipes for dinner but that’s not the norm.
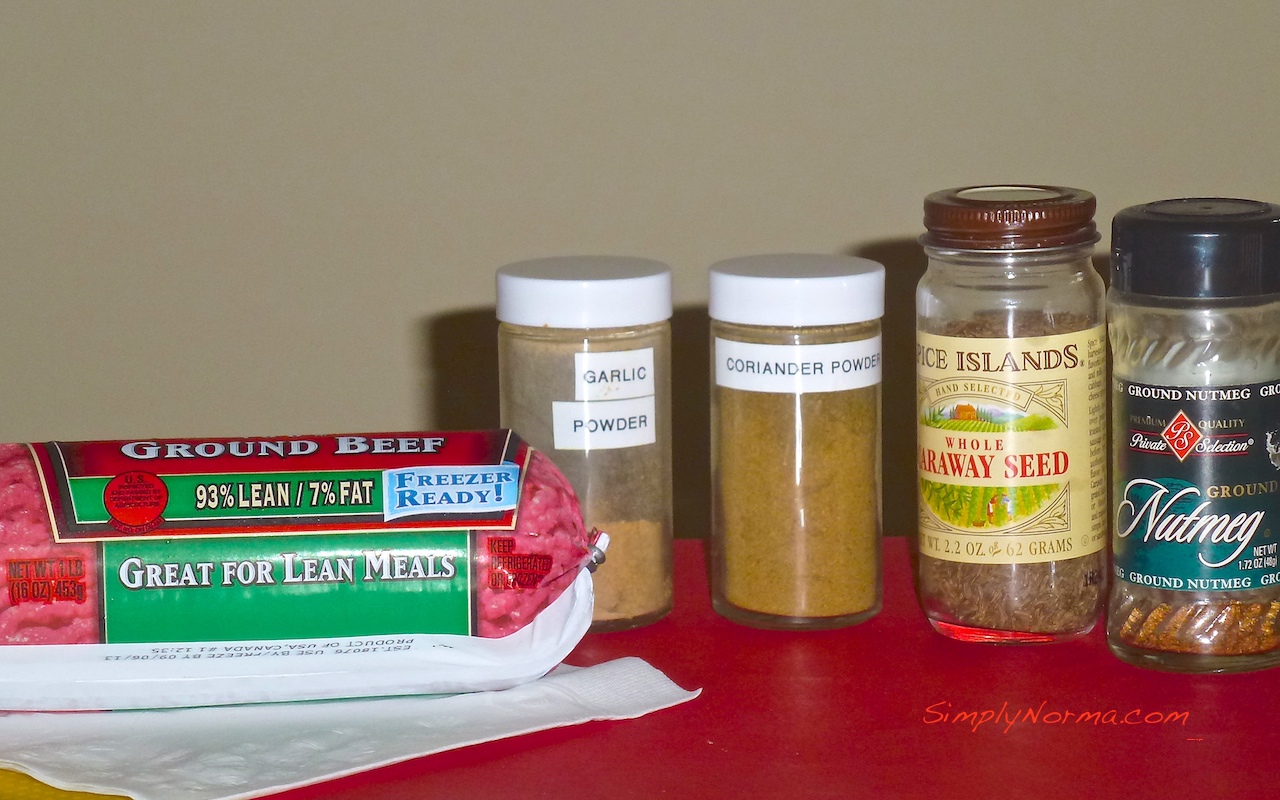
I made this Garlic Beef Sausage so my husband could have something quick for breakfast. All of the ingredients are easy to find in your grocery store. (Excuse the shoddy photos on this post — my camera froze on me so I had to use the backup which has a broken screen so I had no idea how the pictures would come out.)
Ingredients for Garlic Beef Sausage
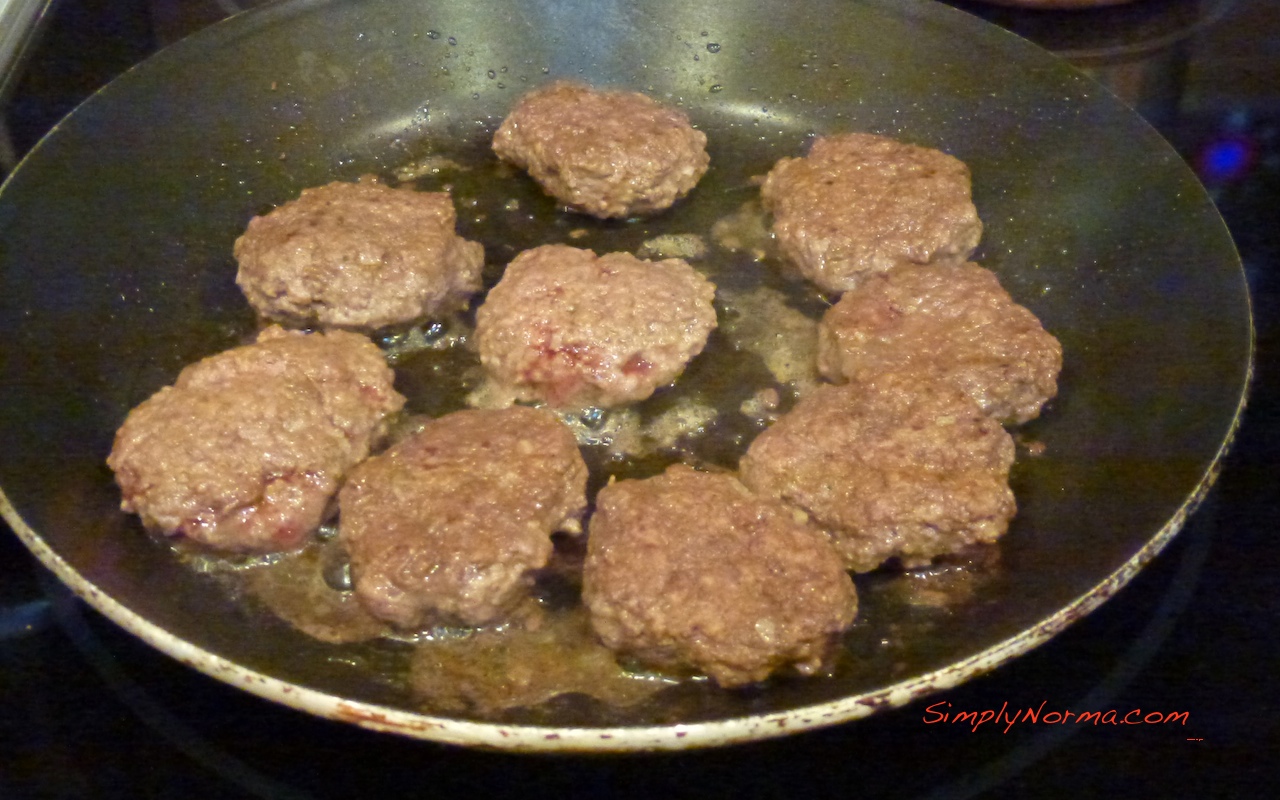
You’re basically going to put all these ingredients into a bowl, mix them all up (preferably with your hands as it works really well), make them into palm size patties and fry them up.
Fry the Sausage Patties
Then — whala!
Garlic Beef Sausage Patties
They are quite tasty.
Here’s the recipe for you …
Ingredients
1Â lb ground beef (I like the really lean meat – 96% lean)
1/4Â tsp Caraway Seed
1/4Â tsp Ground Coriander Seed
1/2Â tsp Garlic Powder
1/4Â tsp Ground Mace
1/4Â tsp Salt (to taste)
1 tablespoon olive oil for frying
And there you have it! Just fry them up until they’re cooked through.
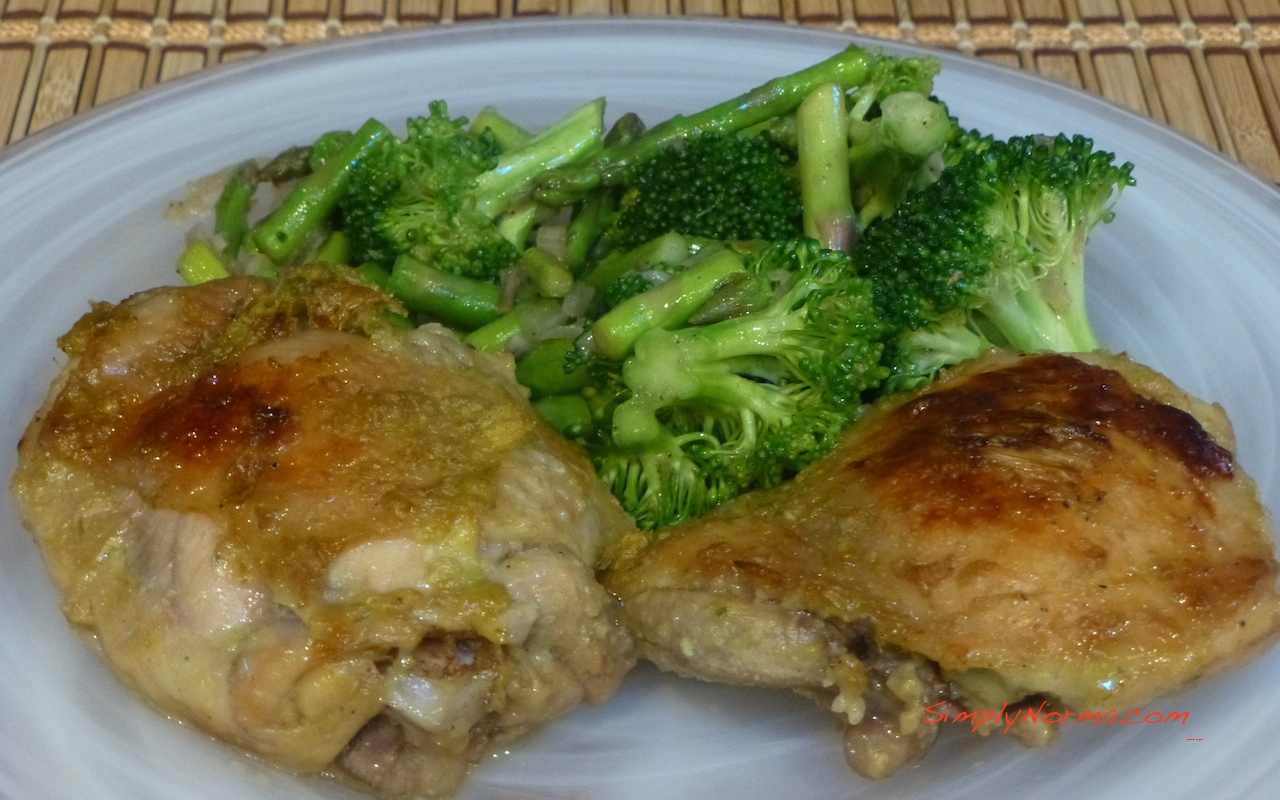
This Asian Chicken Thigh recipe was a pleasant surprise. I wasn’t expecting to like it as much as I did as the marinade looks “yellow” and, well, it just didn’t look appetizing. But, I’ve learned to not judge things too harshly until I try them.
The recipe is paleo although many paleo-ites will not use the rice wine vinegar. Â I did. There was also an expensive ingredient that was a little hard to find — coconut aminos. I finally found it at a health food store as the local store and Trader Joe’s didn’t carry it. It only required 1 tablespoon of the aminos but I wanted to be true to the recipe so splurged on it. I’ll definitely make this recipe again so it’s worth it.
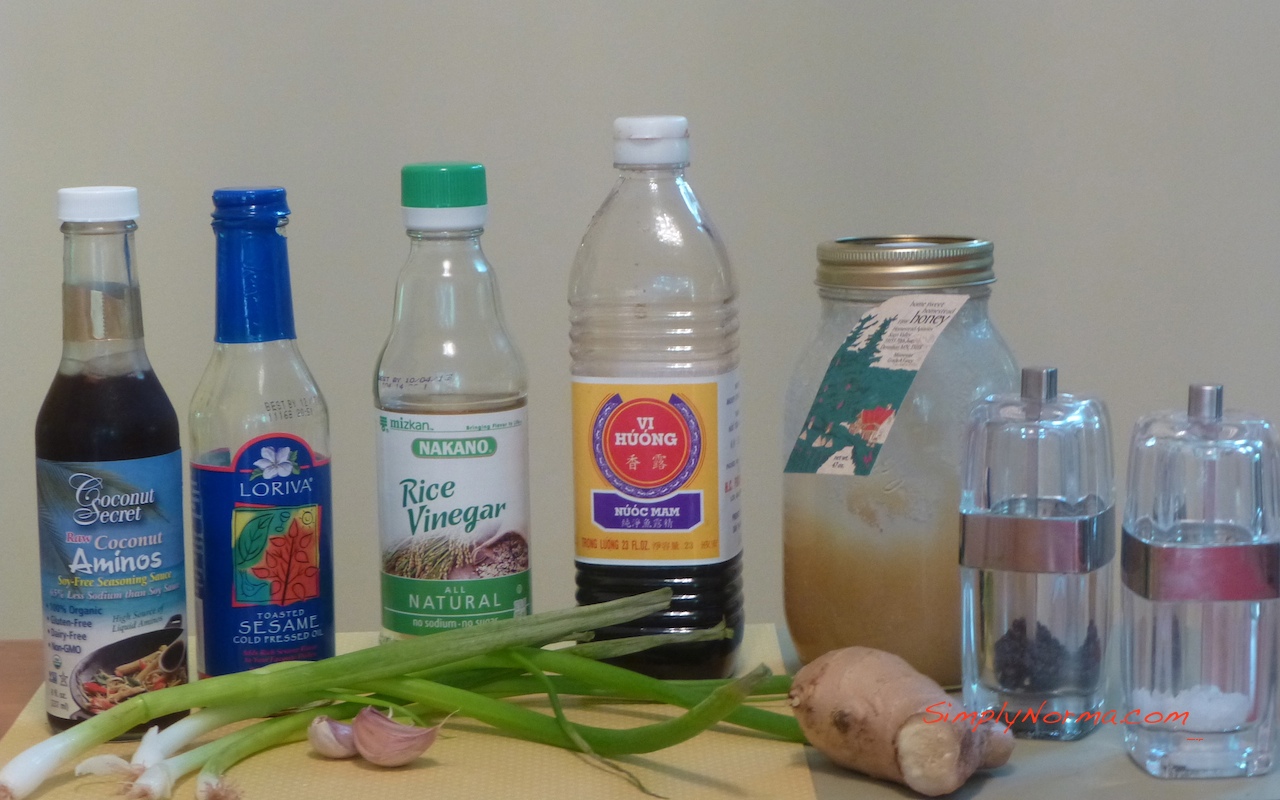
Here are the ingredients you’ll be using — minus the olive oil and the chicken thighs.
Ingredients for Asian Chicken Thighs
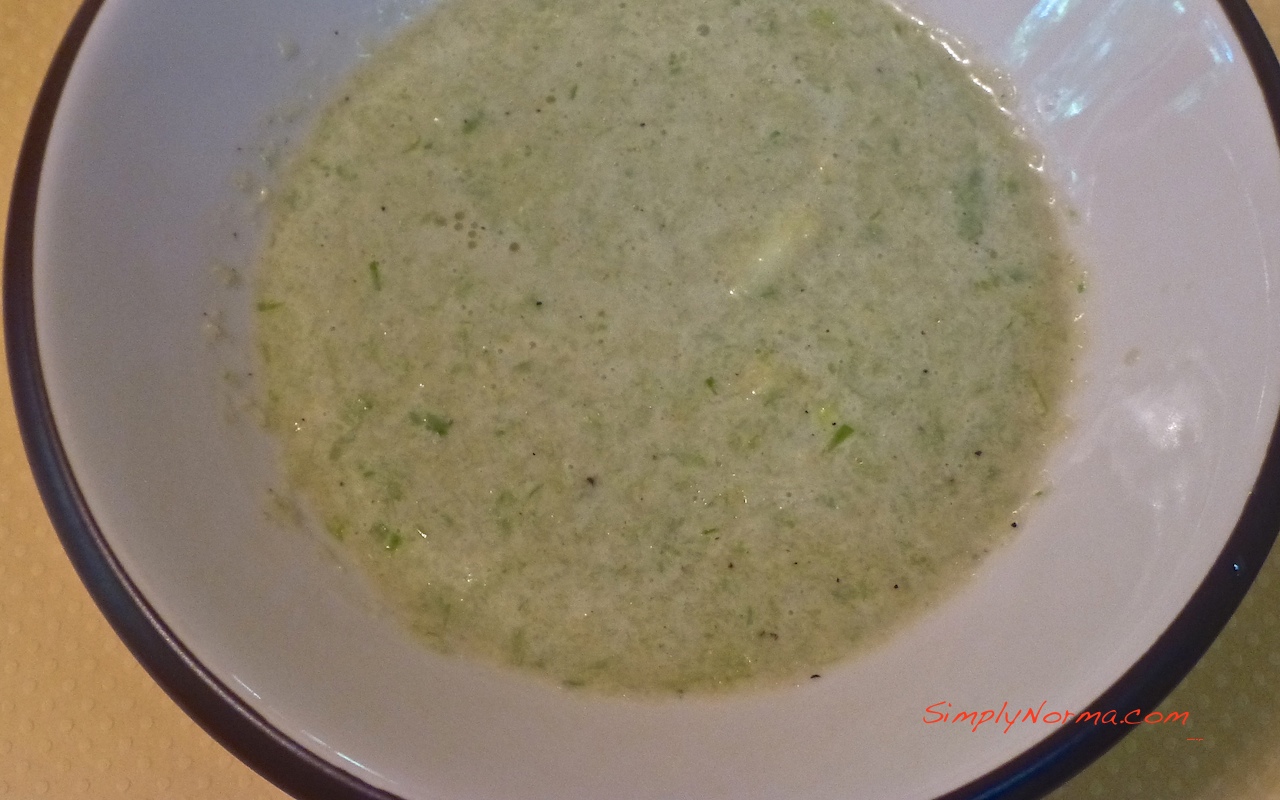
As I said earlier, the marinade doesn’t look very appetizing but ignore the looks in this recipe.
Marinade for Asian Chicken Thighs
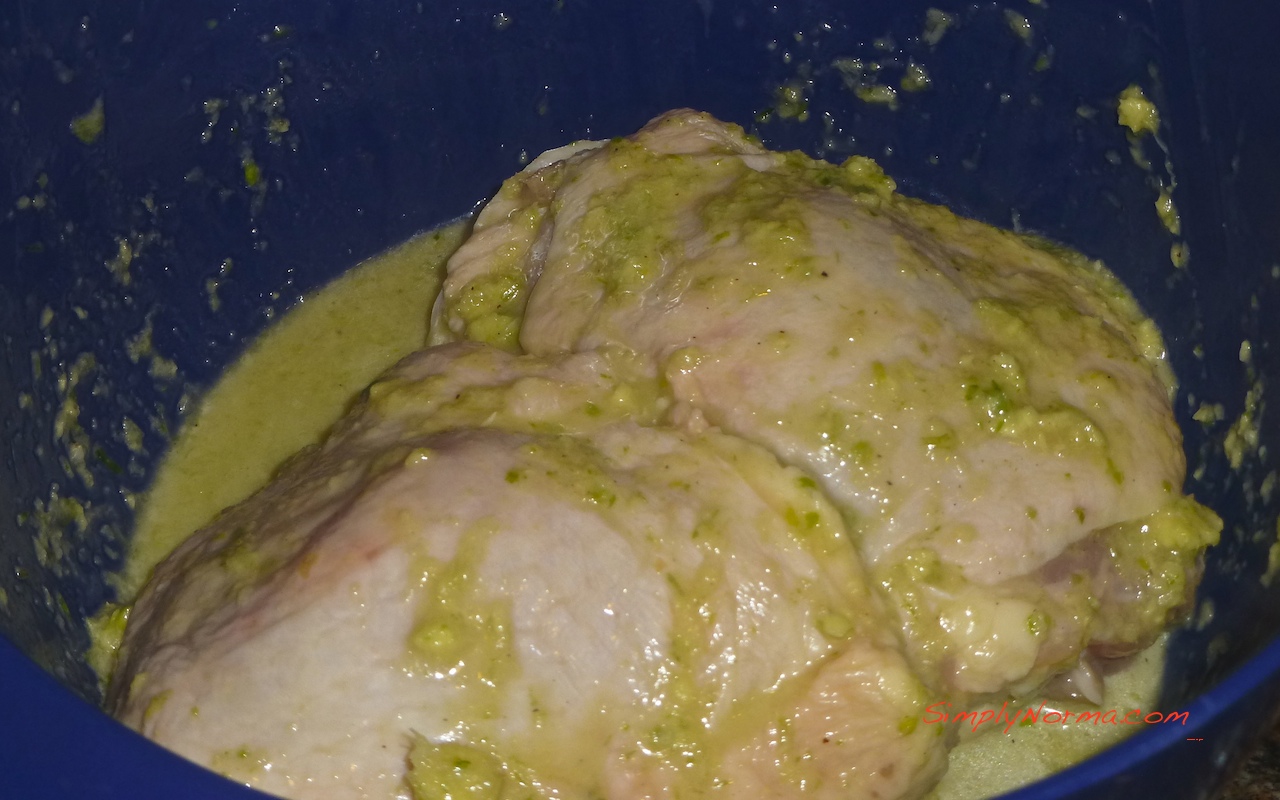
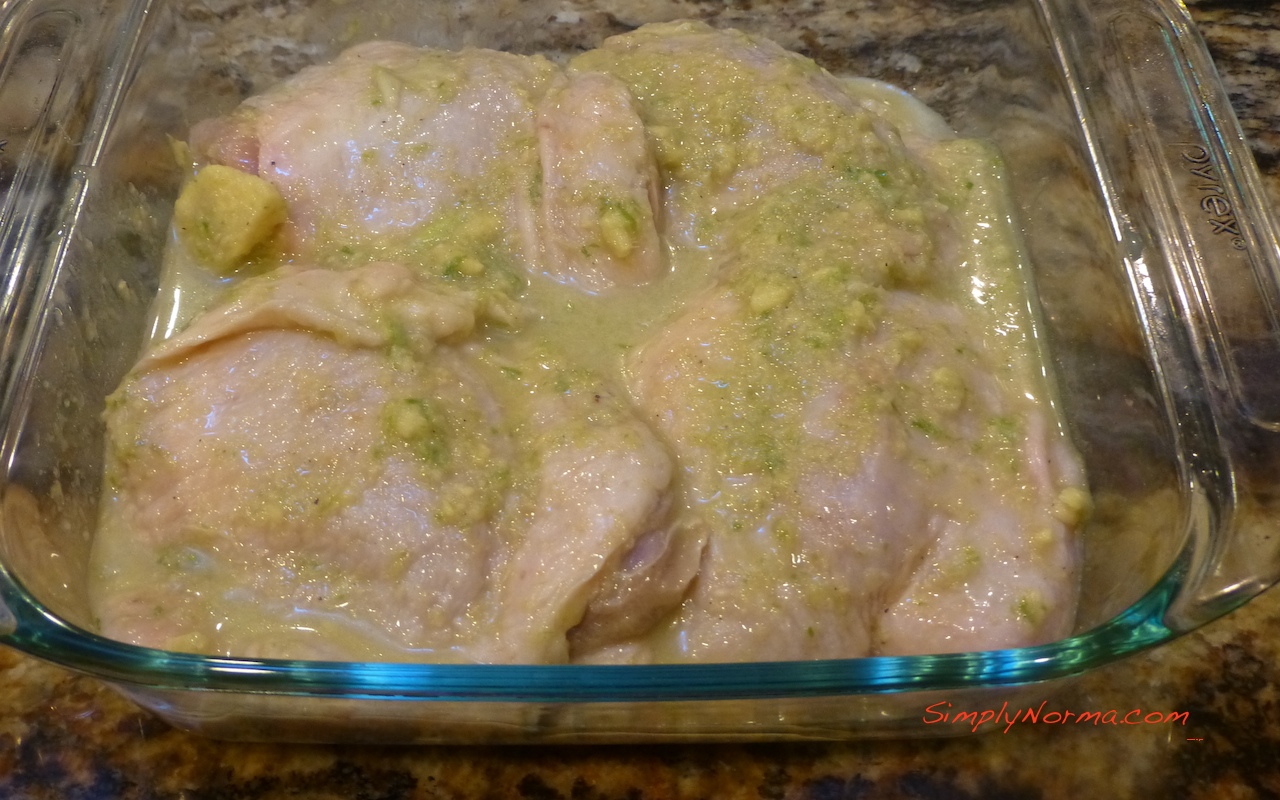
You’ll be pouring this marinade into a large bowl along with the chicken thighs and making sure the thighs are coated thoroughly. Â That’s a LOT of marinade but that’s because the original recipe called for 4 pounds of chicken thighs and I used 4 chicken thighs.
Marinate the Chicken Thighs
Instead of putting the thighs on an aluminum foil lined rack, I put them in a glass dish to bake.
Put Thighs in a Baking Dish
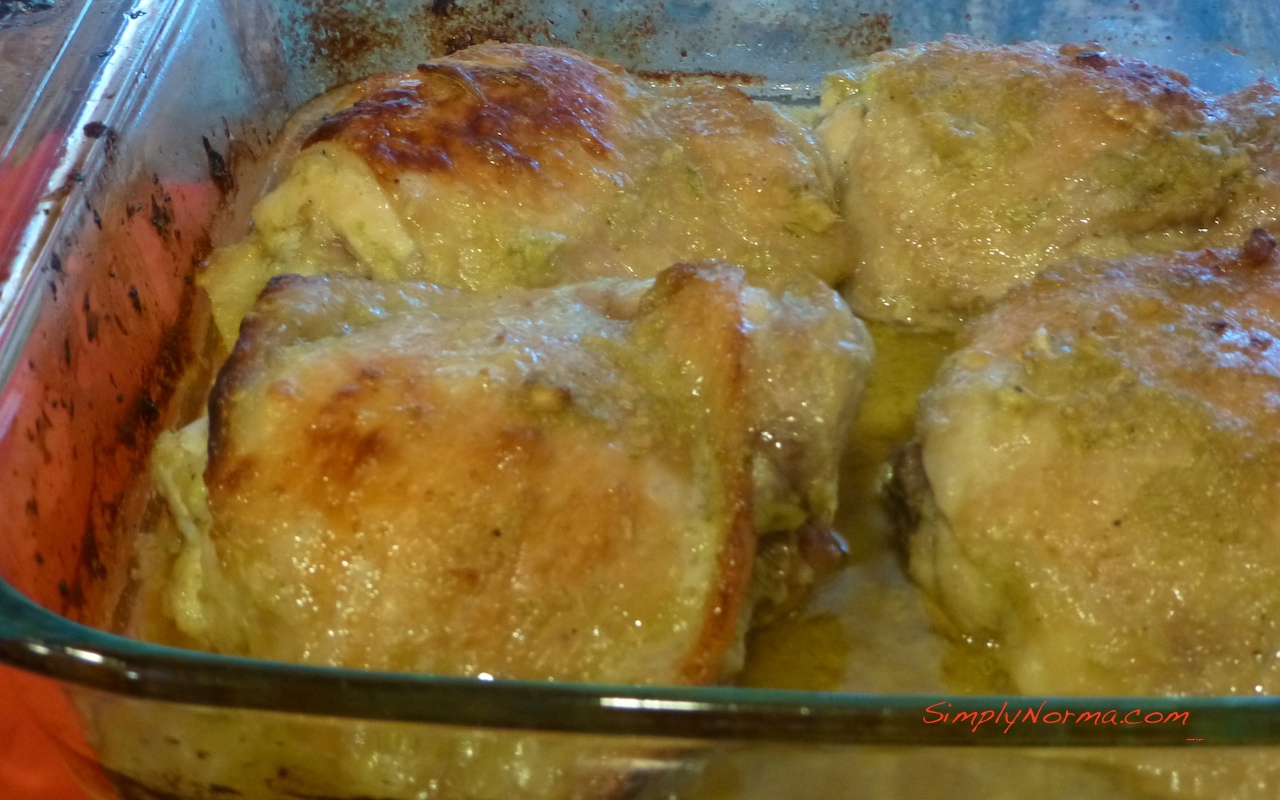
They will crisp up really beautifully.
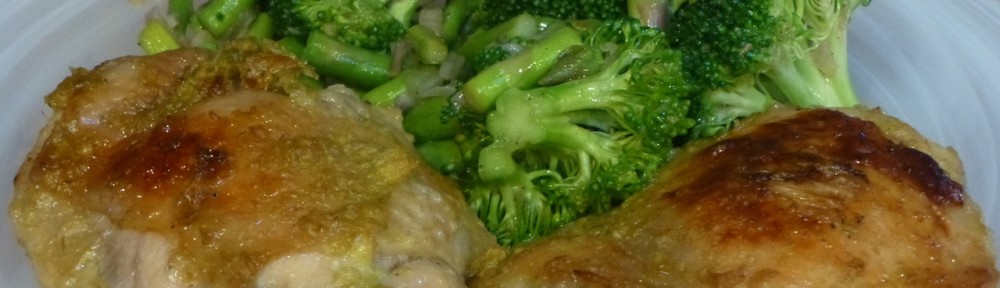
Baked Asian Chicken Thighs
Ready to try the recipe?
Ingredients
1 bunch of scallions, trimmed and cut into thirds
2 garlic cloves, minced
8 slices of fresh ginger
3 tablespoons rice wine vinegar
3 tablespoons olive oil
1 tablespoon coconut aminos
1 tablespoon fish sauce
2 tablespoons honey
½ teaspoon toasted sesame oil
2 teaspoons kosher salt
Freshly ground pepper to taste
4 chicken thighs
Directions
Preheat your oven to 400 degrees Fahrenheit.
Prepare all the ingredients except for the chicken then put them into a blender.
Blend until everything is combined and pour it into a large bowl.
Cut any extra fat off the chicken thighs and put the thighs in the large bowl with the marinade. (This does not have to sit overnight or even for an hour.)
Make sure the marinade is blended well with the thighs and then put the thighs in an oven proof dish.
Bake for approximately 40 minutes or until the chicken is cooked through.
That’s it! Pretty simple if you ask me. And very very tasty. This will be a regular at our house.
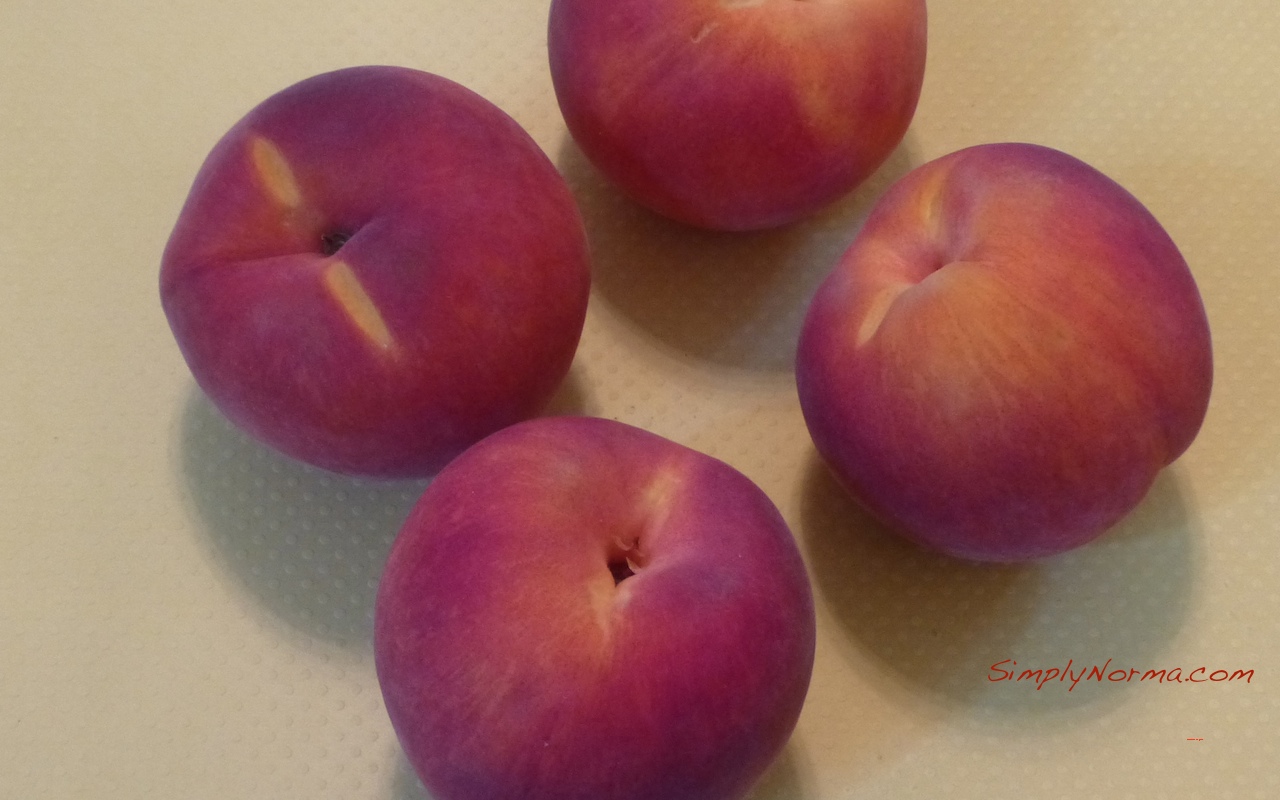
It is never too late for cobbler, is it? This Peach Cobbler is paleo and vegan — and very good.
I used peaches that were not over-ripe but were “ripe enough.” A strong smell of “peaches” is one sign of their ripeness. The other is how soft they are.
Peaches
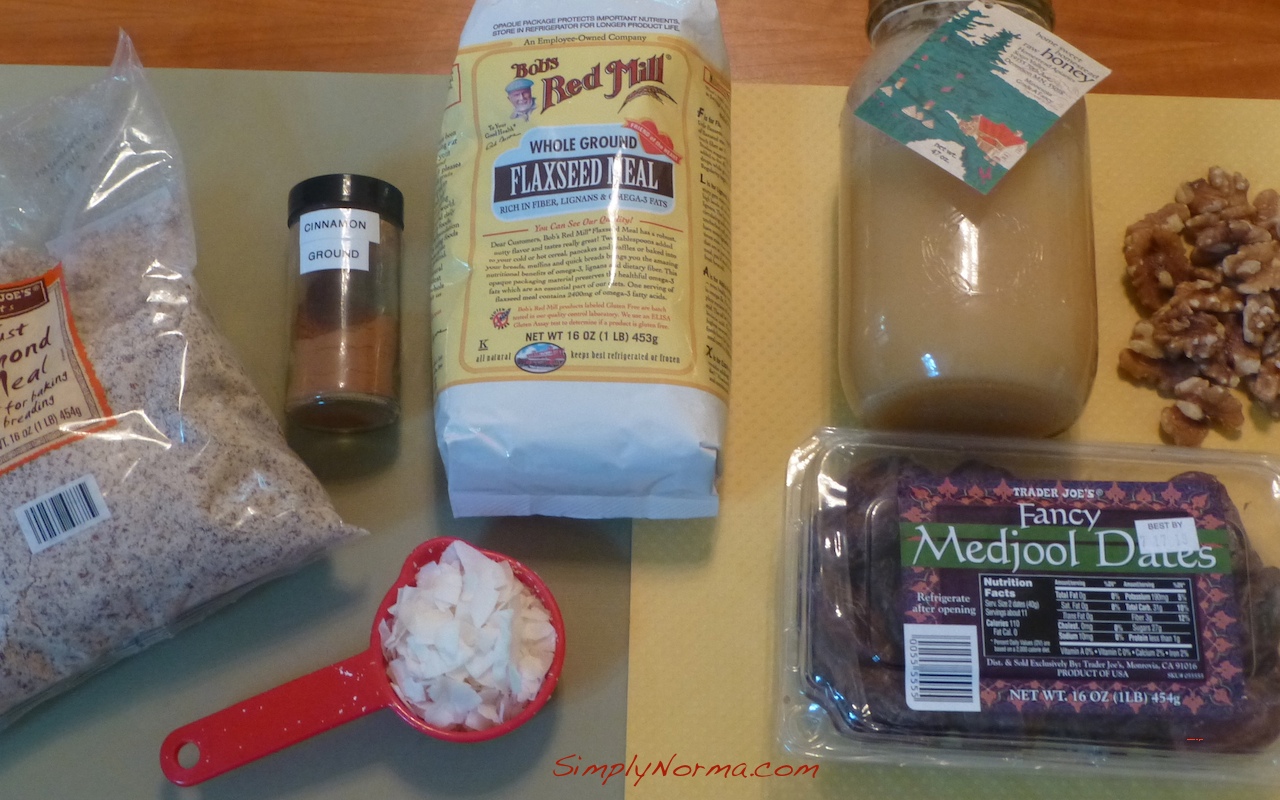
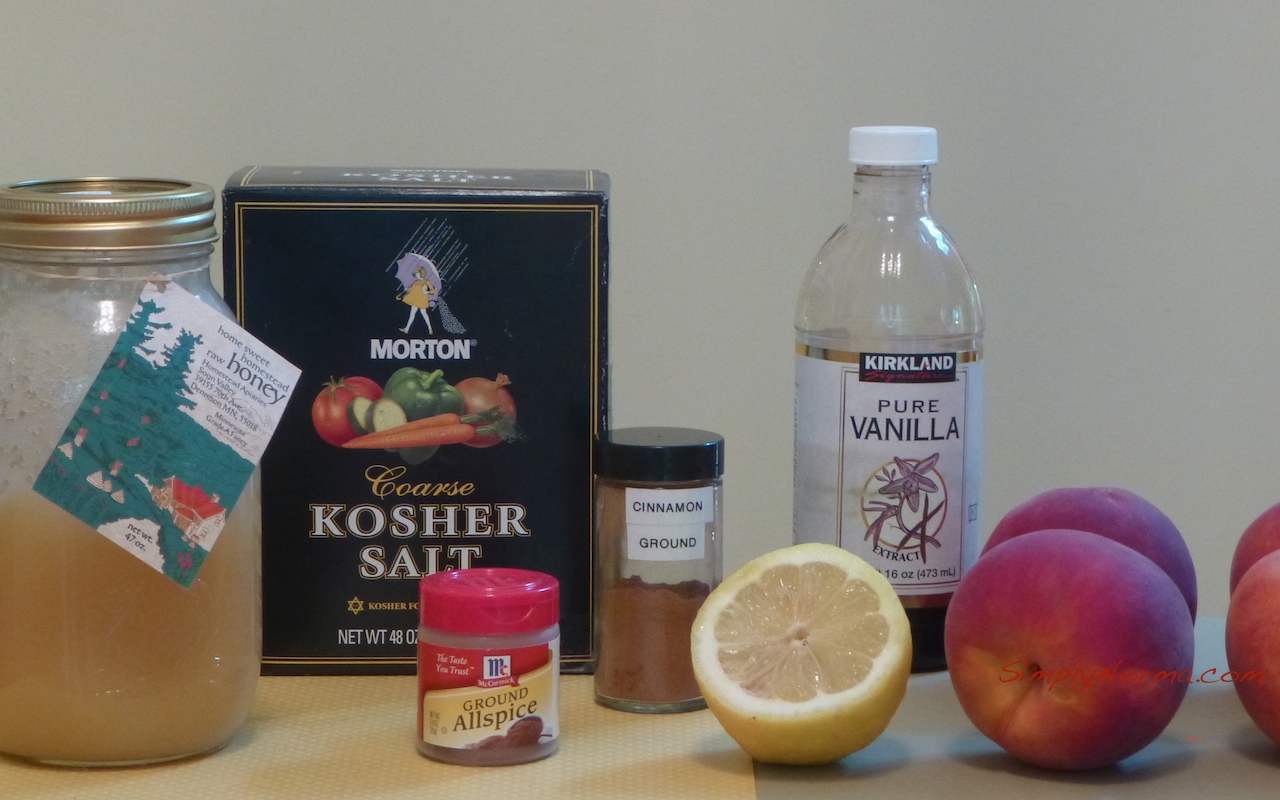
Here are the key ingredients.
Ingredients for Paleo Peach Cobbler (Topping)Peach Cobbler (Filling)
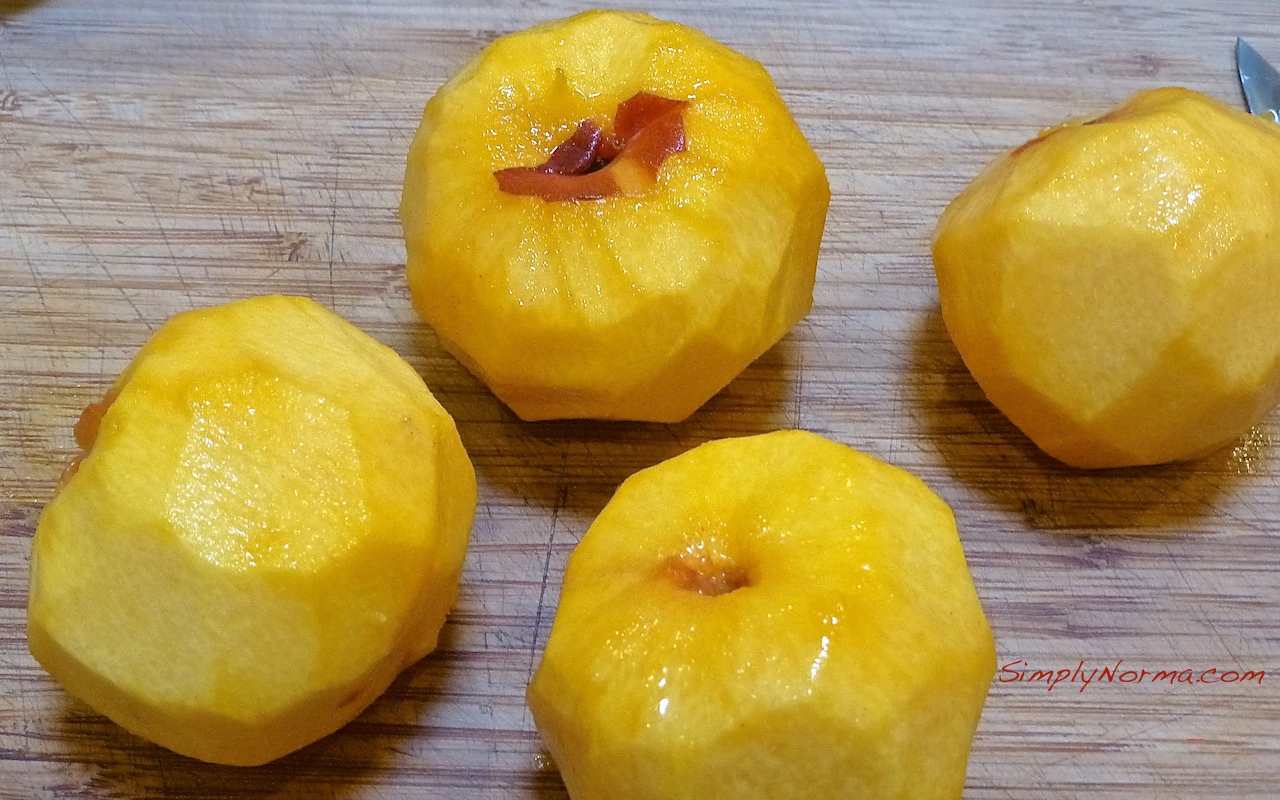
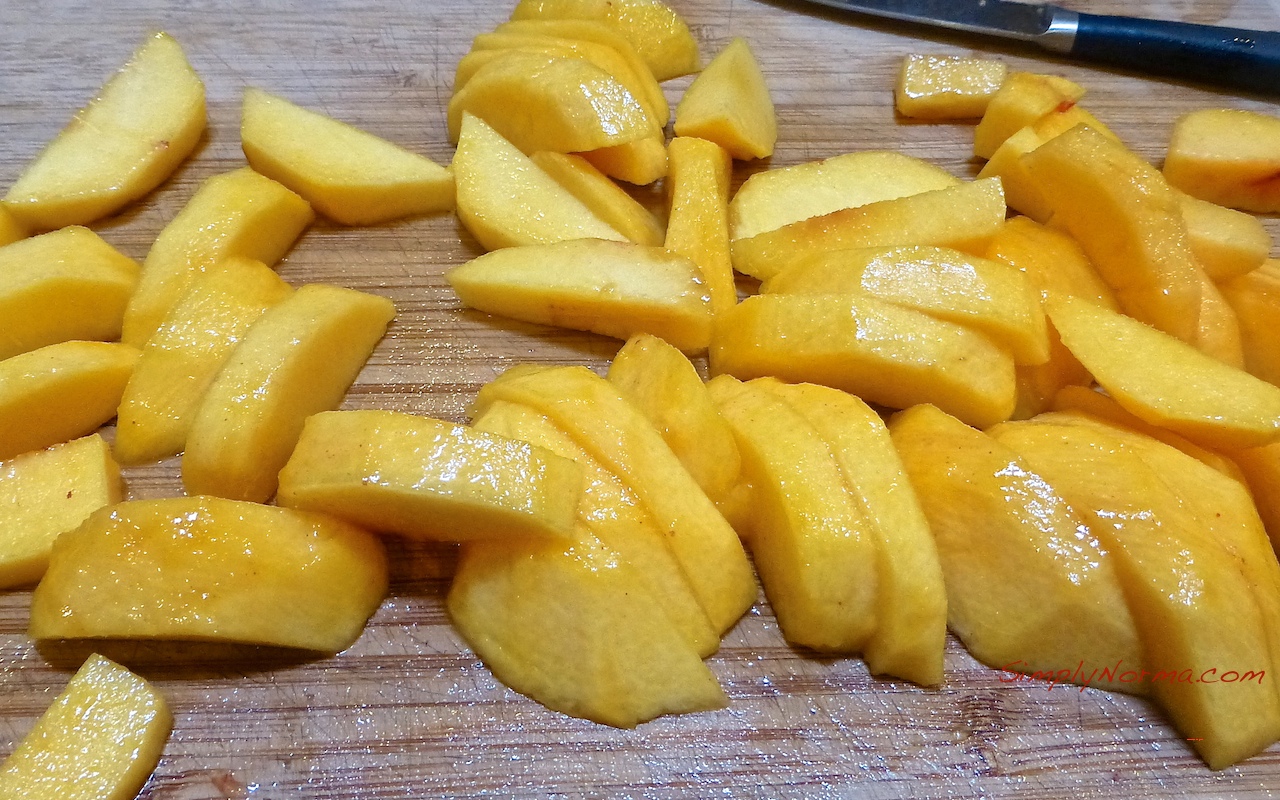
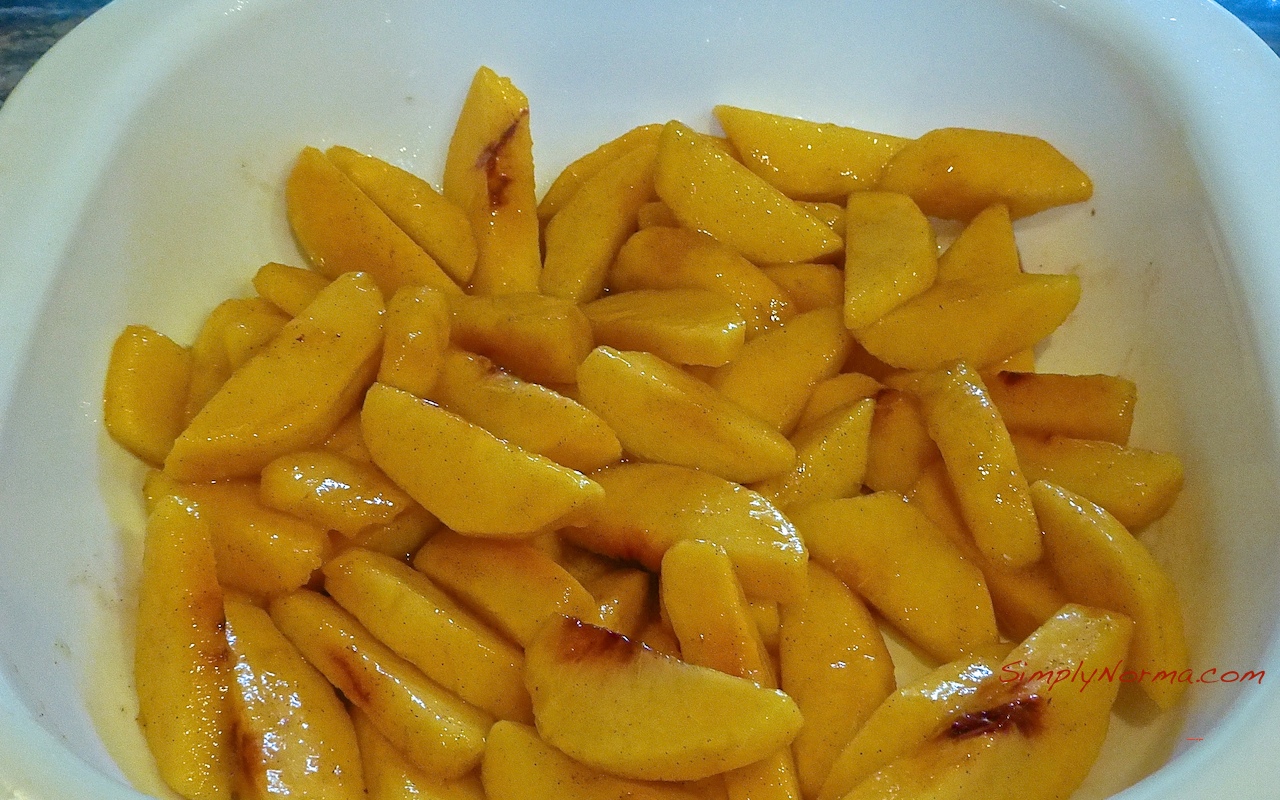
You’ll be peeling the beautiful peaches, removing the pit and then slicing them.
Peel and Remove PitSlice Peaches
Next you’ll be putting these slices, tossed with lemon juice, vanilla extract, cinnamon, allspice and salt, into a baking dish.
Add Prepared Peaches to Baking Dish
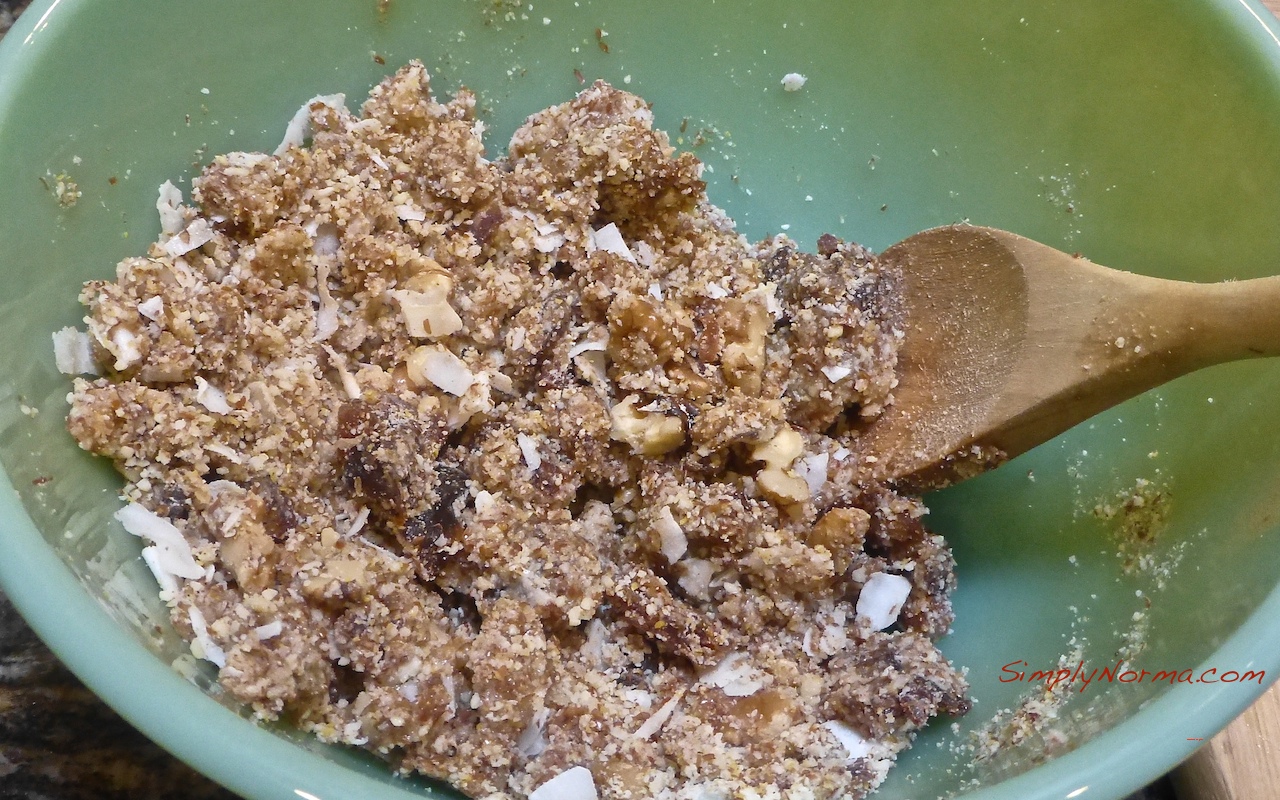
Next you’ll be covering it with the topping. (Is your mouth watering yet?)
Peach Cobbler Topping
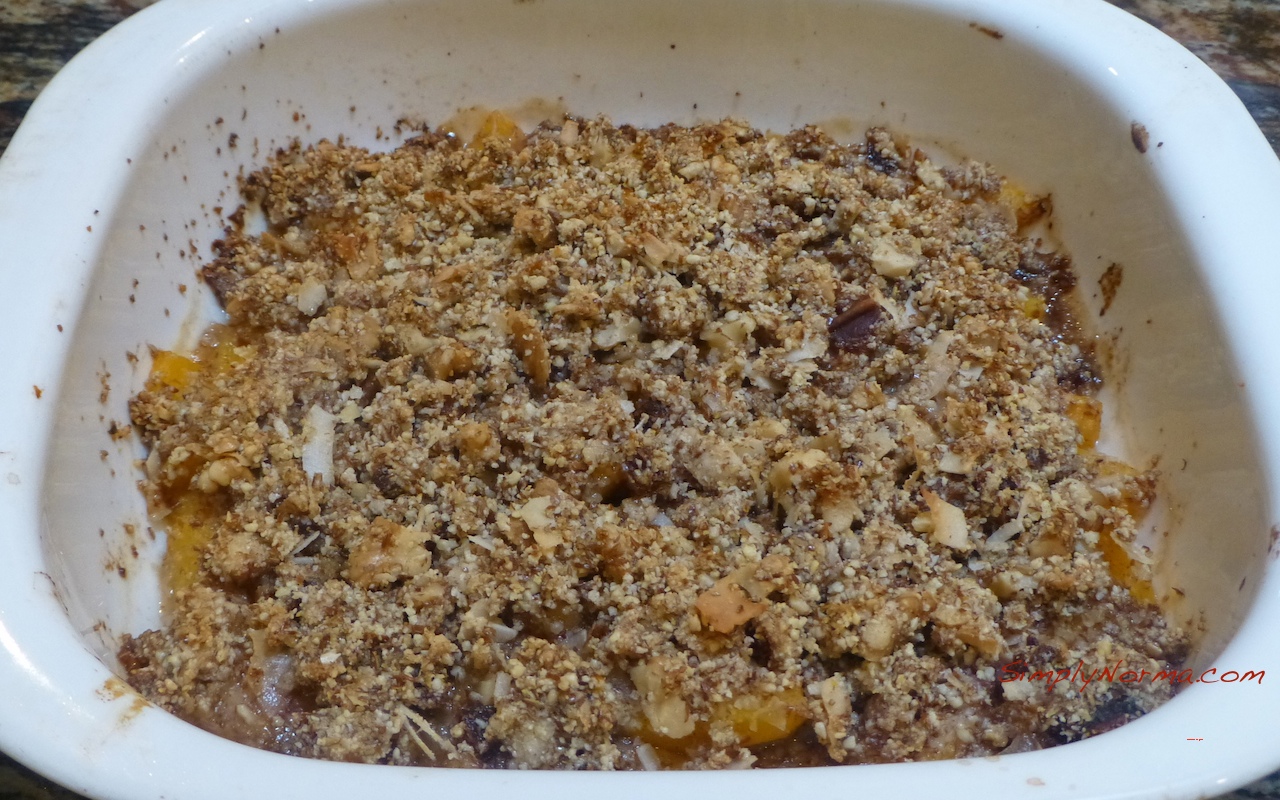
And when it comes out of the oven — whala! It will look like this.
Peach Cobbler
Now — I know it’s not the prettiest picture. I’ve debated back and forth whether to try to make my pictures really pretty but decided against it. The “normal” person doesn’t make everything all pretty — they just cook and eat. No?
Are you ready to try this delicious peach cobbler? I have to assure you that it tastes just like a “regular” cobbler even though it’s a healthy paleo recipe.
Ingredients
4 peaches (but 5 would be better)
2Â Tablespoons Honey
1Â Tablespoon Lemon Juice
1Â teaspoon Vanilla Extract
1/4Â teaspoon Cinnamon
1/4Â teaspoon Allspice
1/4Â teaspoon Kosher Salt
Ingredients (for the topping)
5Â Mejol Dates
1/2Â cup Walnuts
1/3Â cup Coconut Flakes
3Â Tablespoons Coconut Oil
3/4Â cup Almond Flour
1/3Â cup Flaxseed Meal
2Â Tablespoons Honey
1Â teaspoon Cinnamon
Kosher Salt
Directions
Preheat the oven to 400 degrees Fahrenheit.
Peel, remove the pit and slice the peaches.
Add the lemon juice, vanilla extract, cinnamon, allspice and salt to the peaches then gently stir to combine.
Pour the peaches into a baking dish.
Chop the dates, coconut flakes and walnuts.
In a separate bowl, combine the dates, coconut flakes, walnuts, coconut oil (which does not have to be melted), almond flour, flaxseed meal, honey and cinnamon.
Stir everything to blend together then spread the topping over the peaches and sprinkle with a little salt.
Cover the dish with aluminum foil and bake for 25 minutes.
After 25 minutes, uncover the dish and bake for another 10 minutes, or until the top is bubbly and crunchy.
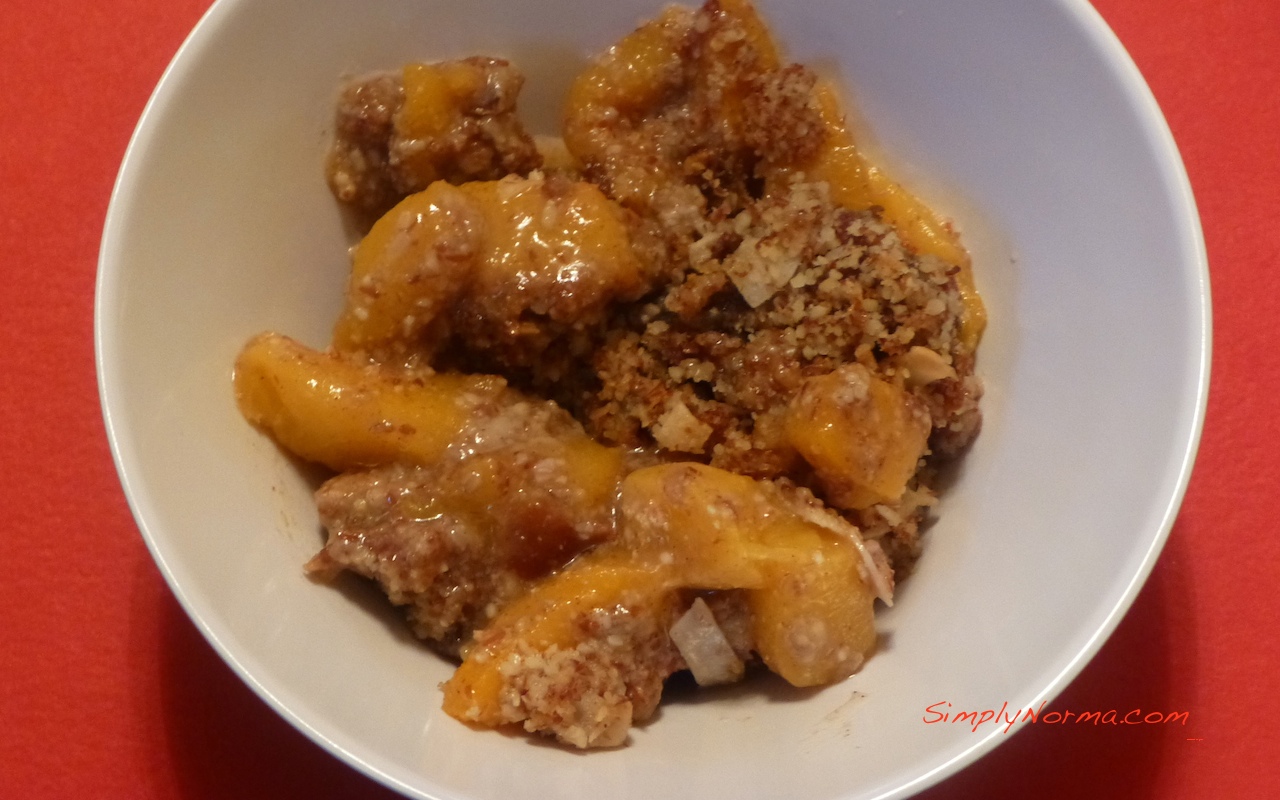
Simply delicious!
Okay now — have a slice!
Paleo Vegan Peach Cobbler
Note: This is the 3rd recipe that I’ve tried in a week from Paleo Effect which tells you that you should head over there and try some of her other recipes as they are tried and true.
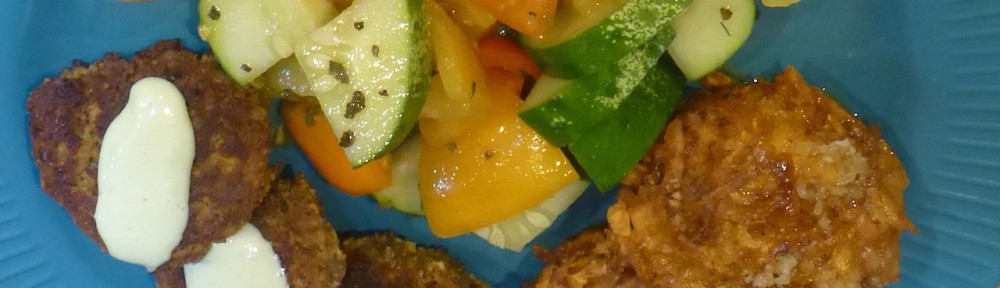
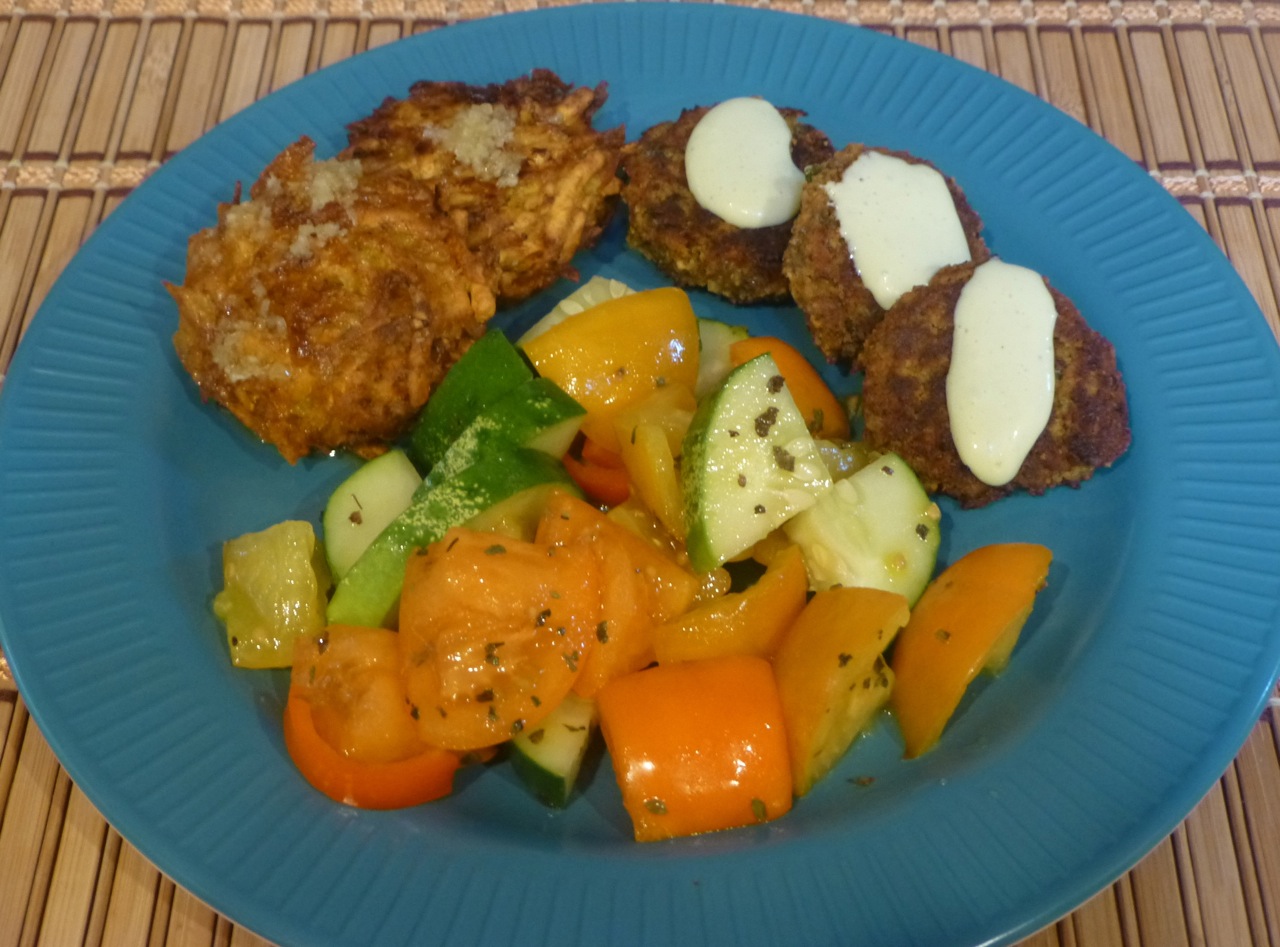
I decided to make a paleo vegetarian dinner today with two new recipes. It came out quite good! I’m trying to have a couple of vegetarian paleo meals a week — we’ll see how that goes.
The first recipe I made is called Paleo Vegetarian Burgers. I did not use them as burgers though but as small patties with an aioli sauce (not the Lemongrass ailoi that was optional in the original recipe) on top of them. I refrigerated the patties overnight and took them out of the refrigerator about 30 minutes before I was ready to fry them.
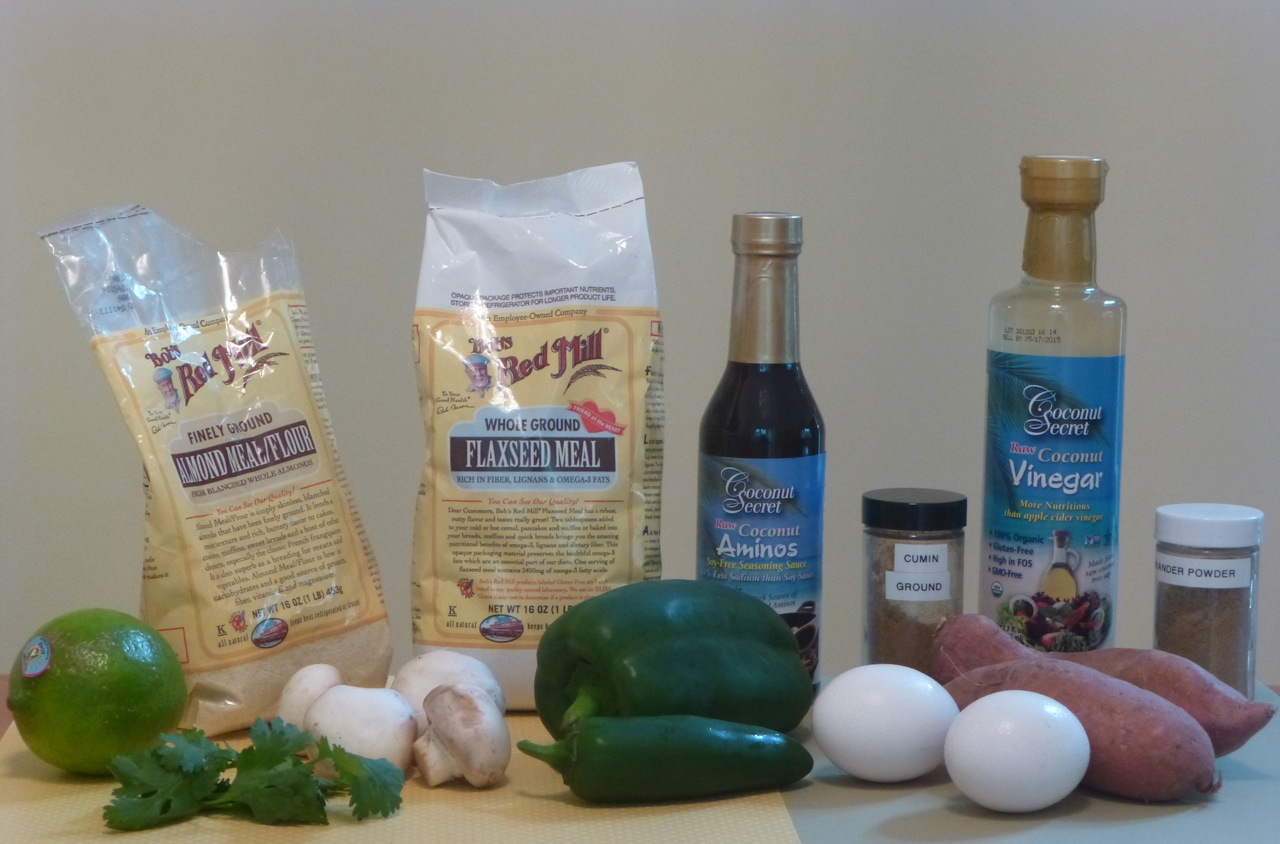
Here are the ingredients you’ll be needing …
Paleo Vegetarian Ingredients
They will all be combined and put in a blender or food processor to blend together. I used 2 smaller sweet potatoes instead of 1 large one which I baked, peeled and then put in the food processor with everything else.
Make sure your eggs and sweet potatoes are at room temperature before adding them to the food processor.
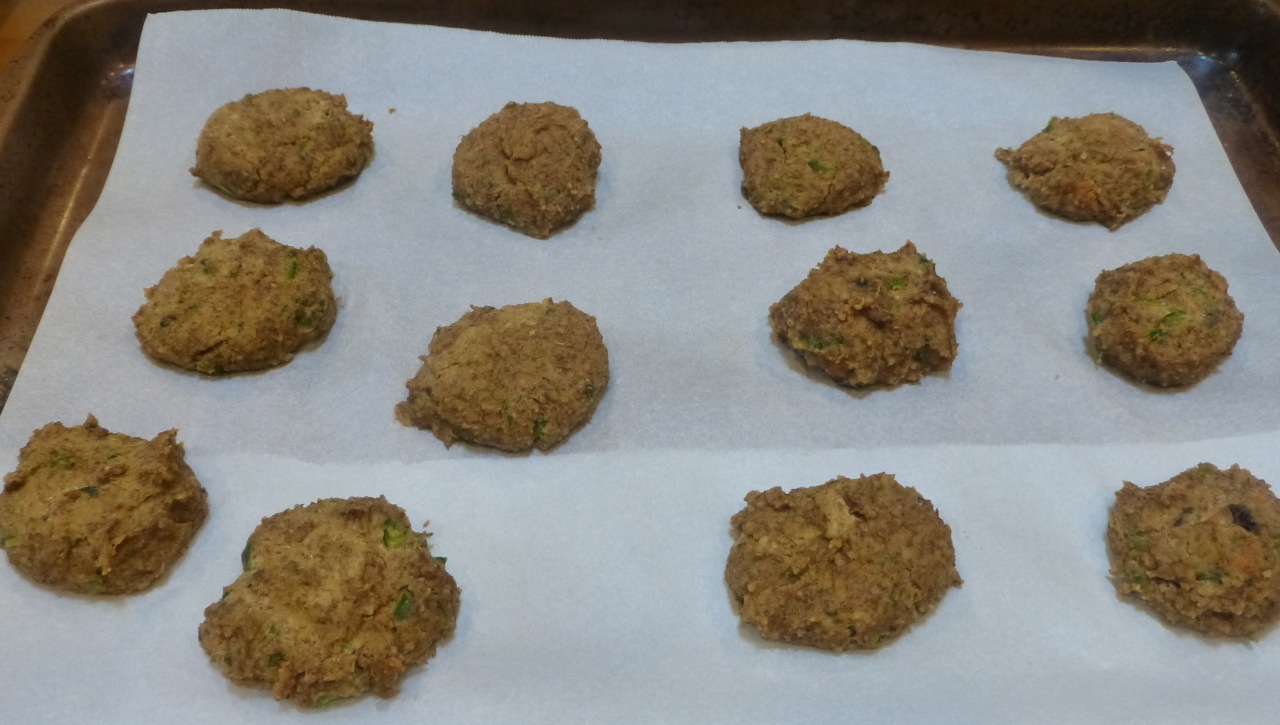
Once everything is combined you’ll be making small patties and putting them on a cookie sheet lined with parchment paper then putting that cookie sheet in the refrigerator. You don’t have to keep them there overnight but I would suggest at least a couple of hours to make sure they are firm before frying them.
In a food processor, combine the sweet potato, peppers, jalapeno, cilantro, almond flour, flaxseed meal, eggs, garlic cloves, cumin, coriander, coconut aminos, lime juice, coconut vinegar, salt and black pepper. Pulse until everything is combined but in small pieces.
Line a baking sheet with parchment paper.
Form your patties and put them on the baking sheet then refrigerate them for at least 30 minutes or overnight as I did.
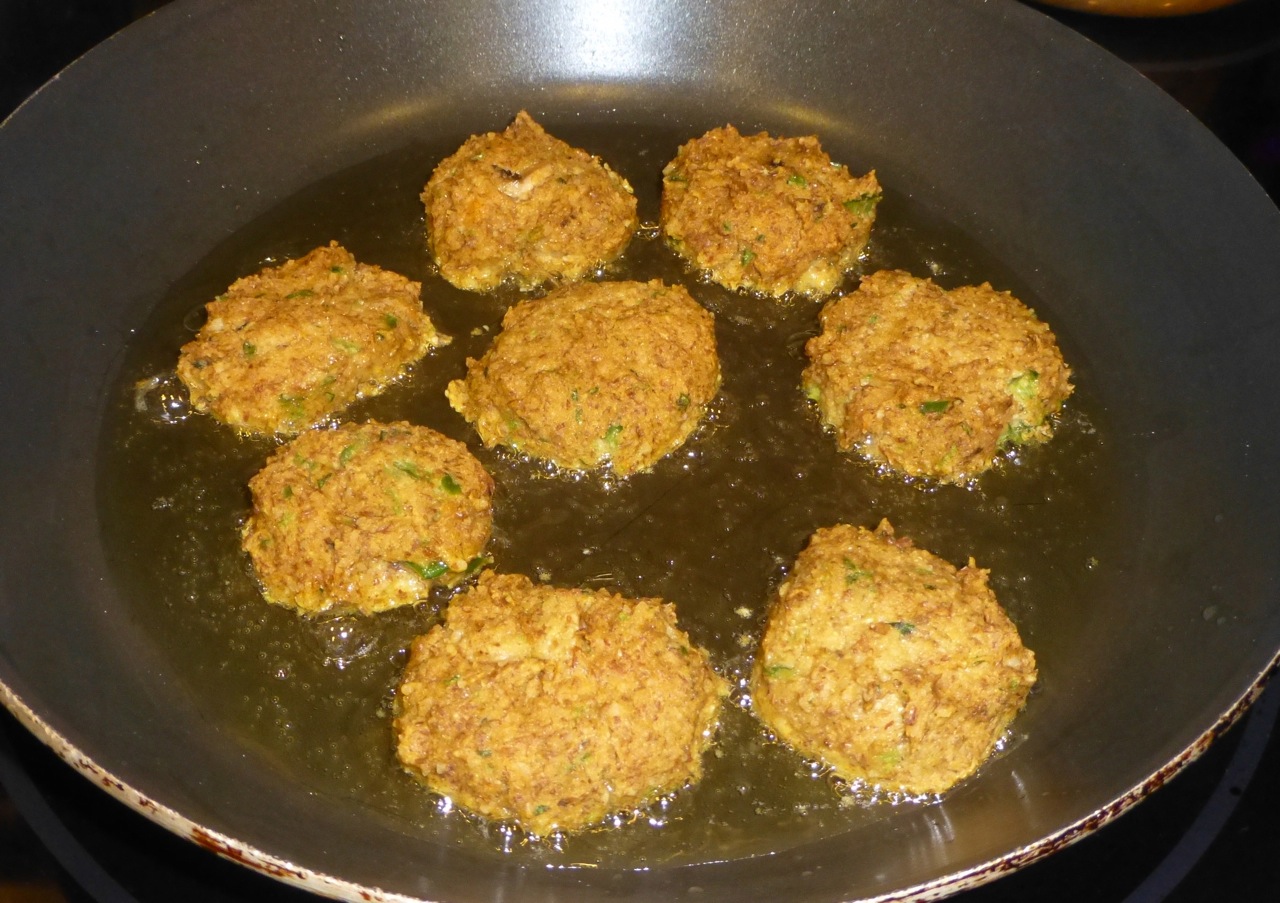
Once you’re ready to cook them, heat the olive oil in a skillet over medium heat then add the patties. If you cook these patties too quickly they will be done on the outside but not on the inside so don’t rush the cooking process.
Cover the skillet and cook for 3-5 minutes on each side.
That’s pretty much it for the patties.
The Aranitas were a snap to make. Really easy. The only suggestion I would make is to make sure you don’t make them too thick or the outside will be beautifully done while the inside will be slightly raw. (I had a couple come out that way so next time I’ll make sure I’m more careful.)
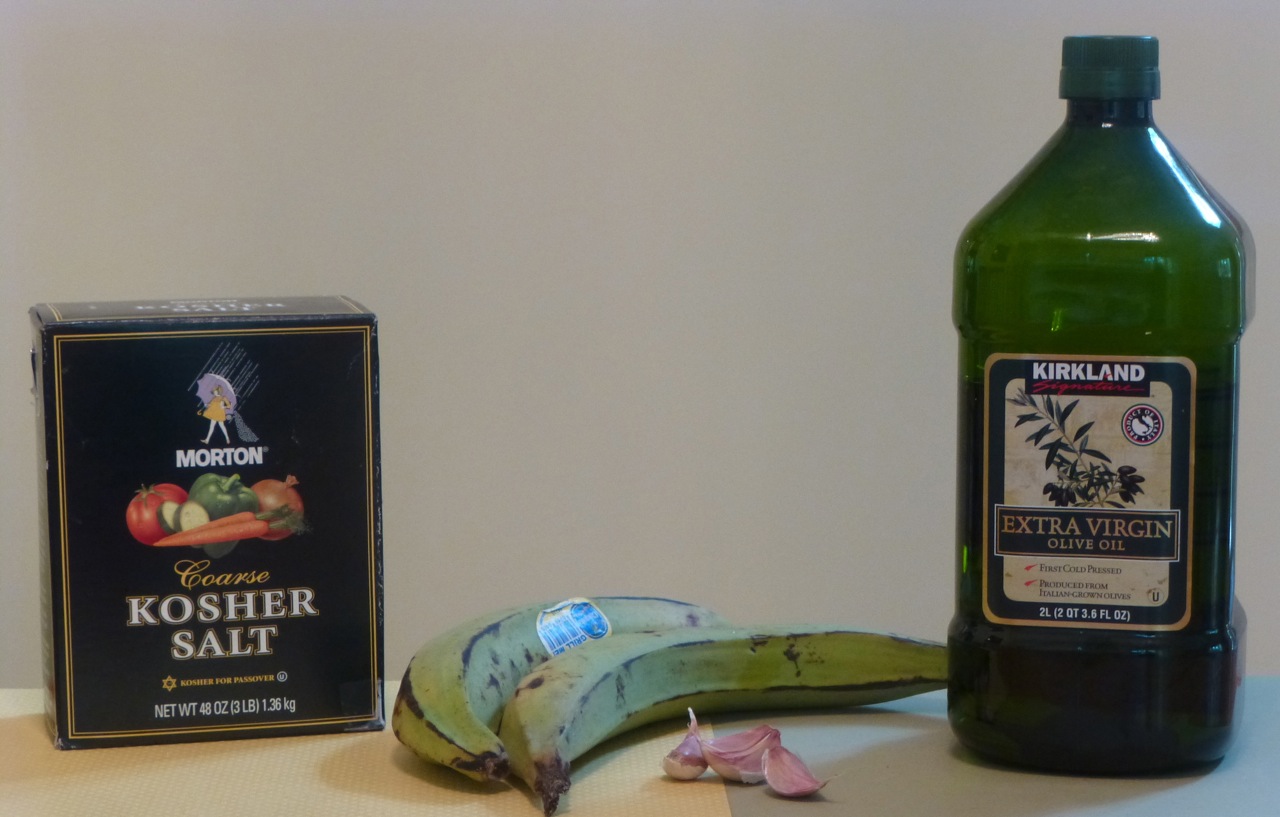
Here are the ingredients you’ll need. Yes — this is all, isn’t that fantastic? The original recipe calls for coconut oil but I used the olive oil to fry in also — either one will work.
Aranitas
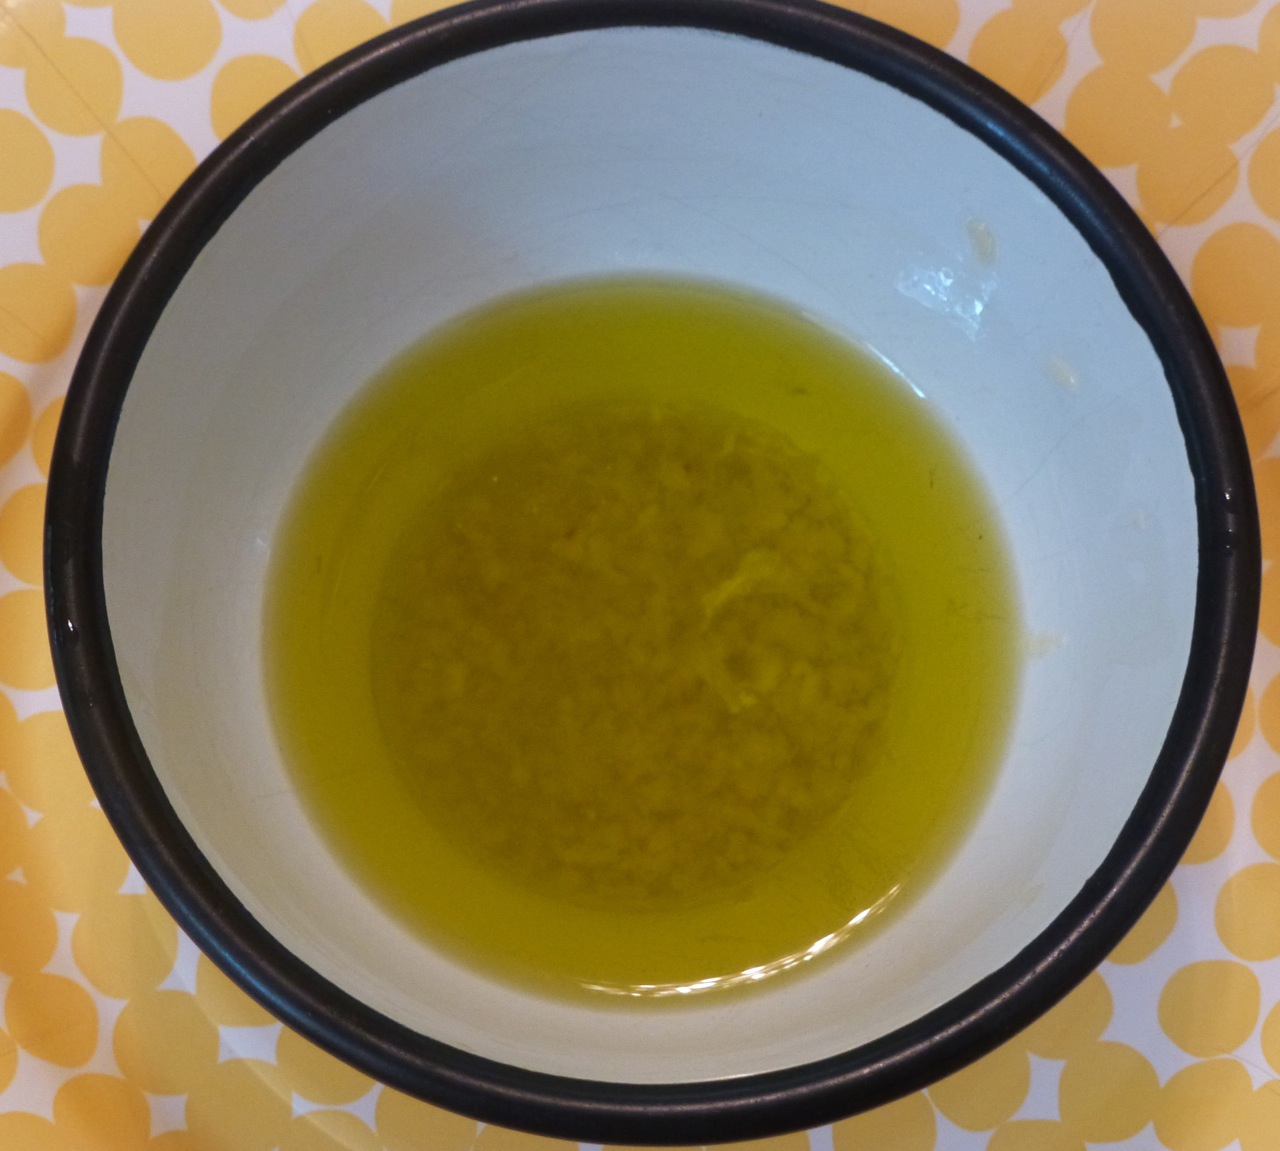
This is what the “dip” will look like. (You’ll be stirring it up really good right before serving to get garlic pieces on your aranitas. Â Yum!
Aranitas Dip
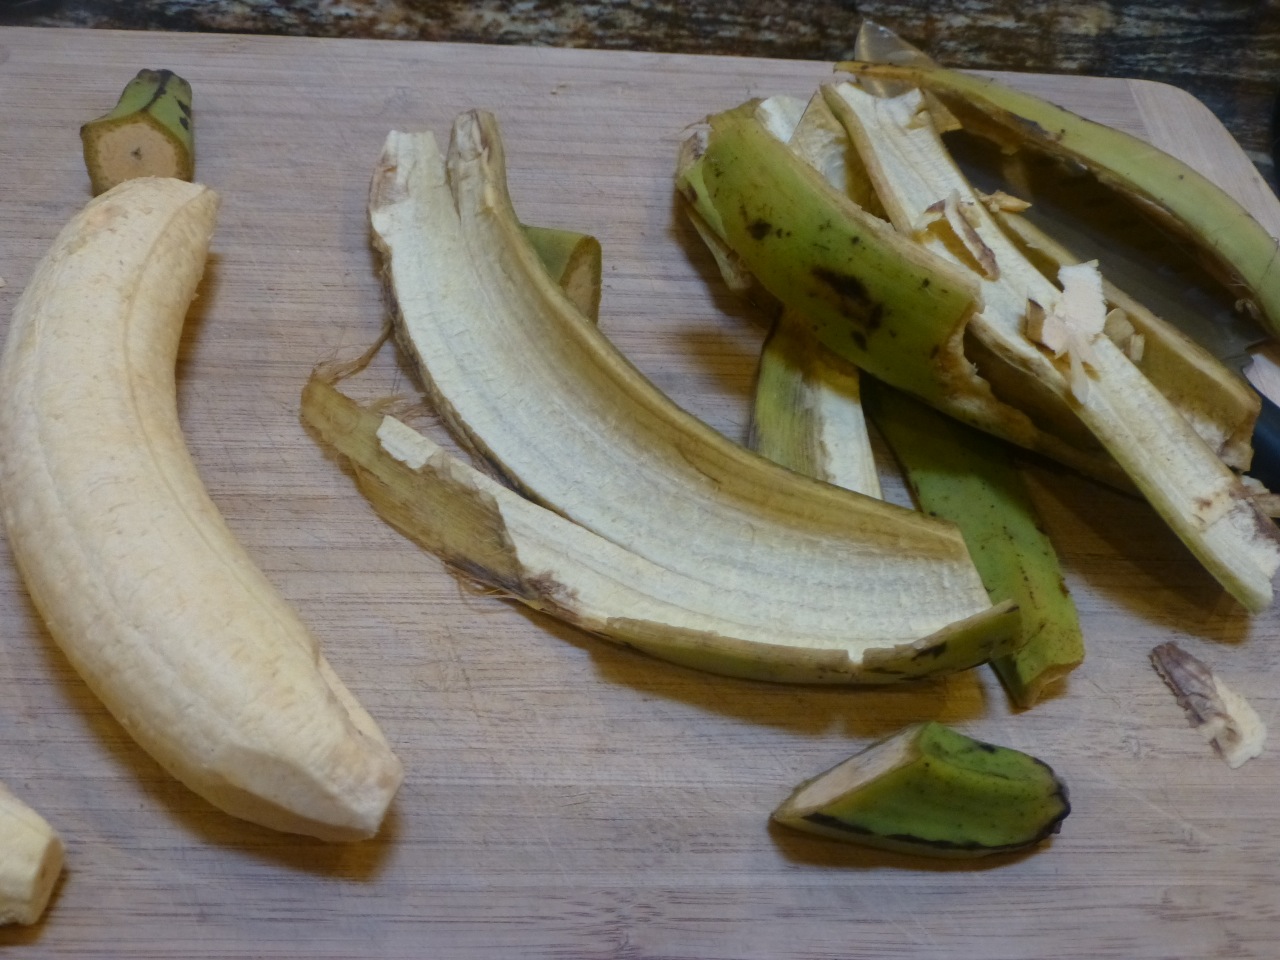
Next you’ll be preparing your green plantains. They truly must be green as the yellow ones (also called maduros) won’t shred well enough for this recipe.
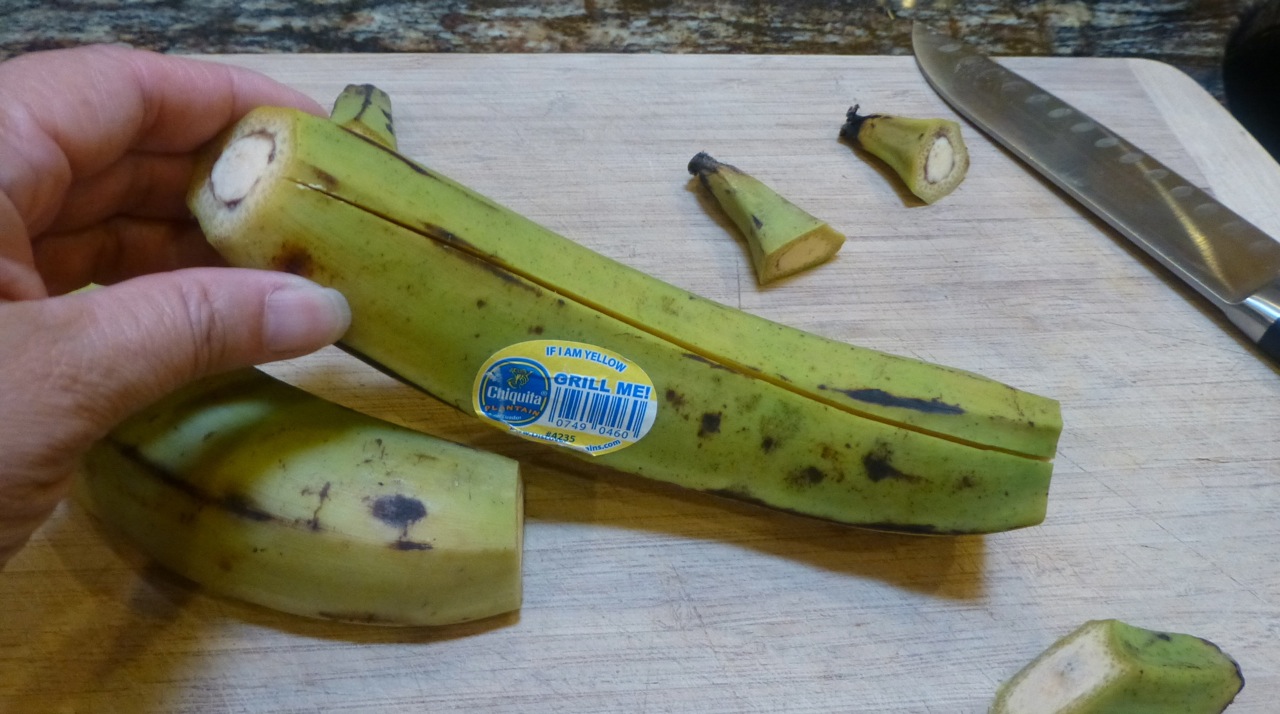
First, you’ll be cutting the tips off the plantains to make it easier for you to peel this “banana” then slitting it right down the middle.
Cut the tips off plantain then slit down the middle
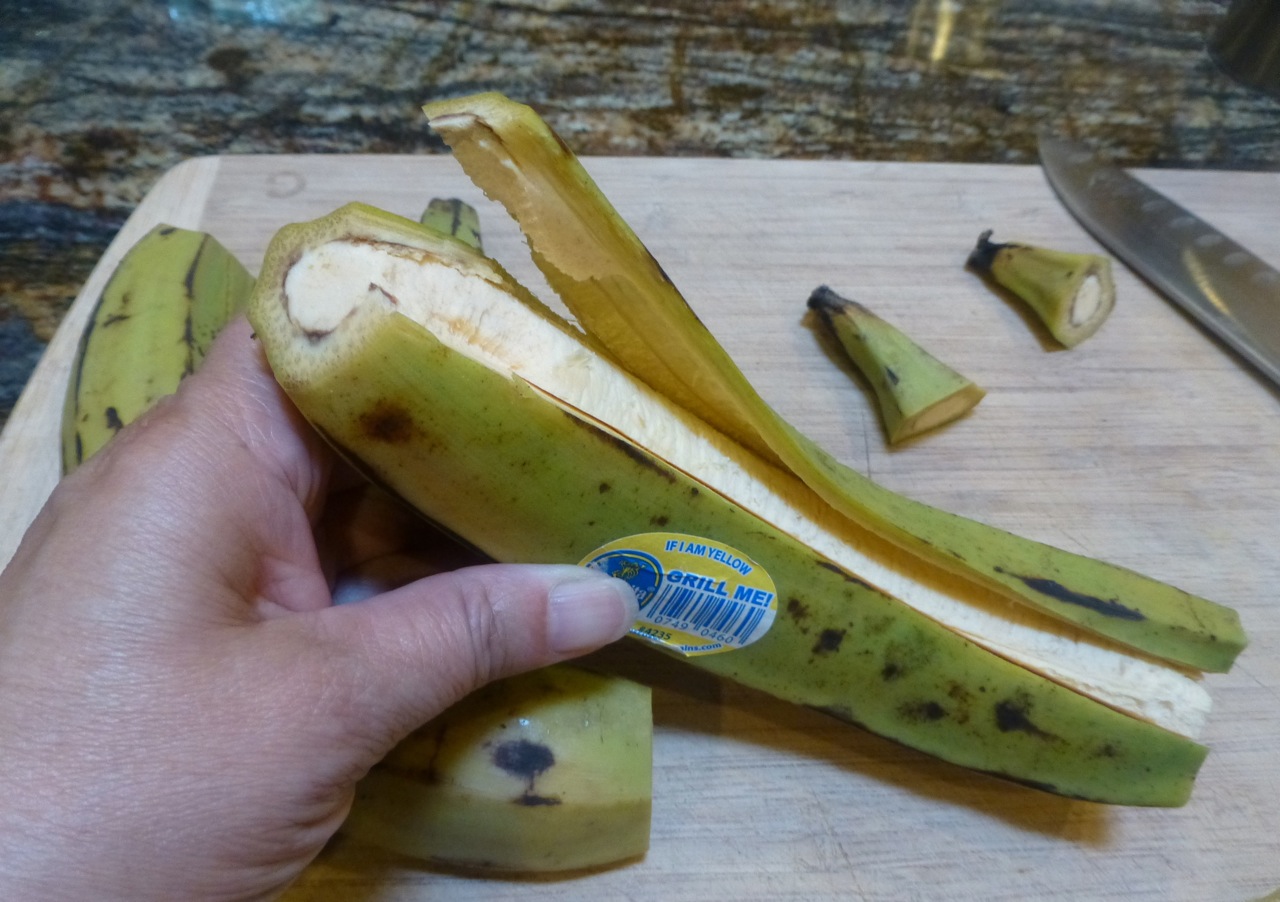
Next you’ll be peeling the plantain. This requires a little finesse but I grew up with plantains so it was very easy. Simply pull the peel from the slit portion to the right and work your way down and around.
Remove the Peel
The peel will come off in chunks. If small pieces of peel are left on the plantain, simply use a small knife and scrape them off.
Peeled Plantain
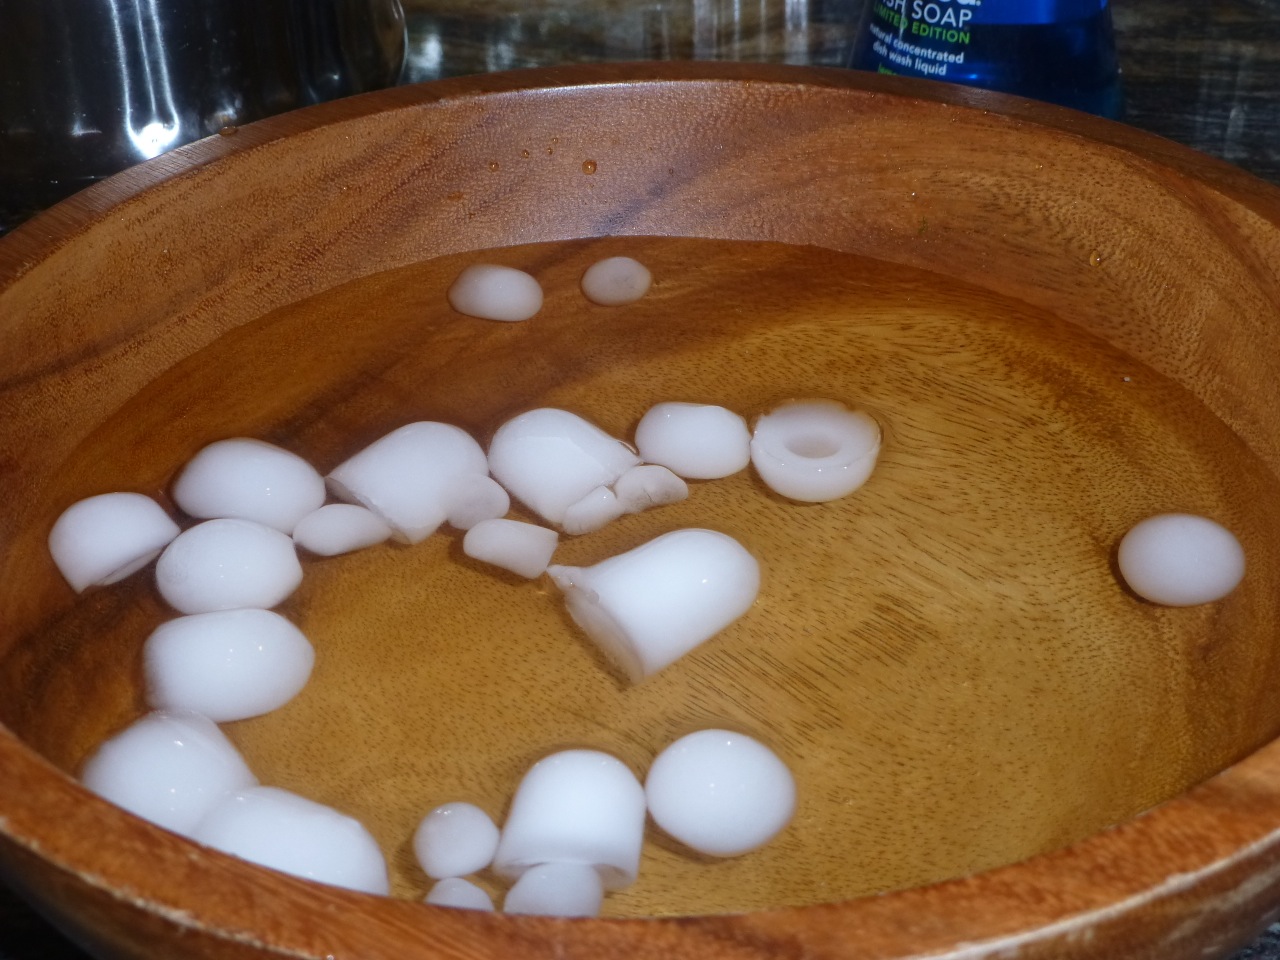
Next you’ll be preparing a bowl of cold cold salted water. I used a large salad bowl and added ice to it to make sure the water was cold.
Ice Cold Water
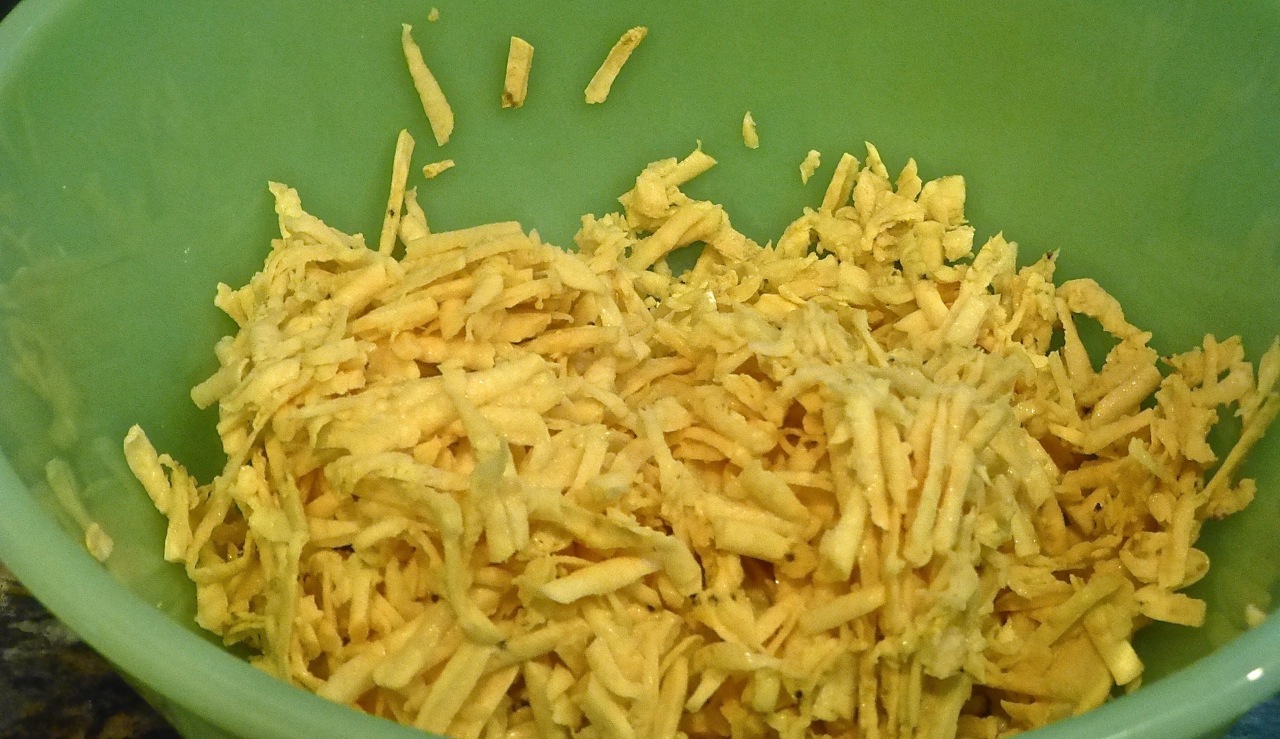
Next, add the plantains to the cold water and allow them to soak for at least 30 minutes. Once that’s completed, get a grater and grate the plantains.
Grate the plantains
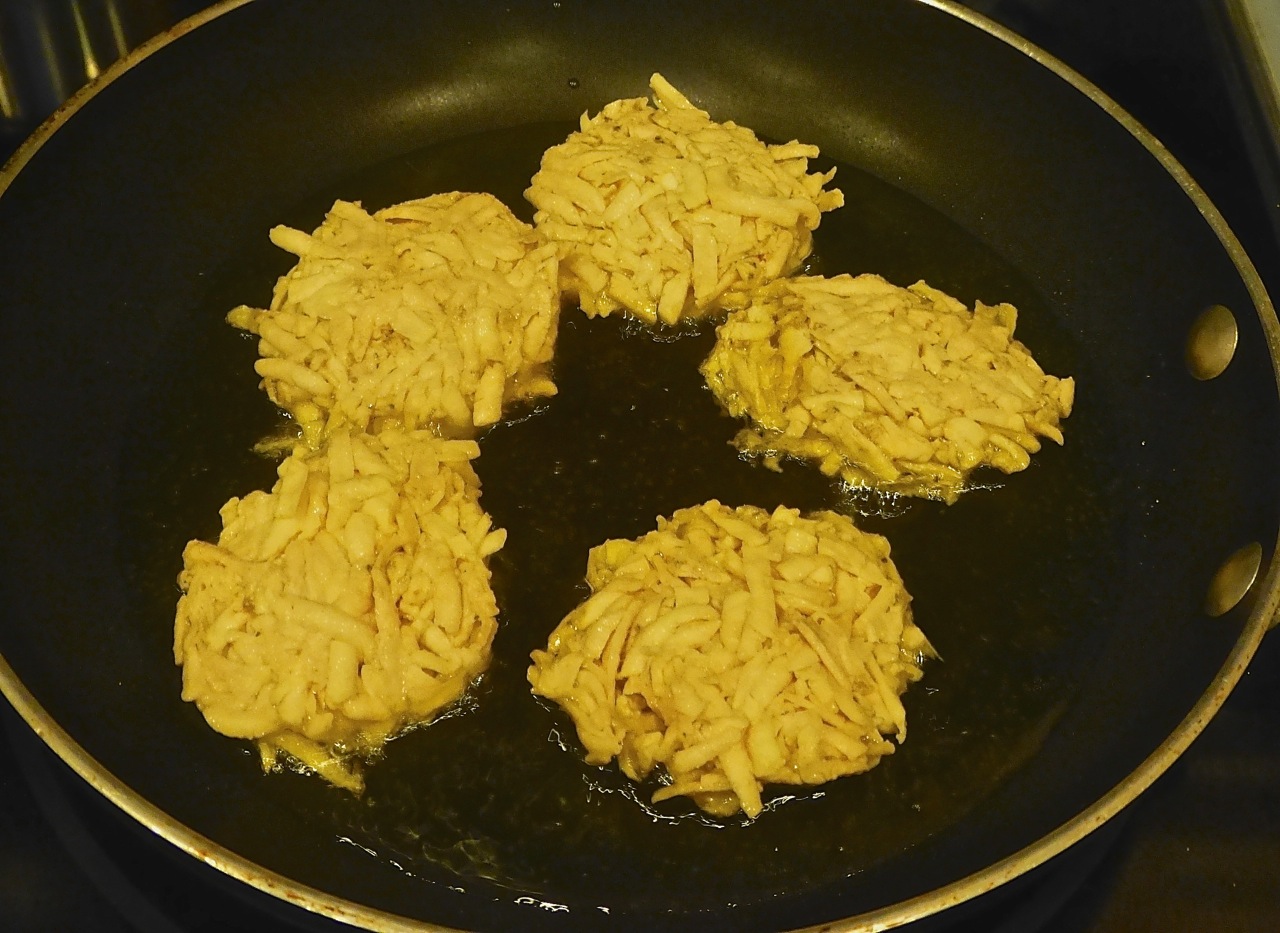
After heating your oil in a skillet (coconut or olive if you’re on the paleo diet), use your hands to form flattened “pancakes” — you want them to be kind’ve flat or (as I said above) they won’t cook fully through. Â Some of mine came out a little “puffy” — edible but not the best.
Oh — make sure your oil is HOT when you slide these in the skillet.
Form Plantains into Balls and Fry
You can see the (above) plantains starting to get crispy on the sides. That’s a good thing. You don’t want them to cook too quickly or you’ll also have the “raw in the middle” problem. But you’ll want these crispy as you’ll be using your hands (yes, your hands) to pick them up and eat them.
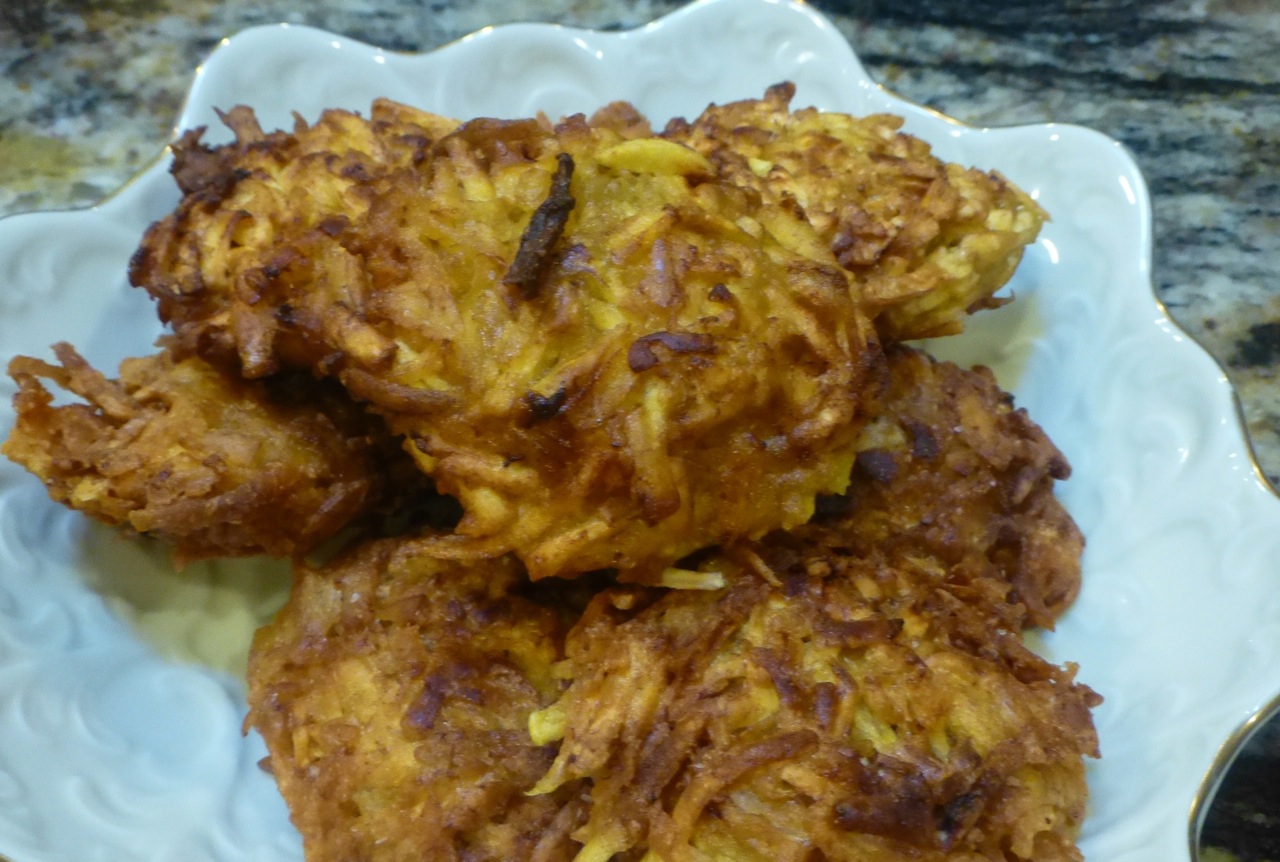
And this is what they will look like … A very old Puerto Rican dish served with an olive garlic dip.
Aranitas
Ready to try the recipe?
Ingredients
2 Green Plantains, grated
3Â Garlic Cloves, minced
1/4Â cup Olive Oil
Kosher Salt
Coconut or Olive Oil (for cooking and the dip)
Directions
In a small bowl, add the garlic and the olive oil and whisk them together then set aside for about an hour.
Peel the green plantains then soak them in salt water for about 30 minutes.
Remove the plantains from the water, dry them slightly with a paper towel and then grate them. Add salt to the plantains if you prefer them even more salty.
Using your hands, form palm sized patties.
Heat about 2 inches or so of oil over medium-high heat in a large skillet. The oil should be hot enough so that it “sizzles” when you put a plantain in the skillet.
Fry until golden on both sides. Crispy is how you want them.
When you remove them from the skillet, put them on paper towels to remove some of the oil.
These are best if served warm.
And that is pretty much it! Here is what our dinner looked like. I served the Veggie Patties with an aioli sauce and the Aranitas with the garlic sauce. I also put together a cucumber/tomato/pepper salad to serve with this meal.