It is never too late for cobbler, is it? This Peach Cobbler is paleo and vegan — and very good.
I used peaches that were not over-ripe but were “ripe enough.” A strong smell of “peaches” is one sign of their ripeness. The other is how soft they are.
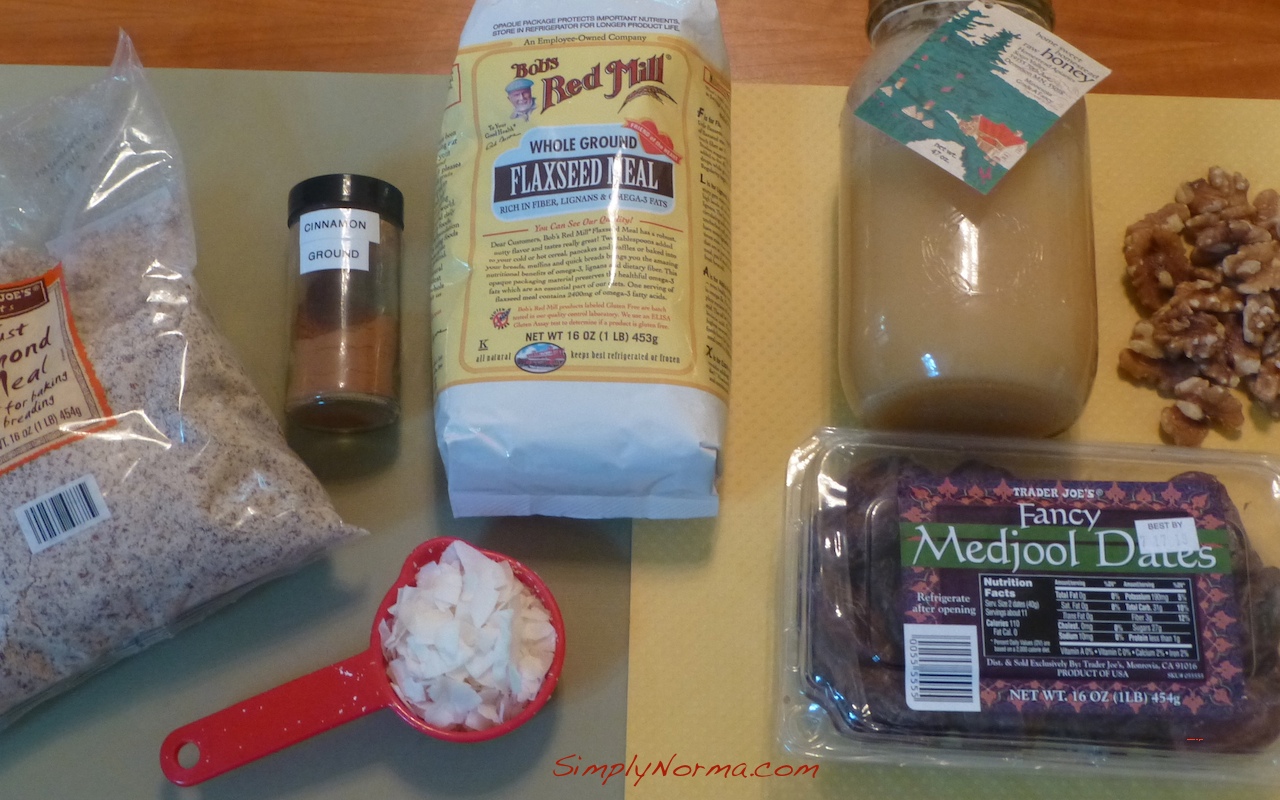
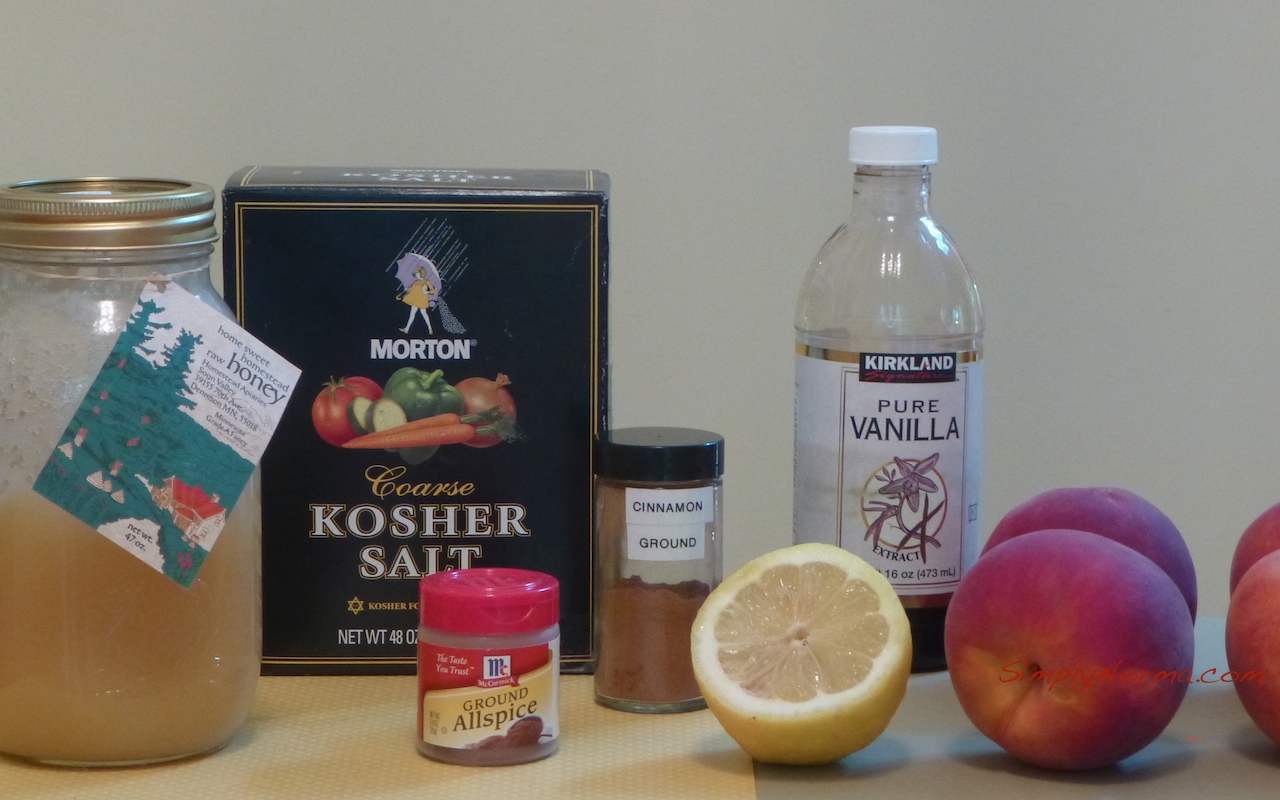
Peaches
Here are the key ingredients.
Ingredients for Paleo Peach Cobbler (Topping)Peach Cobbler (Filling)
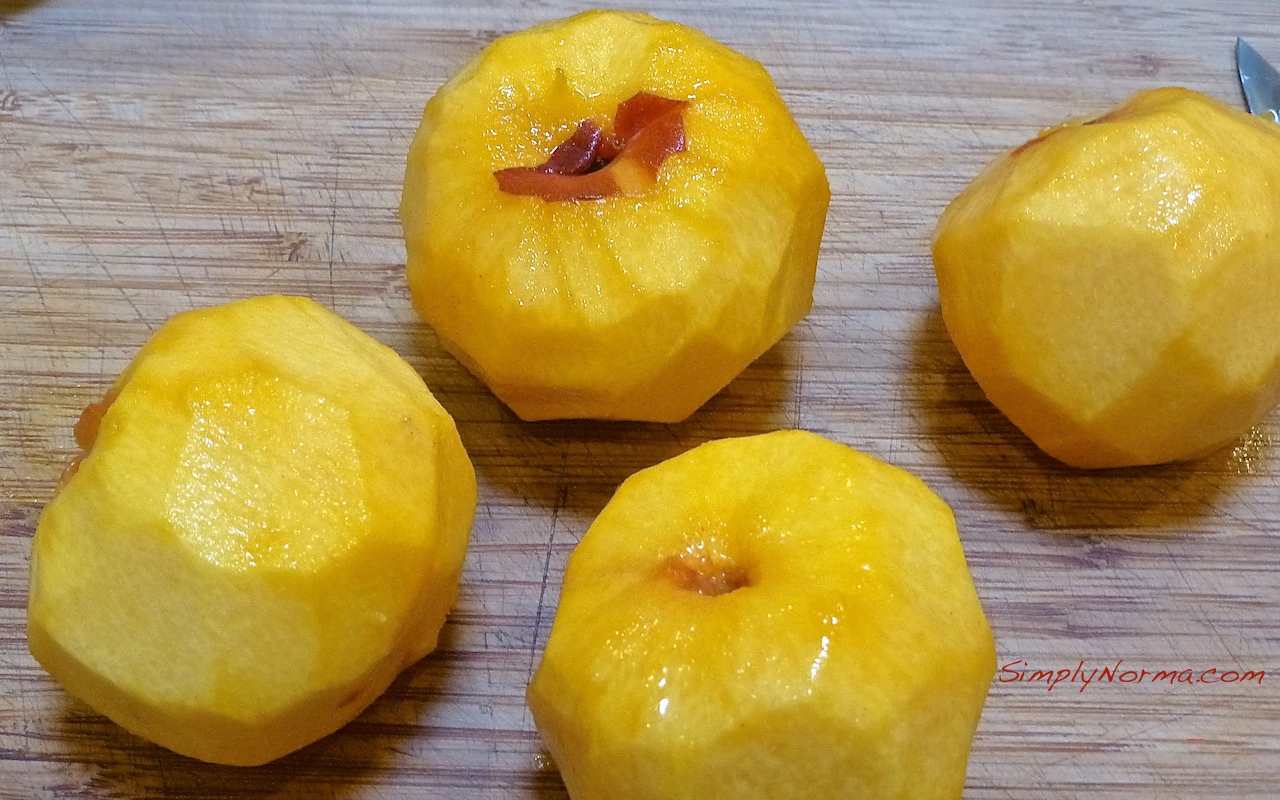
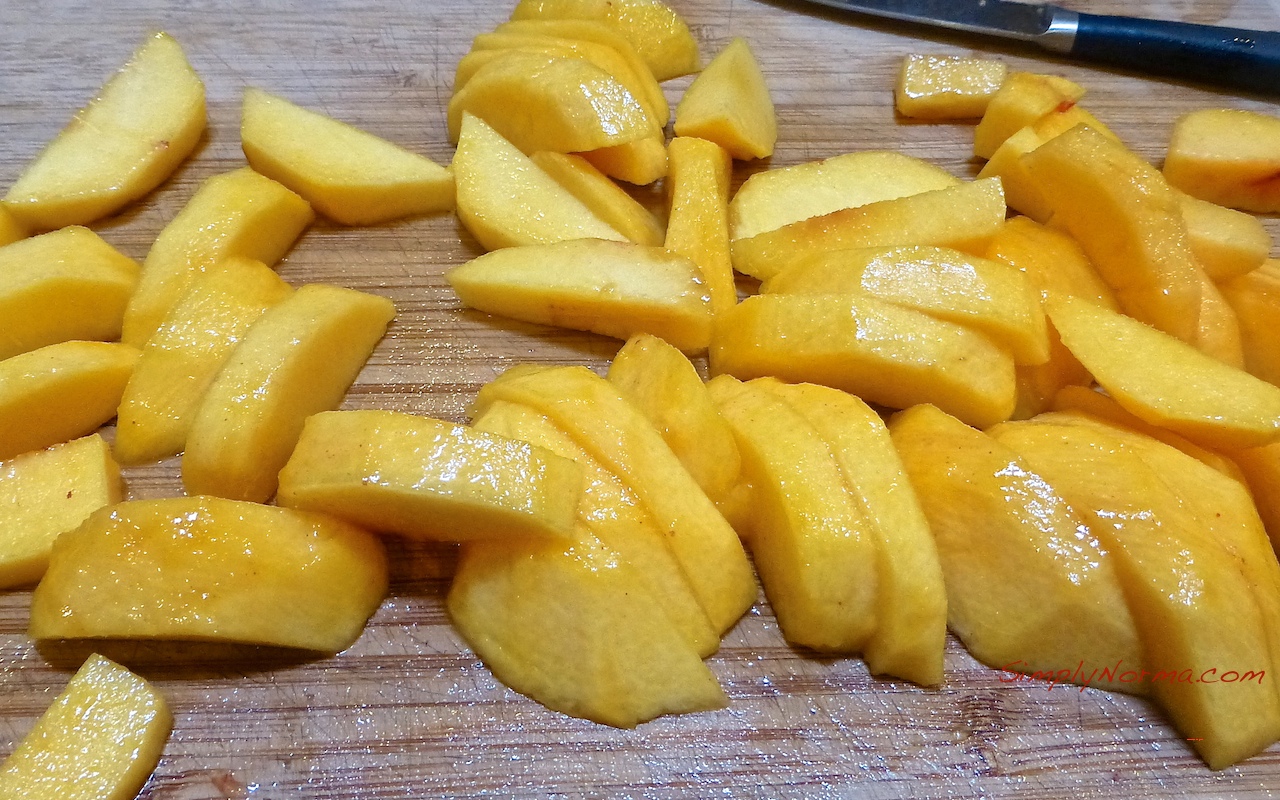
You’ll be peeling the beautiful peaches, removing the pit and then slicing them.
Peel and Remove PitSlice Peaches
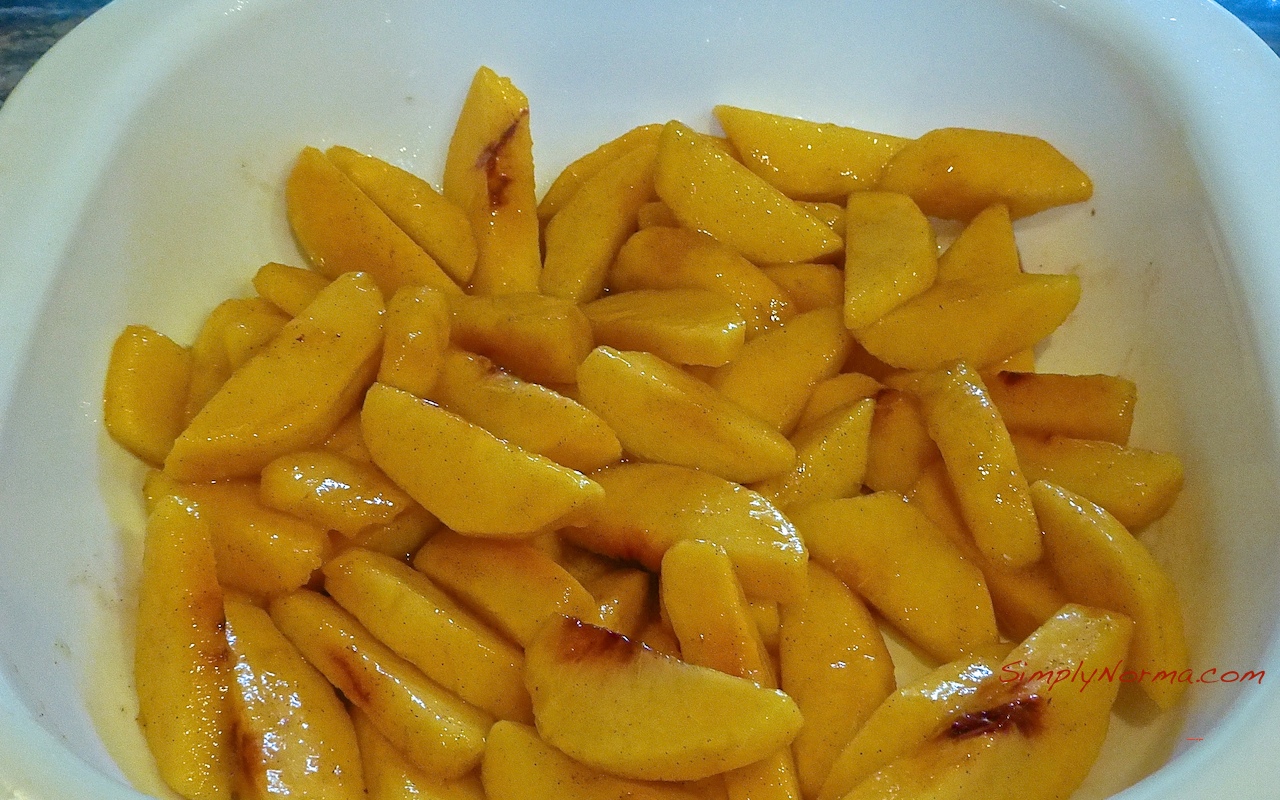
Next you’ll be putting these slices, tossed with lemon juice, vanilla extract, cinnamon, allspice and salt, into a baking dish.
Add Prepared Peaches to Baking Dish
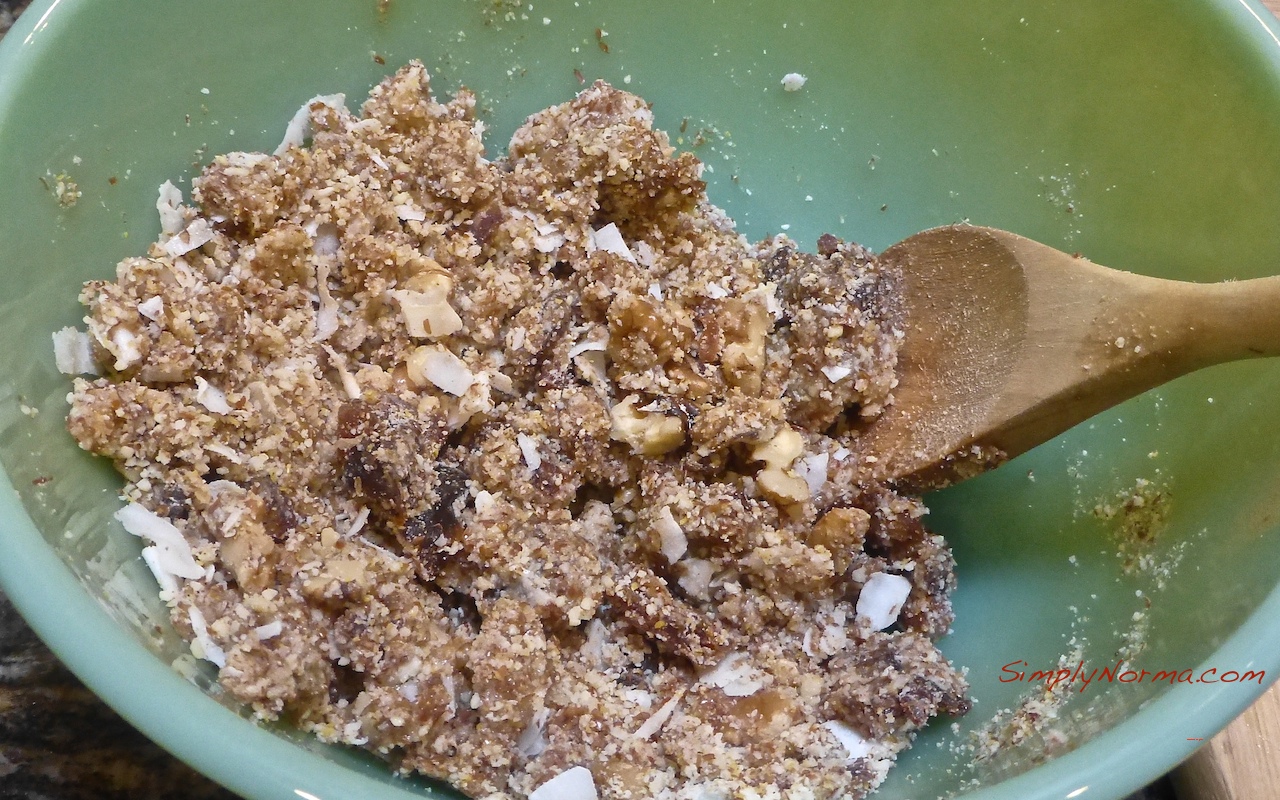
Next you’ll be covering it with the topping. (Is your mouth watering yet?)
Peach Cobbler Topping
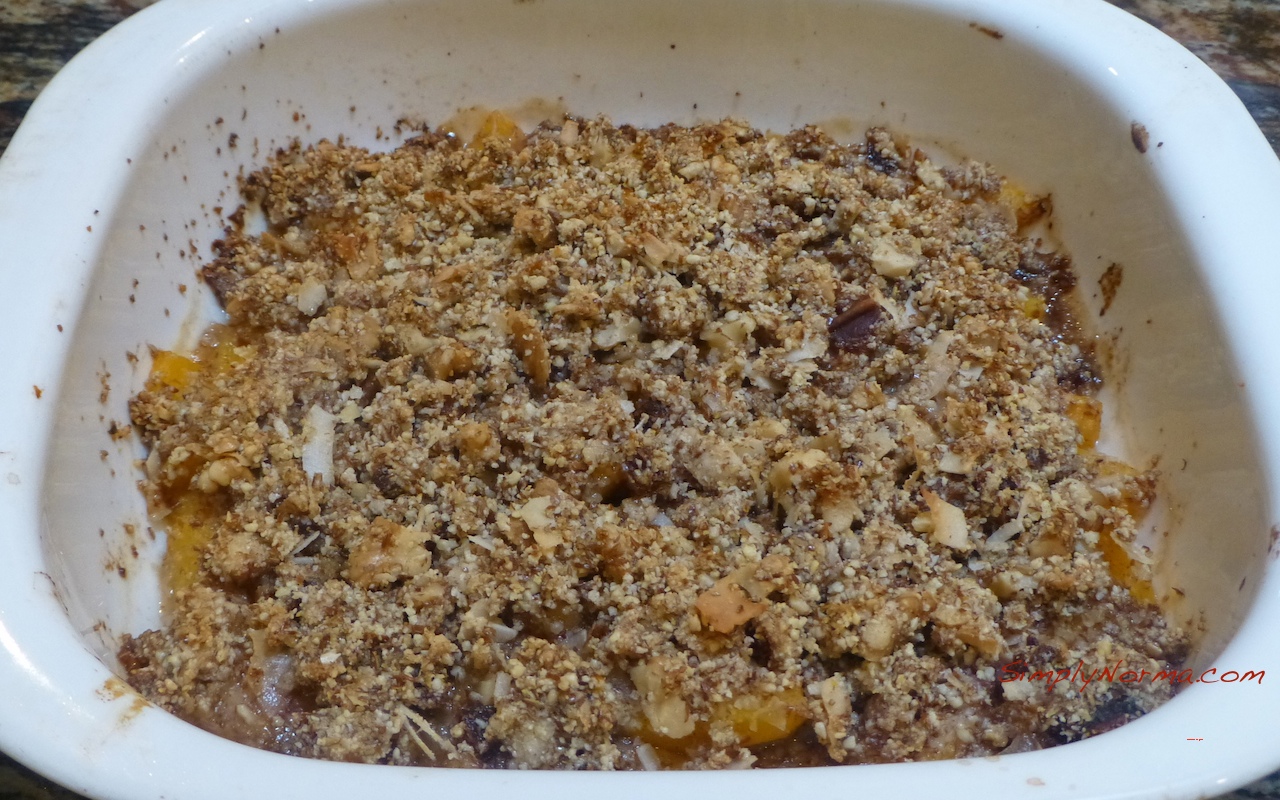
And when it comes out of the oven — whala! It will look like this.
Peach Cobbler
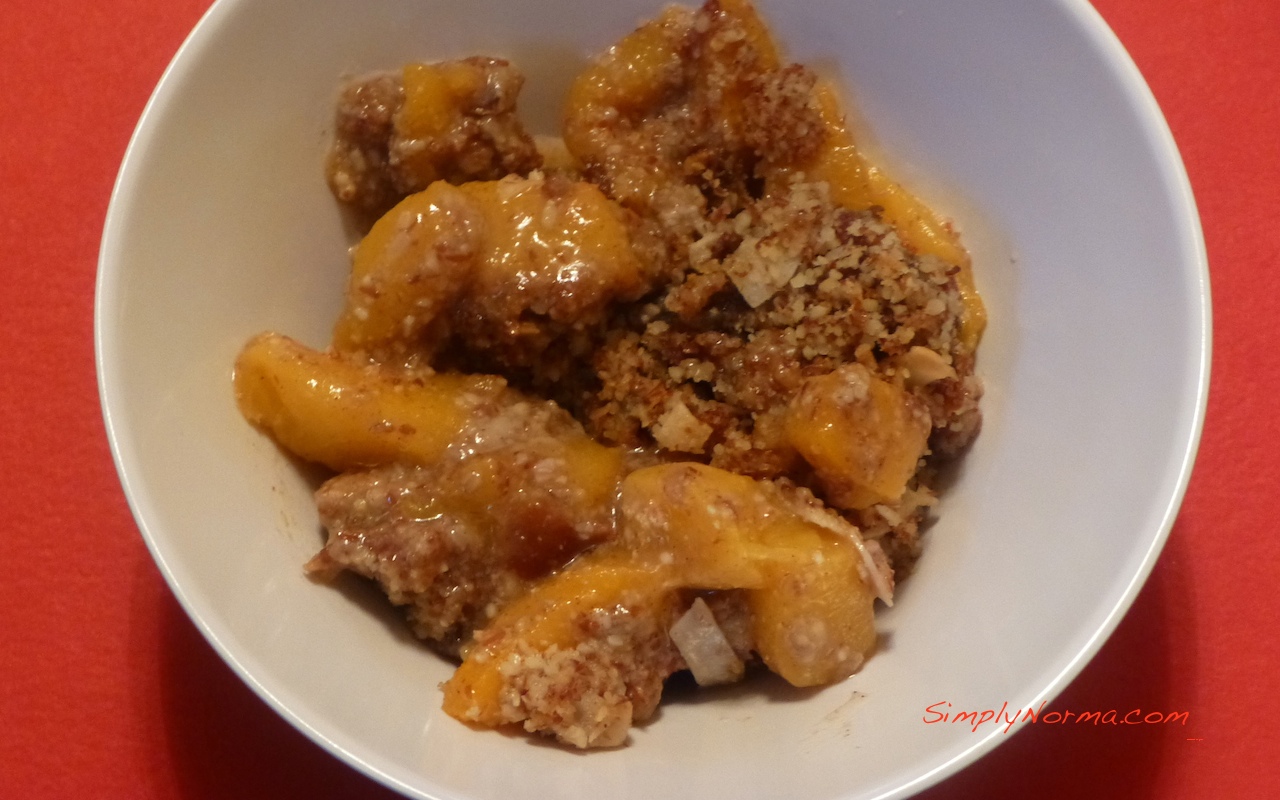
Now — I know it’s not the prettiest picture. I’ve debated back and forth whether to try to make my pictures really pretty but decided against it. The “normal” person doesn’t make everything all pretty — they just cook and eat. No?
Are you ready to try this delicious peach cobbler? I have to assure you that it tastes just like a “regular” cobbler even though it’s a healthy paleo recipe.
Ingredients
4 peaches (but 5 would be better)
2Â Tablespoons Honey
1Â Tablespoon Lemon Juice
1Â teaspoon Vanilla Extract
1/4Â teaspoon Cinnamon
1/4Â teaspoon Allspice
1/4Â teaspoon Kosher Salt
Ingredients (for the topping)
5Â Mejol Dates
1/2Â cup Walnuts
1/3Â cup Coconut Flakes
3Â Tablespoons Coconut Oil
3/4Â cup Almond Flour
1/3Â cup Flaxseed Meal
2Â Tablespoons Honey
1Â teaspoon Cinnamon
Kosher Salt
Directions
Preheat the oven to 400 degrees Fahrenheit.
Peel, remove the pit and slice the peaches.
Add the lemon juice, vanilla extract, cinnamon, allspice and salt to the peaches then gently stir to combine.
Pour the peaches into a baking dish.
Chop the dates, coconut flakes and walnuts.
In a separate bowl, combine the dates, coconut flakes, walnuts, coconut oil (which does not have to be melted), almond flour, flaxseed meal, honey and cinnamon.
Stir everything to blend together then spread the topping over the peaches and sprinkle with a little salt.
Cover the dish with aluminum foil and bake for 25 minutes.
After 25 minutes, uncover the dish and bake for another 10 minutes, or until the top is bubbly and crunchy.
Simply delicious!
Okay now — have a slice!
Paleo Vegan Peach Cobbler
Note: This is the 3rd recipe that I’ve tried in a week from Paleo Effect which tells you that you should head over there and try some of her other recipes as they are tried and true.
I decided to make a paleo vegetarian dinner today with two new recipes. It came out quite good! I’m trying to have a couple of vegetarian paleo meals a week — we’ll see how that goes.
The first recipe I made is called Paleo Vegetarian Burgers. I did not use them as burgers though but as small patties with an aioli sauce (not the Lemongrass ailoi that was optional in the original recipe) on top of them. I refrigerated the patties overnight and took them out of the refrigerator about 30 minutes before I was ready to fry them.
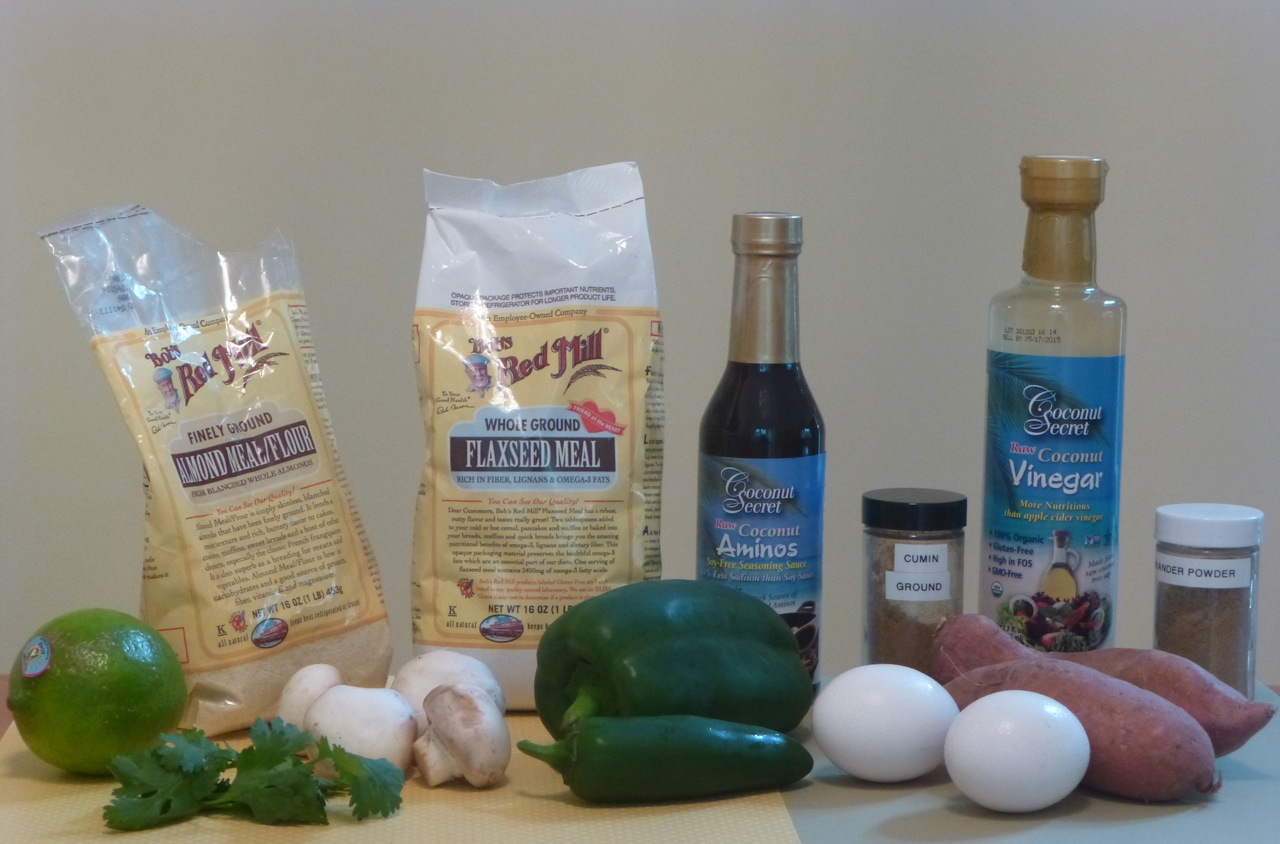
Here are the ingredients you’ll be needing …
Paleo Vegetarian Ingredients
They will all be combined and put in a blender or food processor to blend together. I used 2 smaller sweet potatoes instead of 1 large one which I baked, peeled and then put in the food processor with everything else.
Make sure your eggs and sweet potatoes are at room temperature before adding them to the food processor.
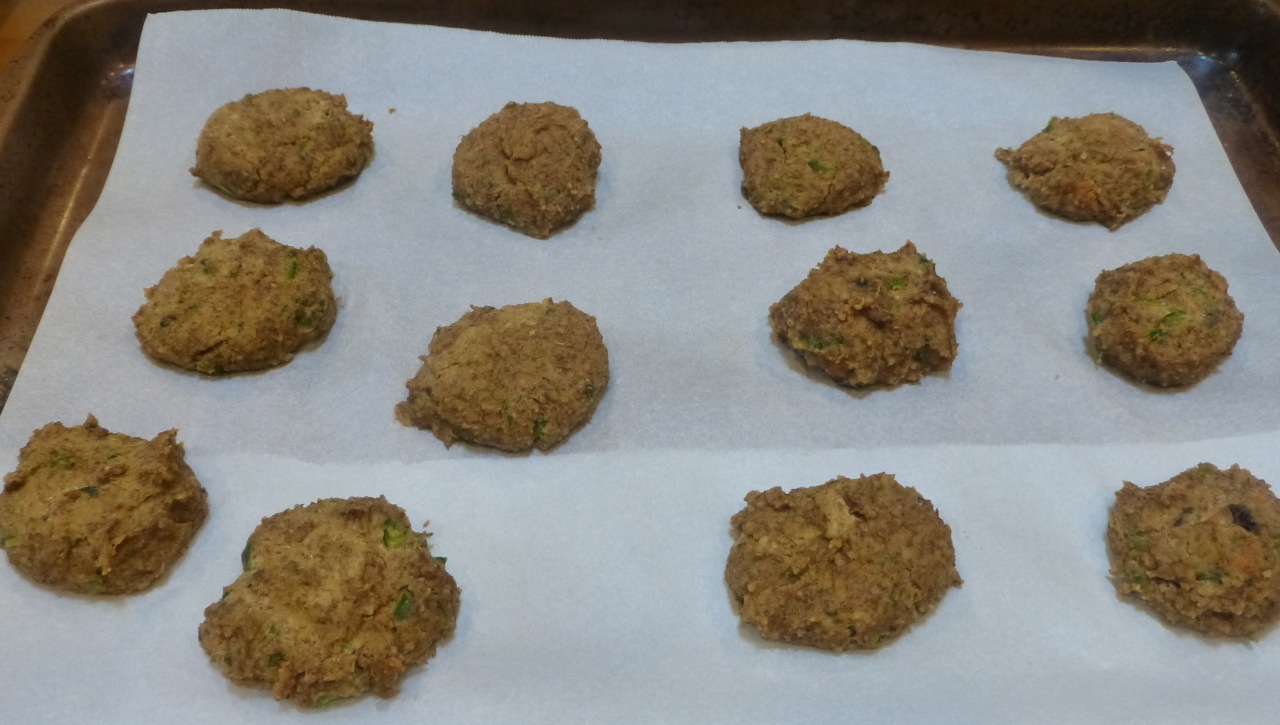
Once everything is combined you’ll be making small patties and putting them on a cookie sheet lined with parchment paper then putting that cookie sheet in the refrigerator. You don’t have to keep them there overnight but I would suggest at least a couple of hours to make sure they are firm before frying them.
In a food processor, combine the sweet potato, peppers, jalapeno, cilantro, almond flour, flaxseed meal, eggs, garlic cloves, cumin, coriander, coconut aminos, lime juice, coconut vinegar, salt and black pepper. Pulse until everything is combined but in small pieces.
Line a baking sheet with parchment paper.
Form your patties and put them on the baking sheet then refrigerate them for at least 30 minutes or overnight as I did.
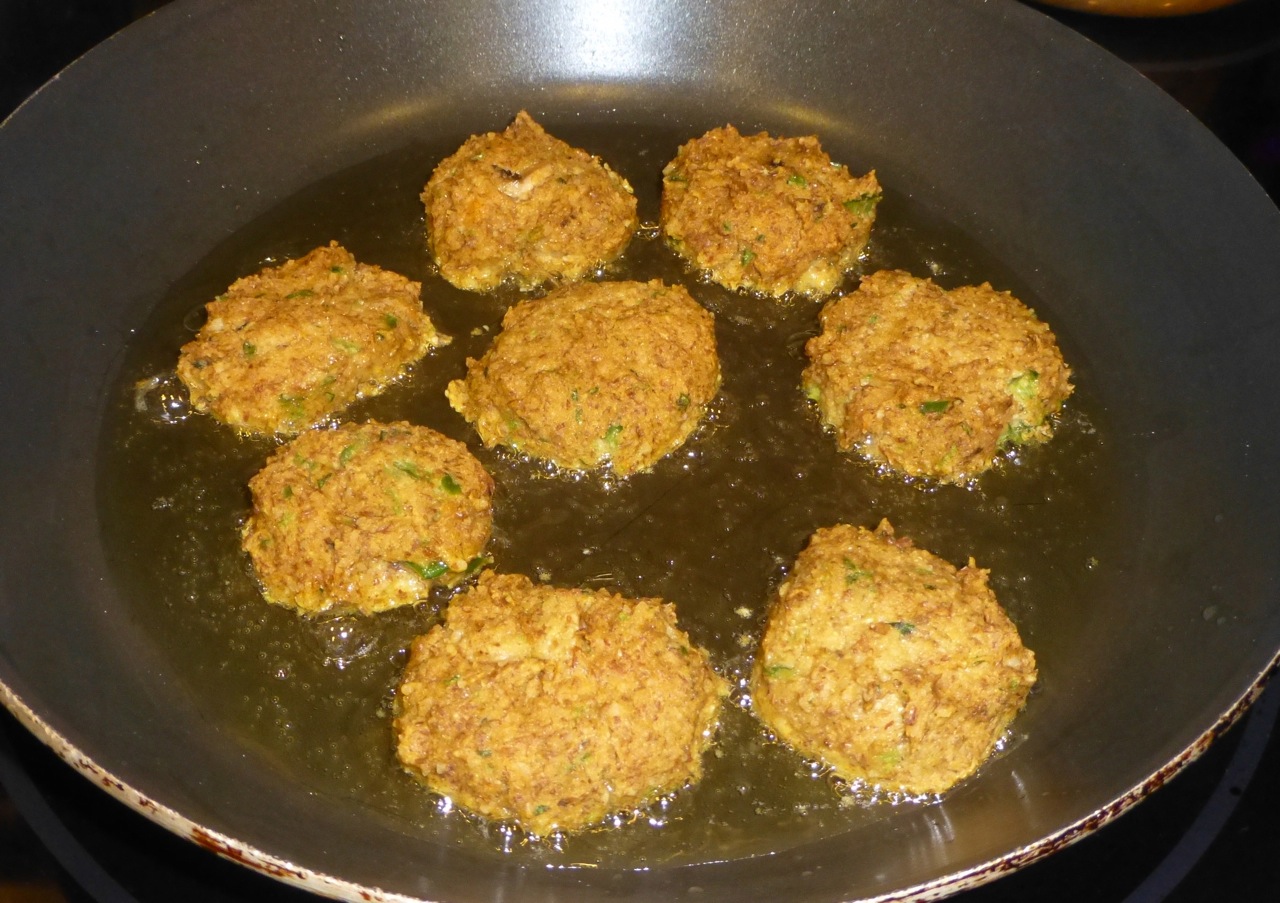
Once you’re ready to cook them, heat the olive oil in a skillet over medium heat then add the patties. If you cook these patties too quickly they will be done on the outside but not on the inside so don’t rush the cooking process.
Cover the skillet and cook for 3-5 minutes on each side.
That’s pretty much it for the patties.
The Aranitas were a snap to make. Really easy. The only suggestion I would make is to make sure you don’t make them too thick or the outside will be beautifully done while the inside will be slightly raw. (I had a couple come out that way so next time I’ll make sure I’m more careful.)
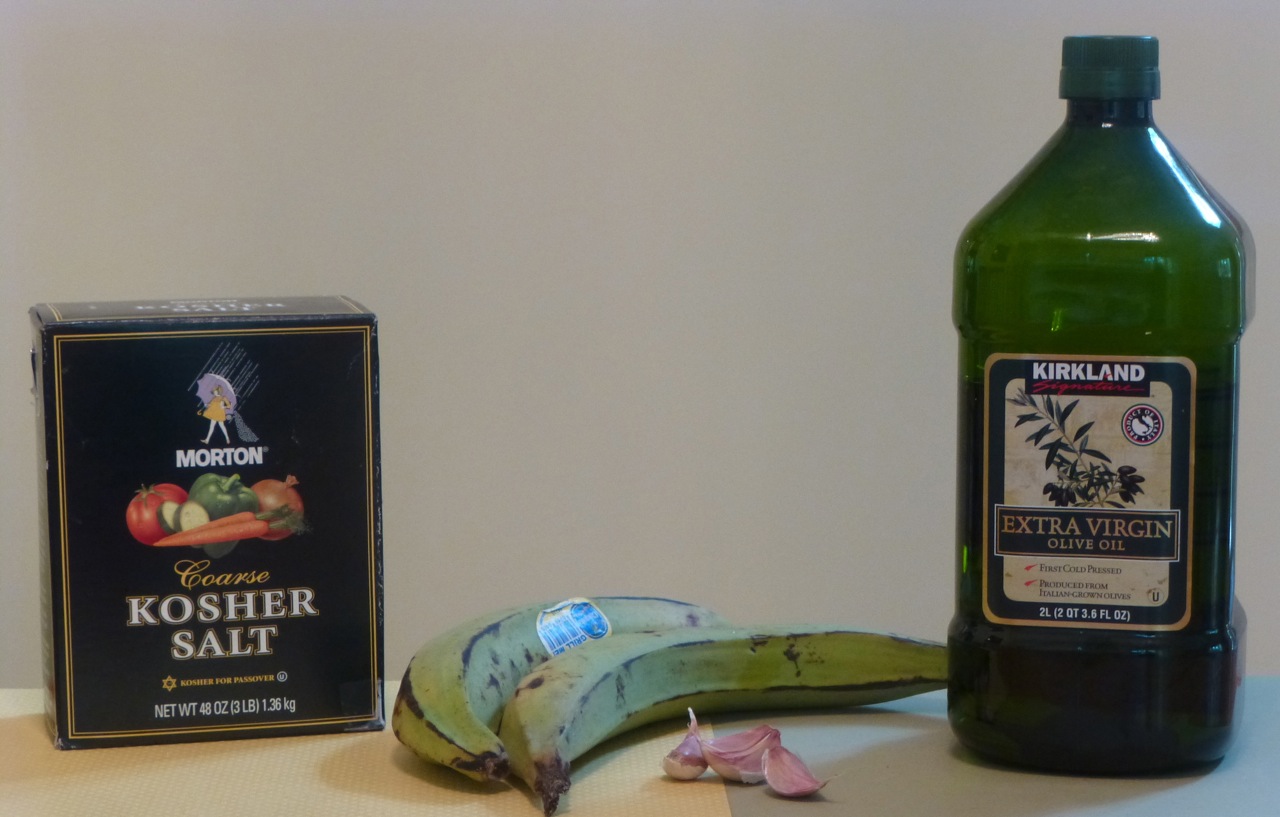
Here are the ingredients you’ll need. Yes — this is all, isn’t that fantastic? The original recipe calls for coconut oil but I used the olive oil to fry in also — either one will work.
Aranitas
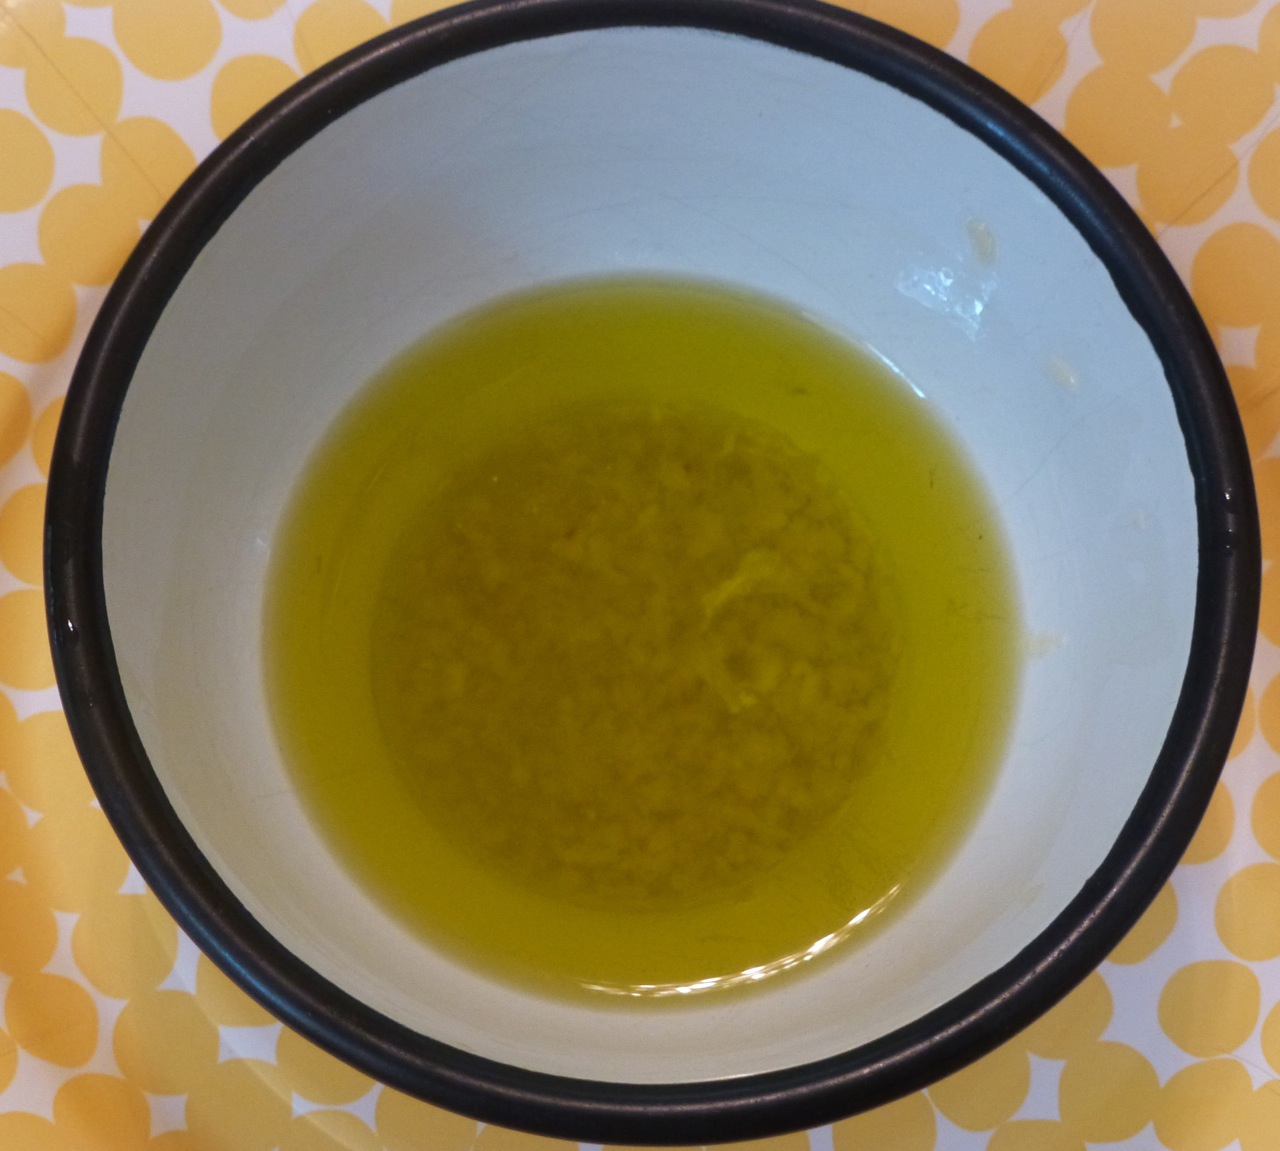
This is what the “dip” will look like. (You’ll be stirring it up really good right before serving to get garlic pieces on your aranitas. Â Yum!
Aranitas Dip
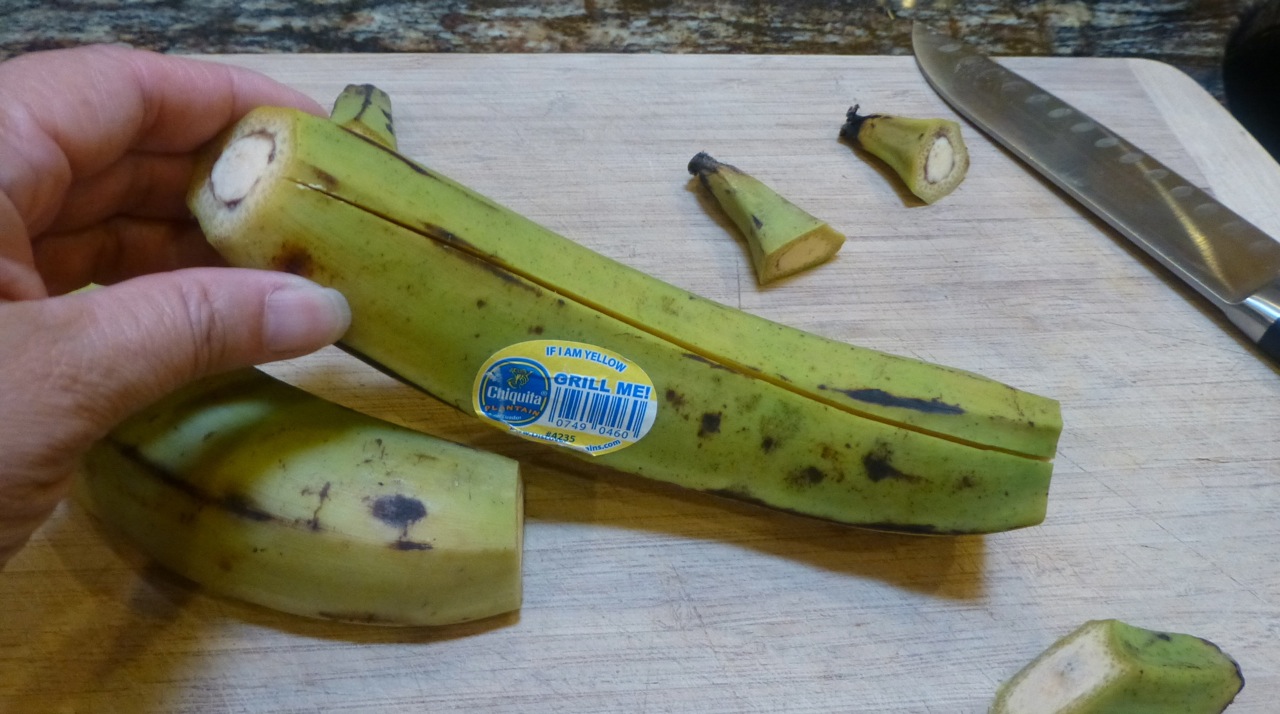
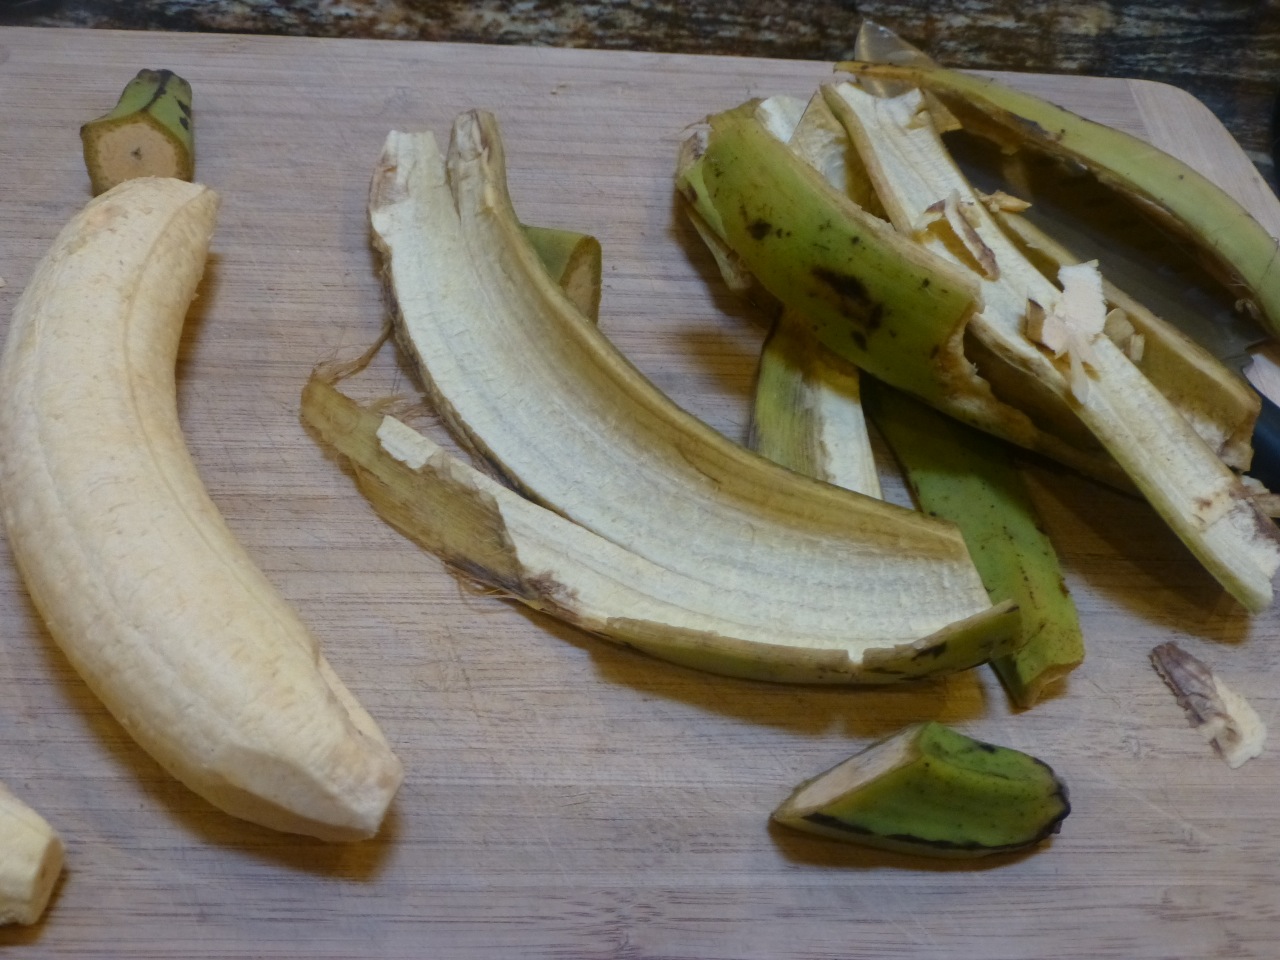
Next you’ll be preparing your green plantains. They truly must be green as the yellow ones (also called maduros) won’t shred well enough for this recipe.
First, you’ll be cutting the tips off the plantains to make it easier for you to peel this “banana” then slitting it right down the middle.
Cut the tips off plantain then slit down the middle
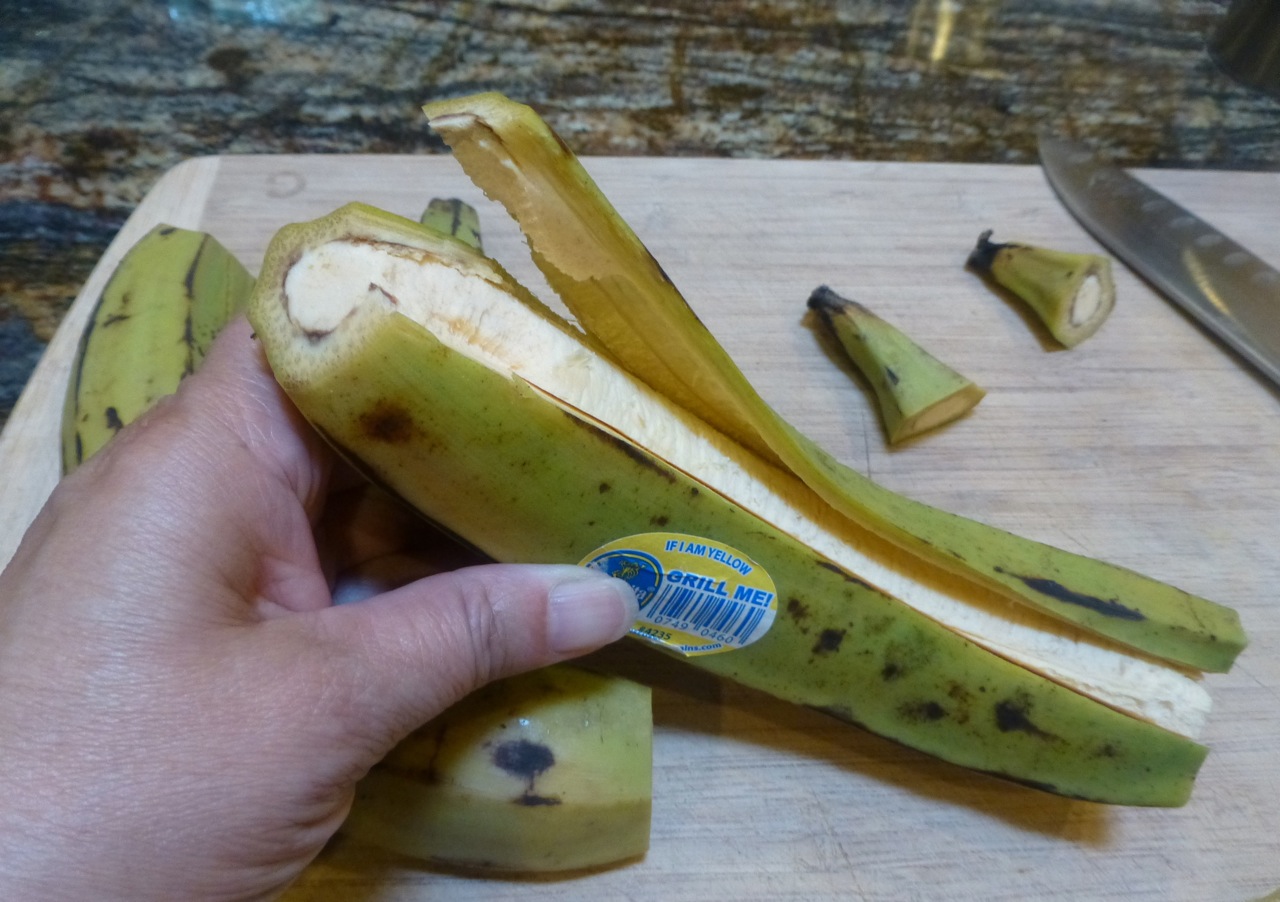
Next you’ll be peeling the plantain. This requires a little finesse but I grew up with plantains so it was very easy. Simply pull the peel from the slit portion to the right and work your way down and around.
Remove the Peel
The peel will come off in chunks. If small pieces of peel are left on the plantain, simply use a small knife and scrape them off.
Peeled Plantain
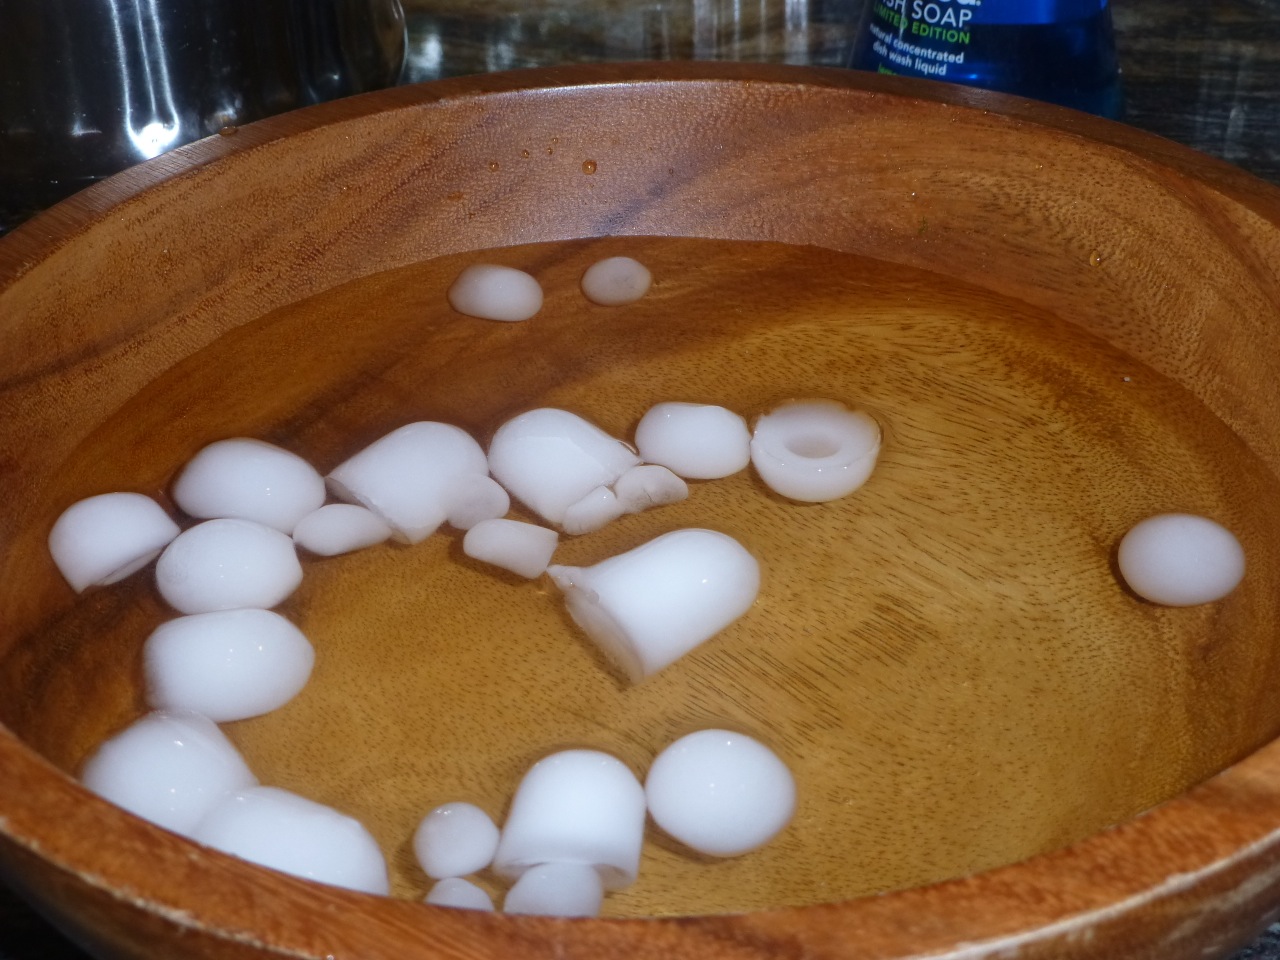
Next you’ll be preparing a bowl of cold cold salted water. I used a large salad bowl and added ice to it to make sure the water was cold.
Ice Cold Water
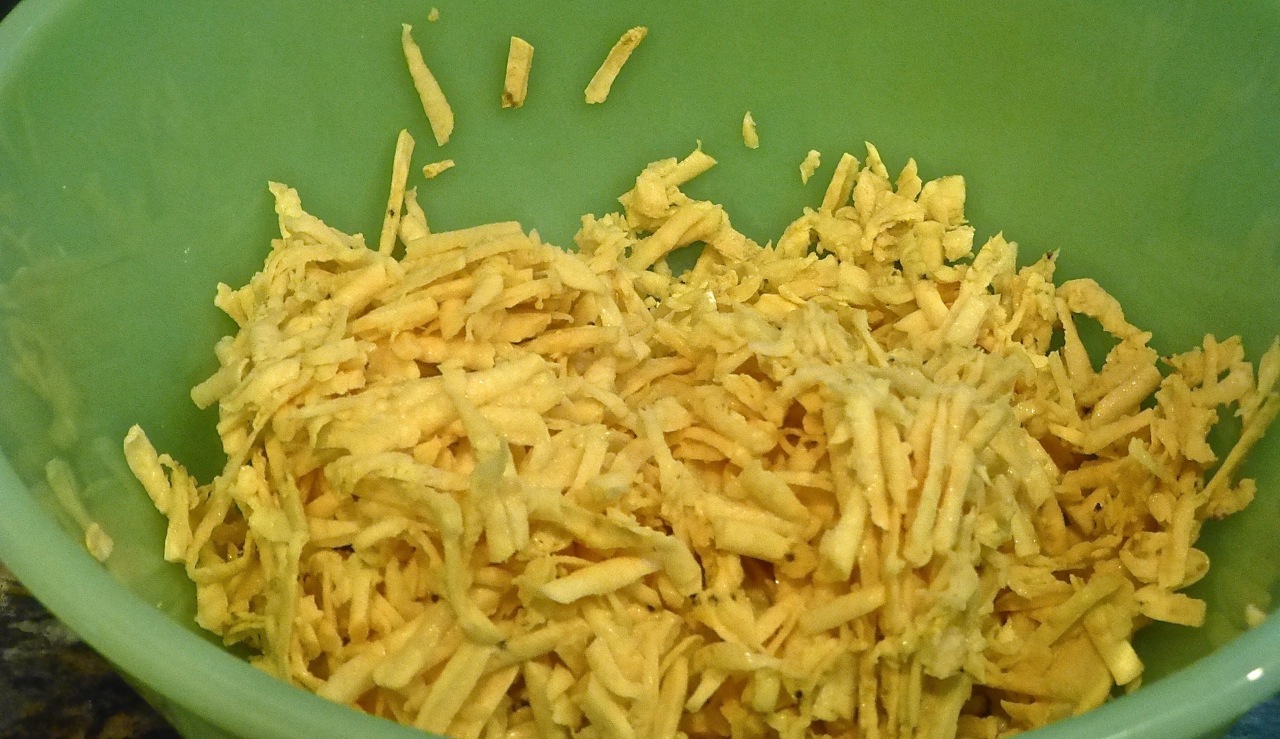
Next, add the plantains to the cold water and allow them to soak for at least 30 minutes. Once that’s completed, get a grater and grate the plantains.
Grate the plantains
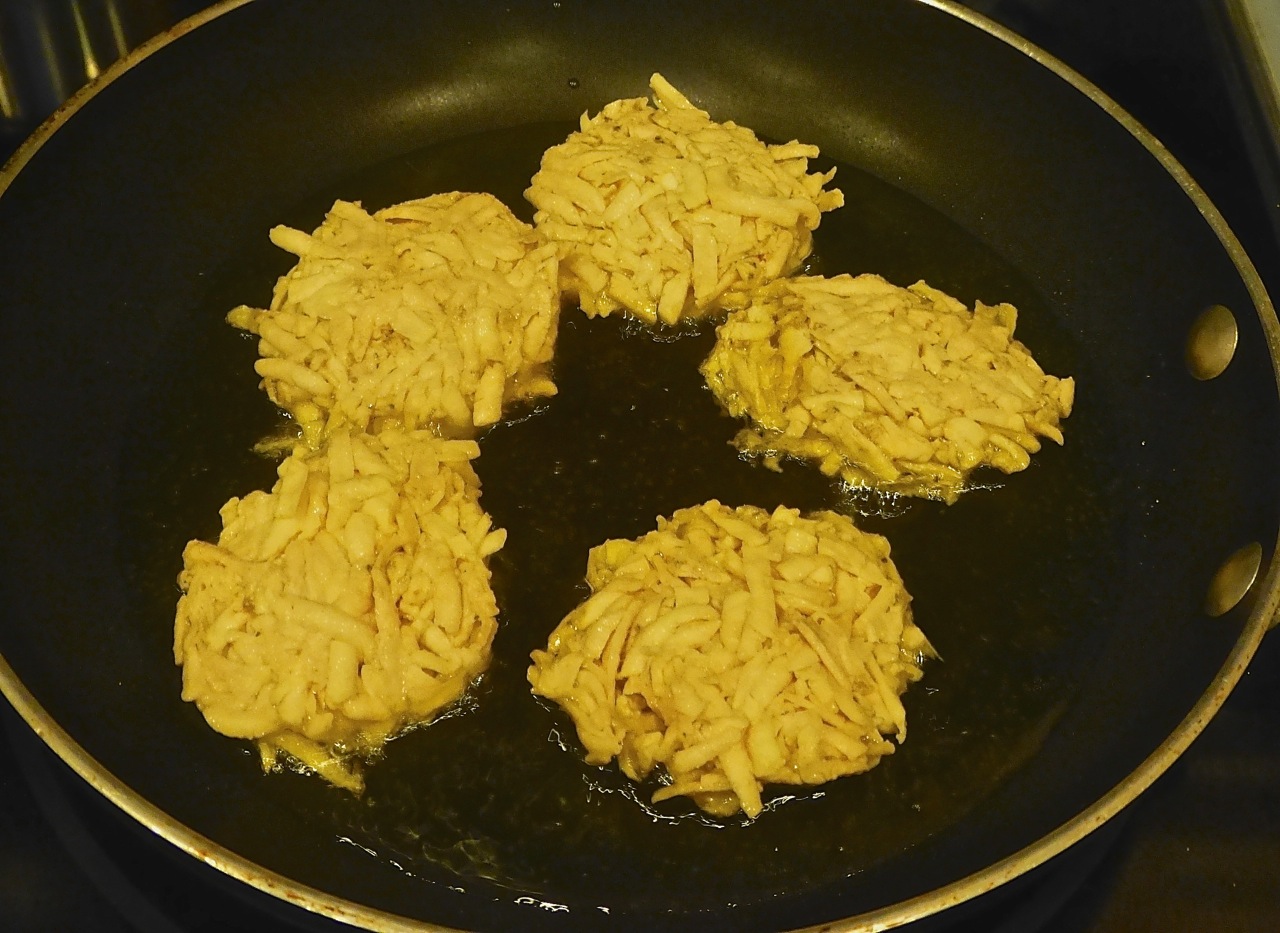
After heating your oil in a skillet (coconut or olive if you’re on the paleo diet), use your hands to form flattened “pancakes” — you want them to be kind’ve flat or (as I said above) they won’t cook fully through. Â Some of mine came out a little “puffy” — edible but not the best.
Oh — make sure your oil is HOT when you slide these in the skillet.
Form Plantains into Balls and Fry
You can see the (above) plantains starting to get crispy on the sides. That’s a good thing. You don’t want them to cook too quickly or you’ll also have the “raw in the middle” problem. But you’ll want these crispy as you’ll be using your hands (yes, your hands) to pick them up and eat them.
And this is what they will look like … A very old Puerto Rican dish served with an olive garlic dip.
Aranitas
Ready to try the recipe?
Ingredients
2 Green Plantains, grated
3Â Garlic Cloves, minced
1/4Â cup Olive Oil
Kosher Salt
Coconut or Olive Oil (for cooking and the dip)
Directions
In a small bowl, add the garlic and the olive oil and whisk them together then set aside for about an hour.
Peel the green plantains then soak them in salt water for about 30 minutes.
Remove the plantains from the water, dry them slightly with a paper towel and then grate them. Add salt to the plantains if you prefer them even more salty.
Using your hands, form palm sized patties.
Heat about 2 inches or so of oil over medium-high heat in a large skillet. The oil should be hot enough so that it “sizzles” when you put a plantain in the skillet.
Fry until golden on both sides. Crispy is how you want them.
When you remove them from the skillet, put them on paper towels to remove some of the oil.
These are best if served warm.
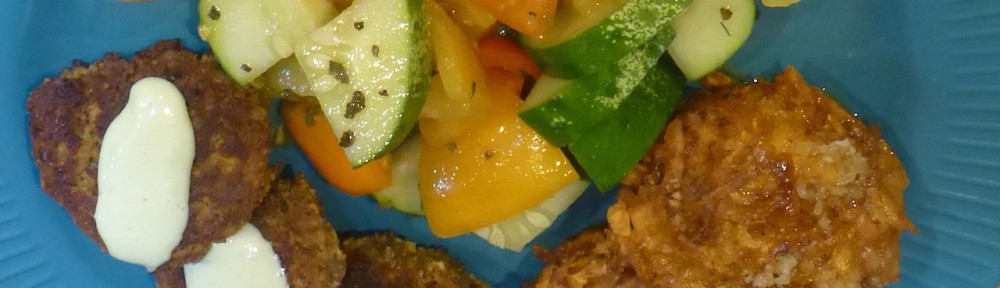
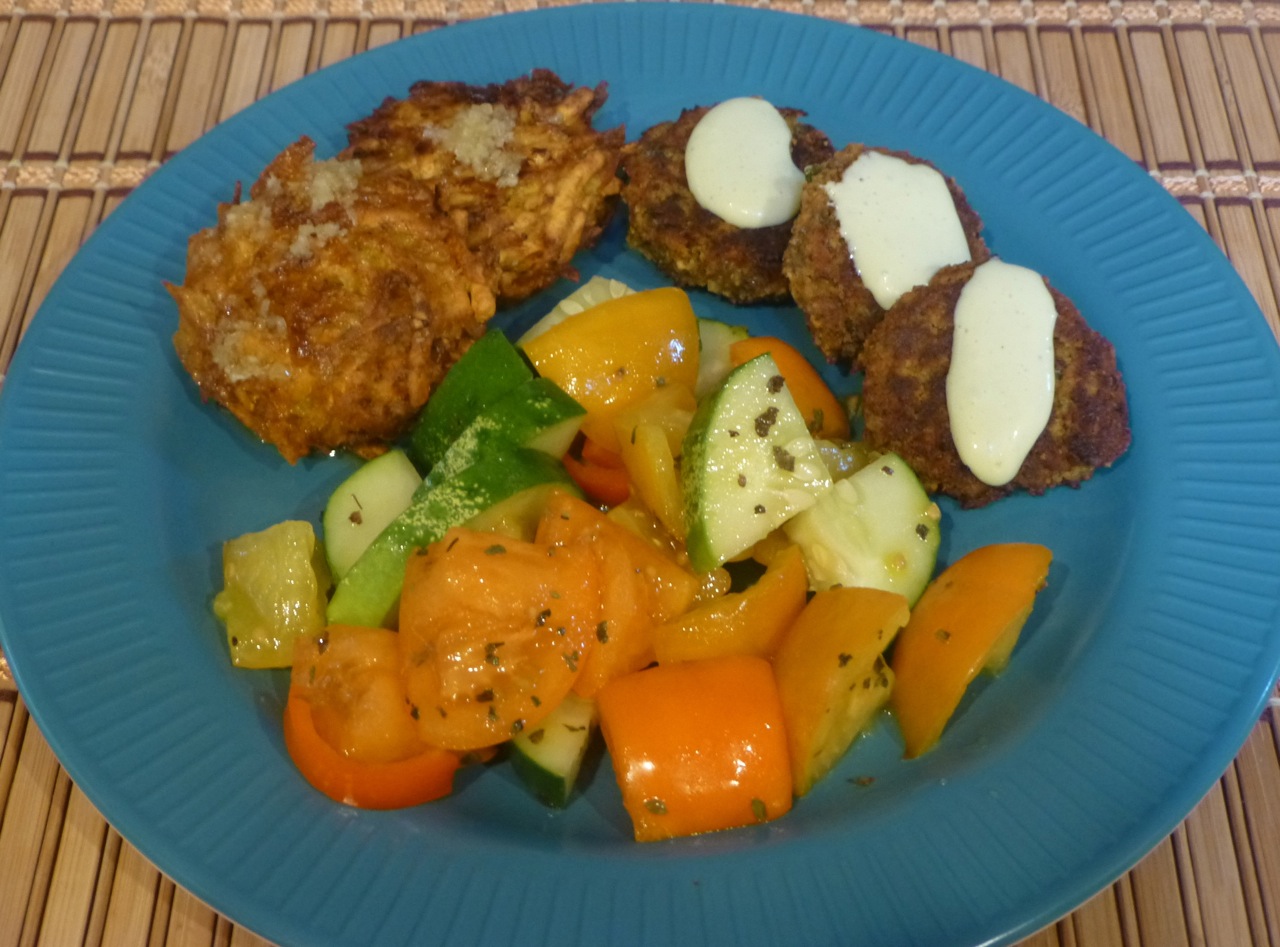
And that is pretty much it! Here is what our dinner looked like. I served the Veggie Patties with an aioli sauce and the Aranitas with the garlic sauce. I also put together a cucumber/tomato/pepper salad to serve with this meal.
This paleo Chicken Fingers recipe is so easy to make and, although it says kids would love it, it’s a great meal for all ages.
Although the recipe uses few ingredients and instructions, it’s a little messy to make if you use your fingers. The breading can get clumpy so be careful to not just toss all the chicken pieces into the breading at once. (I didn’t do that but I did a few pieces at a time and that made it clumpy.)
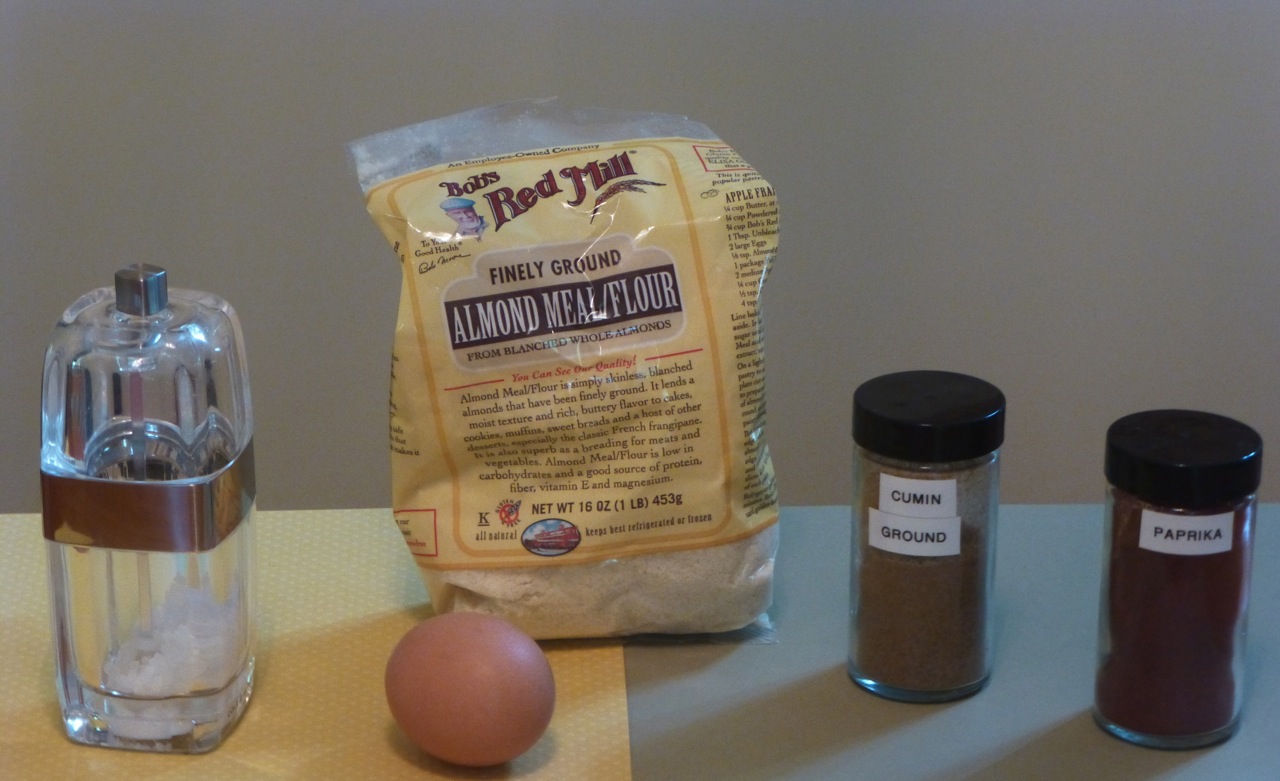
So — let’s begin. Besides the pound of chicken breasts (or tenders if you prefer) here’s what you’ll need.
Ingredients
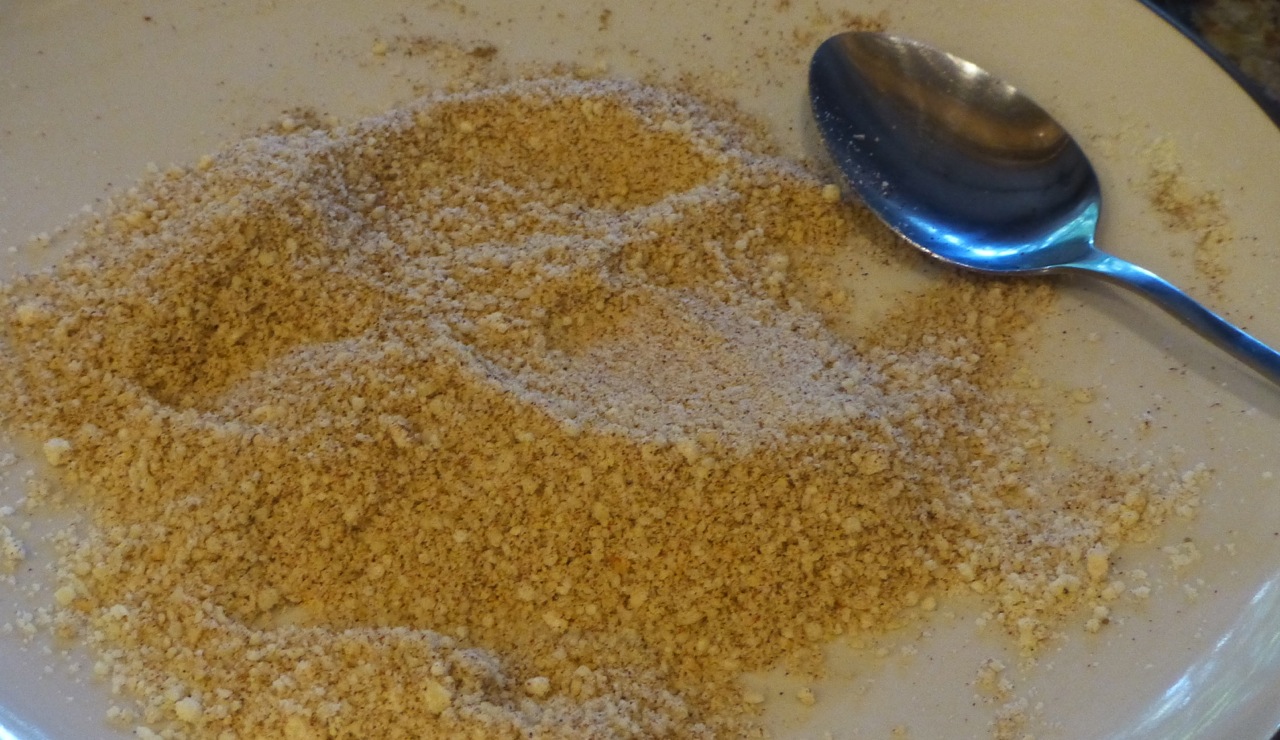
First you’ll be combining the dry ingredients to make the breading.
Breading
Then you’ll be making a “dipping” station. Having your lined cookie sheet next to your dipping station will make it easy to transfer the chicken pieces onto it.
Dipping Station
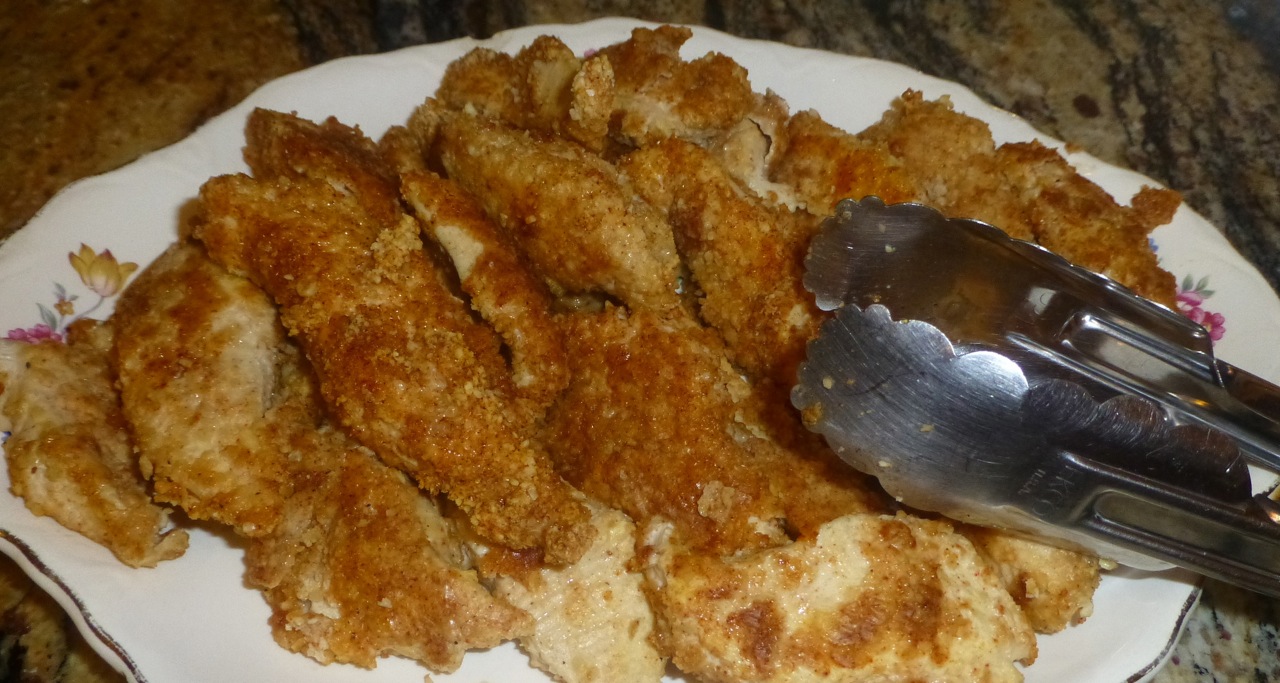
This is what they will look like. Because of the clumps some of my pieces weren’t breaded enough but taste-wise they were fine.
Paleo Chicken Fingers
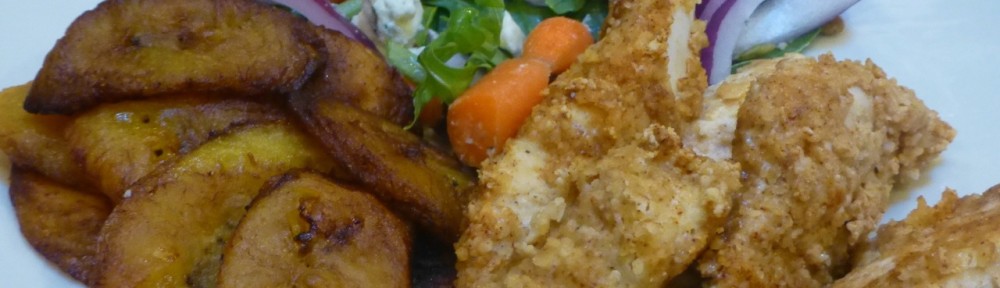
I served this dish with fried ripe plantains. Â Have you ever had them? If you decide to try them, you want to make sure you get very very ripe plantains. Yes, yellow ones are good but the ones that are turning almost black are even riper and sweeter. (But don’t use the green ones for this.) Just inspect them for white fuzziness — mold. Â You don’t want to get sick.
An interesting side note – most grocery stores I’ve been to will get rid of or discount the really really ripe plantains as they think no one will buy them — unless that is you go to a Spanish market who know the clientele who buy these often.
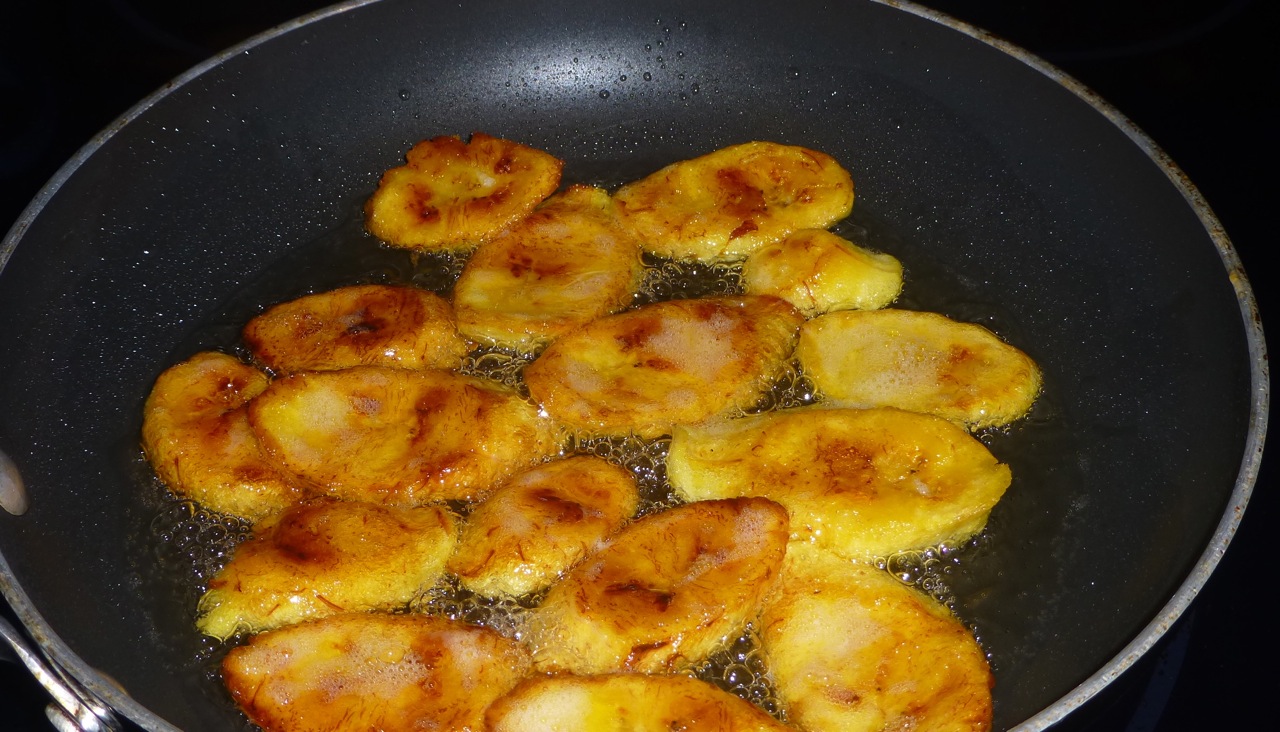
The plantains are sliced at an angle, mashed down a little with the palm of your hand and fried in coconut or olive oil. I chose to use coconut this time. They don’t take long to fry and I can usually tell by the color of the plantain when they’re ready. If your heat is too high though they’ll cook on the outside but not on the inside. Â Turn your stovetop heat to almost medium, check for a nice golden color then turn it to the other side.
Fried Plantains
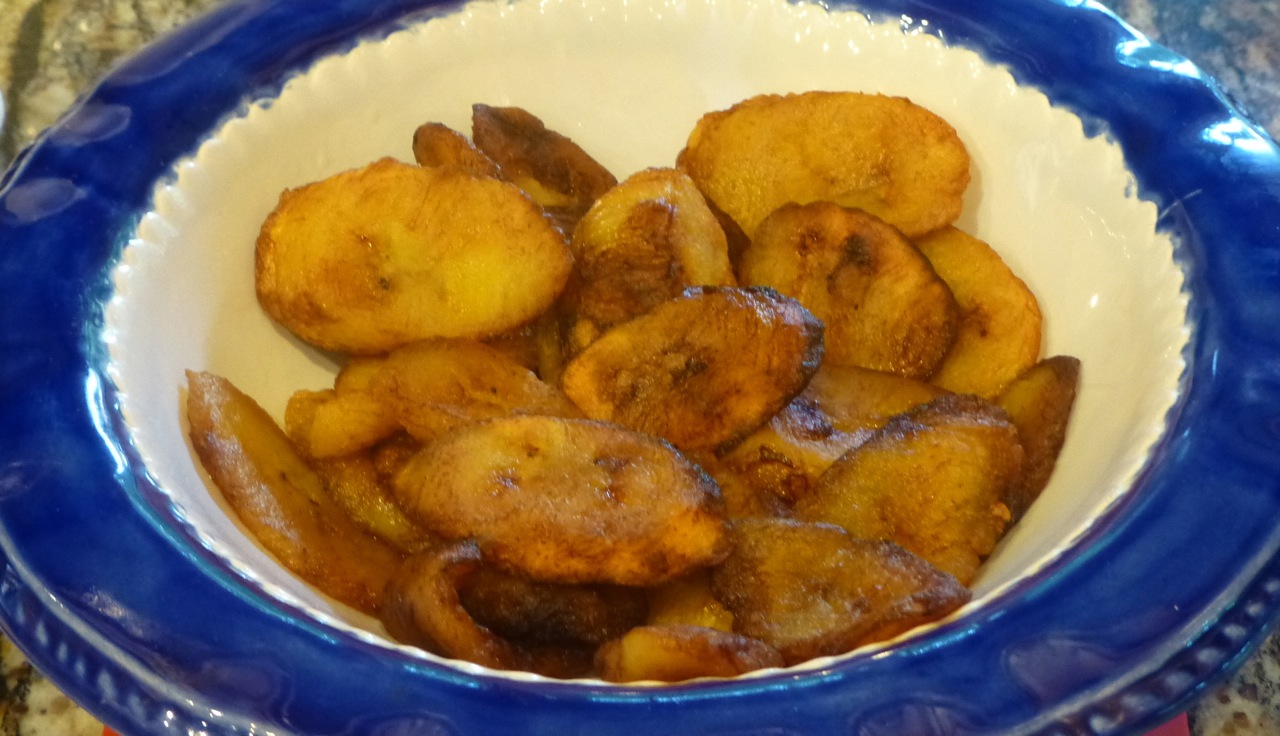
And this is what you’ll get. Â You’ll notice some of them look a little “flat.” With the second batch that I was frying, I got distracted but quickly turned the stovetop off so they wouldn’t burn. Unfortunately they sat in the oil longer than they should have so they absorbed more of the oil than usual. Not a “bad” thing but the fried plantains should have a little “puffiness” to them and shouldn’t taste like oil. Â Remember, this is about the plantain. Â So — pay attention!
Fried Sweet Plantains
Now back to the chicken fingers. Ready to try the recipe?
Ingredients
1 pound skinless chicken breasts cut into long strips and into the same thickness as much as possible
1Â egg, at room temperature and beaten
1/2Â cup Almond Meal
1/2Â teaspoon salt
3/4Â teaspoon paprika
1/4Â teaspoon ground coriander seed
1/4Â teaspoon ground cumin seed
Directions
Preheat your oven to 425F.
While the oven is heating, line a large baking sheet with parchment paper.
Combine the almond meal with the spices on a plate or shallow dish. If you especially like the taste of coriander or cumin, double it to 1/2 a teaspoon for more flavor.
Put the beaten egg in a shallow dish all by its lonesome. You’ll be dipping your chicken in here so make sure the chicken will fit in the dish.
If your chicken is wet or soggy, dry it with a paper towel.
Dip the chicken in the egg mixture then in the almond meal mixture.
Gently put your dipped chicken pieces onto the lined baking sheet.
Bake the chicken for approximately 16-18 minutes turning once in the middle of baking. Making sure that your chicken pieces are about the same thickness will insure that they will all be cooked at the same time.
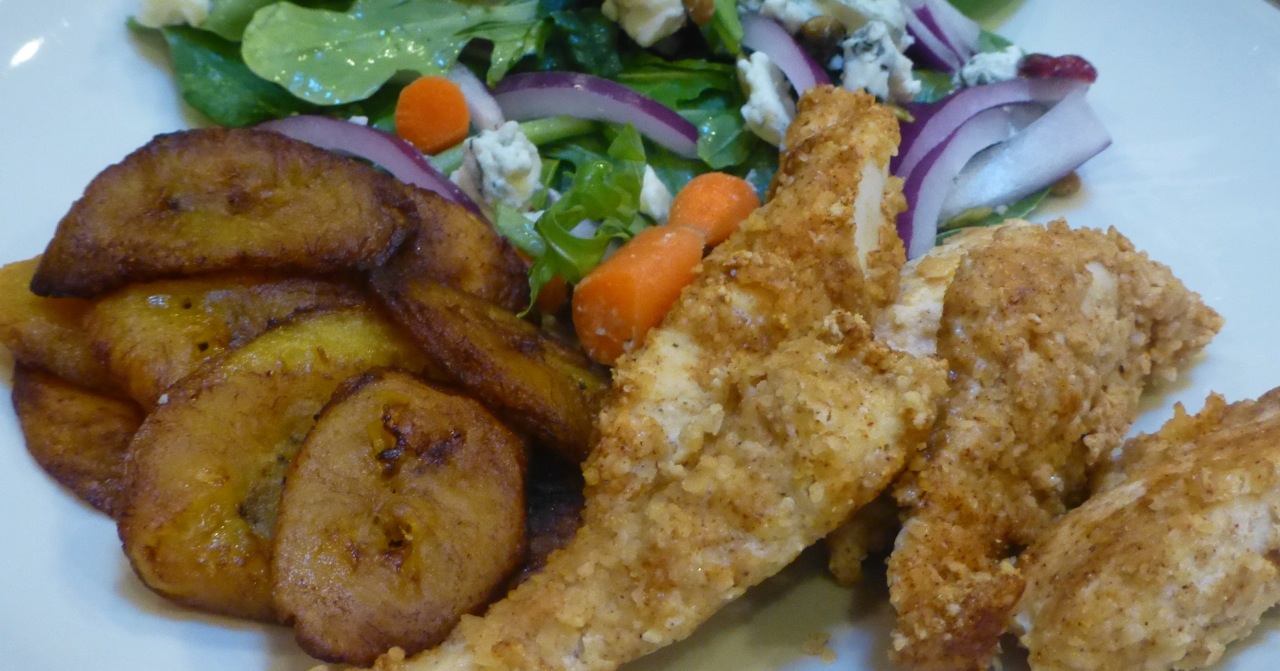
And — that’s it! Simple, no? I served my chicken fingers with fried plantains and a side salad. Enjoy!
Paleo Chicken Fingers
Note: It has been said that paprika has anti-inflammatory and antioxidant properties. Check it out!
It’s muggy. And hot. And humid. Week two of this yuck-i-ness.
Although I’m catching up with a lot of indoor work like hanging pictures, making copies of slideshows I created, etc. I miss working outside in the yard.
My front yard looks quite neglected and the buckthorn in the 1/2 acre of the back of the property must be growing by leaps and bounds.
Still — I can’t manage to get outside to work in the yard. I can barely get motivated to walk outside and get the mail after noon when the mailman drives by.
I’ve noticed that my sinuses are congested and my eyes — my poor eyes. Because we haven’t had much rain in the past 3 weeks, the pollen count has been high.
There is hope for next week though when the weather is supposed to be in the low to mid 80’s during the day and in the 50’s at night. Since I mainly work outside in the mornings, the 50’s sound fantastic to me.
Although my neighbor (and the weatherman) tell me that this heat and humidity is unusual for this time of year, summer is still my least favorite time of year in Minnesota.
Bring on autumn with it’s cooler temperatures — and the leaves!!! I’m sure the lazy squirrels will get moving also.
Is anyone thinking about Thanksgiving already, besides me?
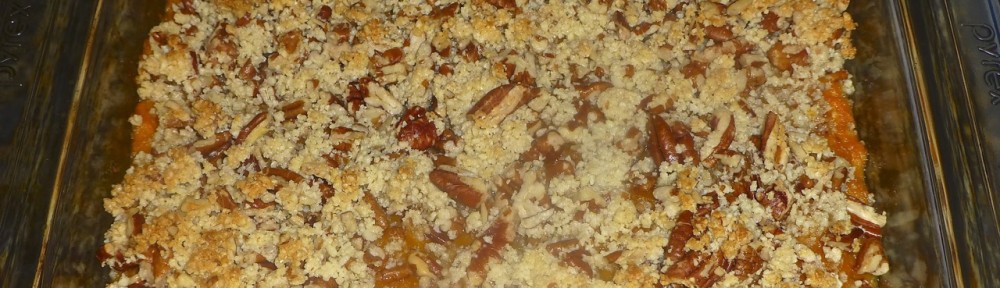
I’ve already tried one paleo sweet potato recipe but thought I’d try another one as a side dish for one of our dinners. This one turned out pretty good — yes, pretty good. I would definitely feel comfortable serving it to any guests we might have.
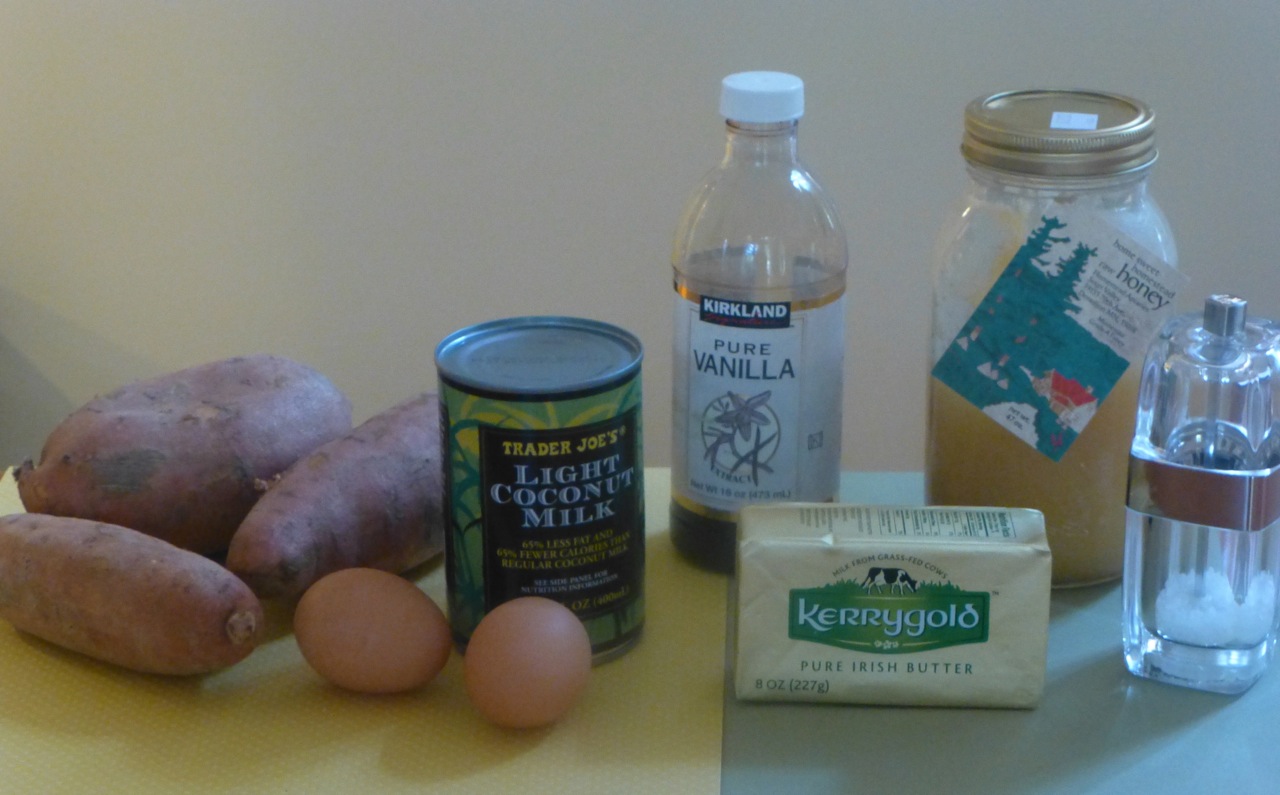
There are two sets of ingredients — one for the “inside” and one for the topping. Here are the ones for the “inside:”
Ingredients (1)
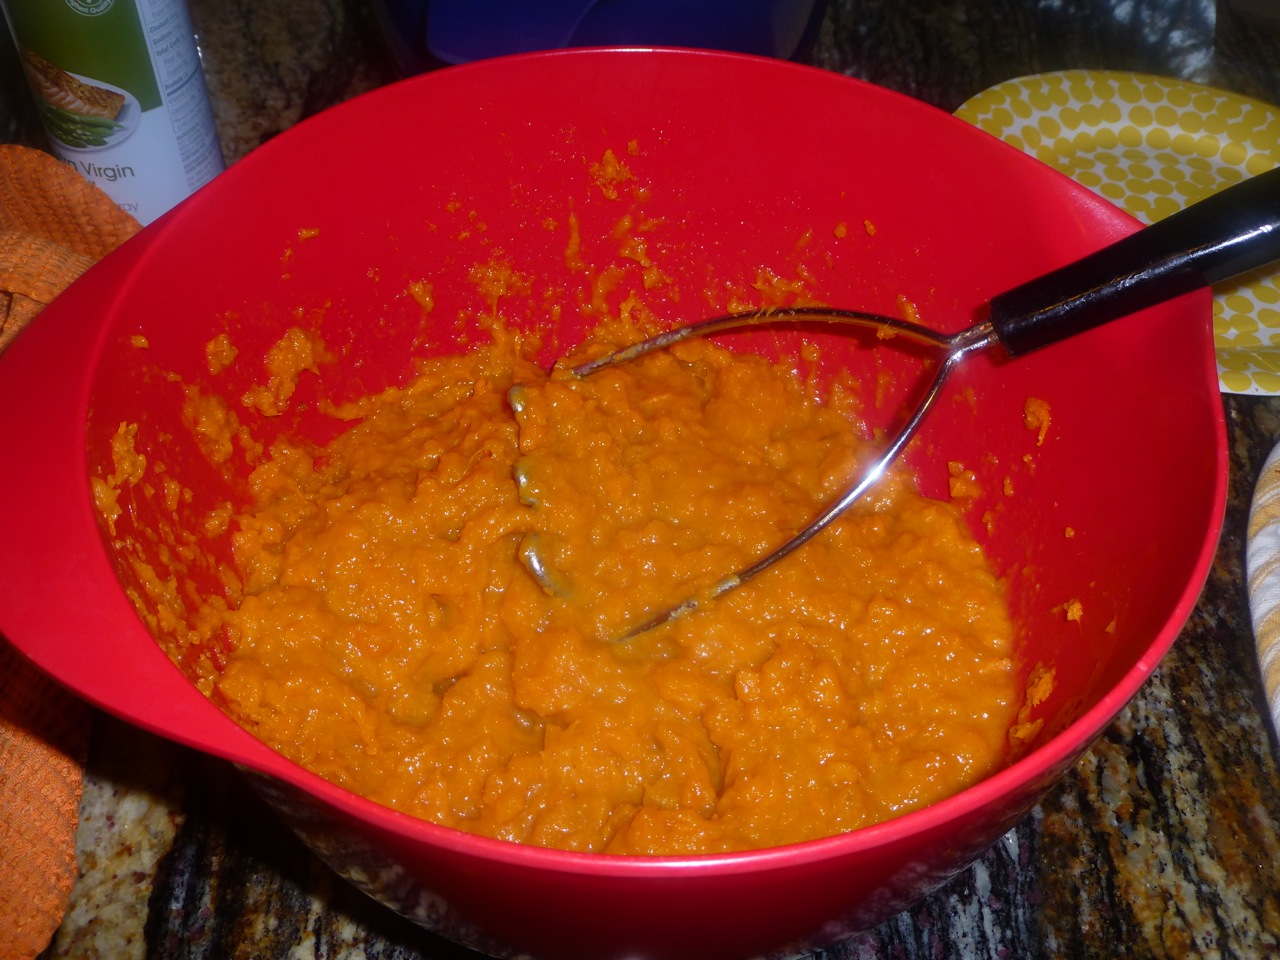
Those sweet potatoes will need to be baked until they’re cooked, skin removed and then mashed.
Bake, Peel and Mash Sweet Potatoes
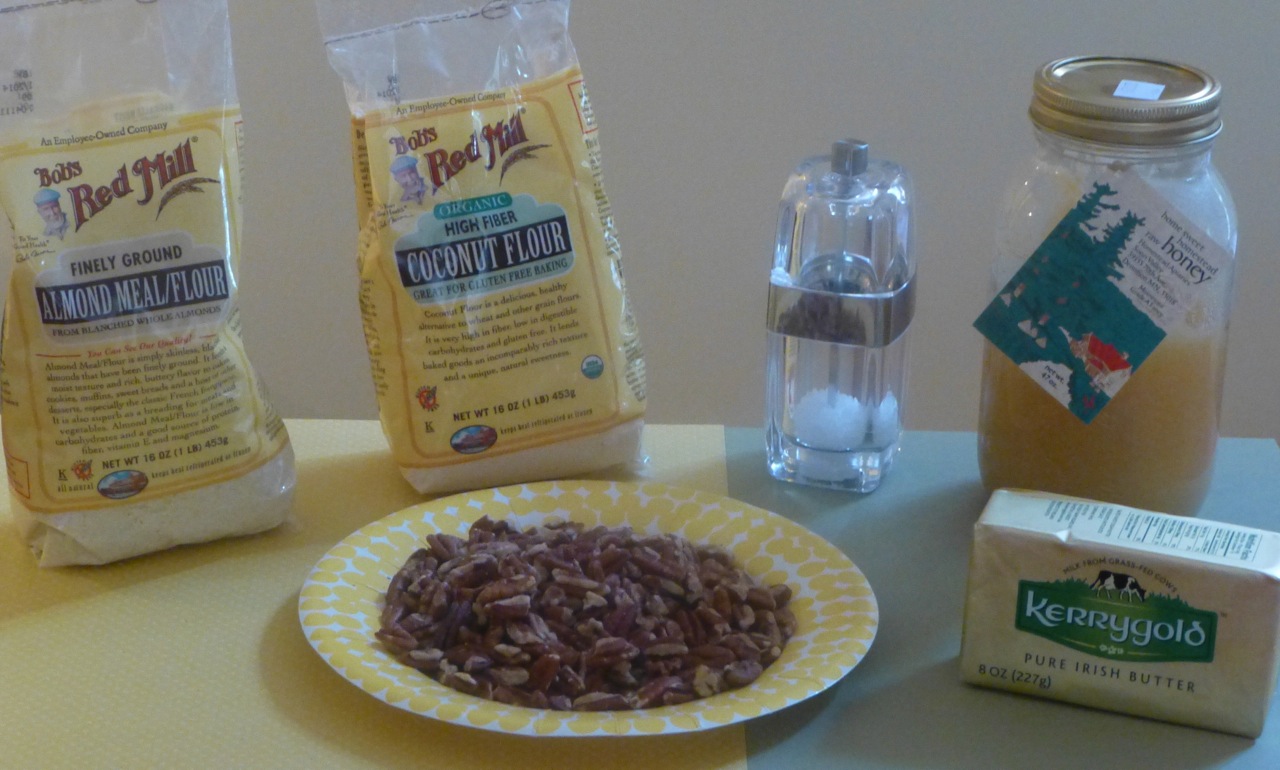
Here are the topping ingredients …
Topping Ingredients
Not too many, eh?
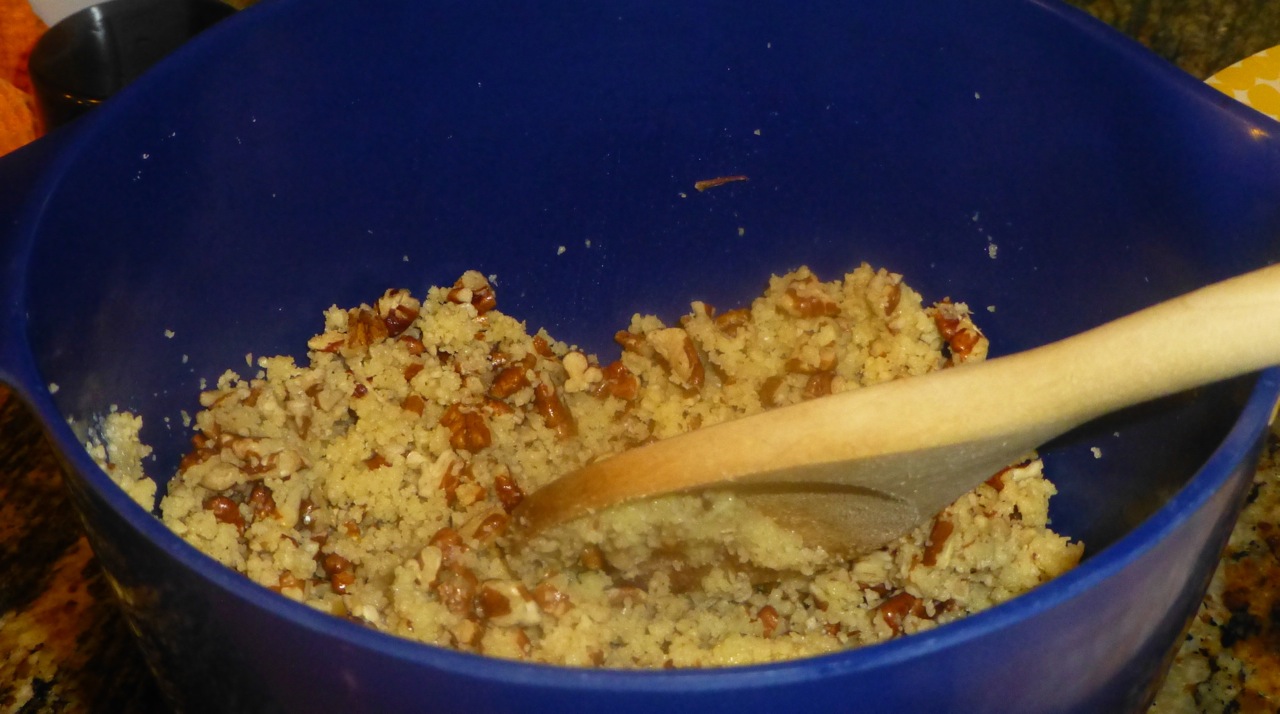
You’ll be combining the topping ingredients all together. It will look similar to this:
Combine Topping Ingredients
After all the ingredients for the “inside” are put together they will be put in a casserole dish and then the topping will be layered on top and then baked.
Are you ready to try it?
Ingredients (for the potatoes)
3Â cups baked sweet potatoes, I used one large, 1 medium and 1 small
1/4Â cup honey
2Â large eggs, beaten and at room temperature
1/2Â cup unsalted butter, melted (8 tablespoons)
1/2Â cup coconut milk
1 1/2Â teaspoons vanilla extract
1/4Â teaspoon Kosher Salt
Ingredients (for the topping)
1Â cup almond flour
2Â tablespoons coconut flour
2Â tablespoons honey
1/8Â teaspoon Kosher Salt
4Â tablespoons butter, melted
1Â cup chopped pecans or you can use walnuts if you prefer
Directions
Preheat your oven to 350ºF.
Bake your sweet potatoes until a fork pricked through the thickest section of the potato goes through with no resistance. (The potatoes will probably be “leaking” by now.) Remove the potatoes from the oven and let them sit until they cool.
While the potatoes are cooling, work on your topping (see step 9).
Once cooled, peel the potatoes and put them in a bowl then mash them well.
Add the honey, eggs, butter, coconut milk, vanilla and salt to the mashed sweet potatoes.
Combine all the ingredients thoroughly.
Add the potato mixture to a 9×9 baking dish.
Place the almond flour, coconut flour, honey, salt and butter in a medium bowl.
Stir to combine the ingredients well.
Add the pecans to the topping mixture and stir to combine.
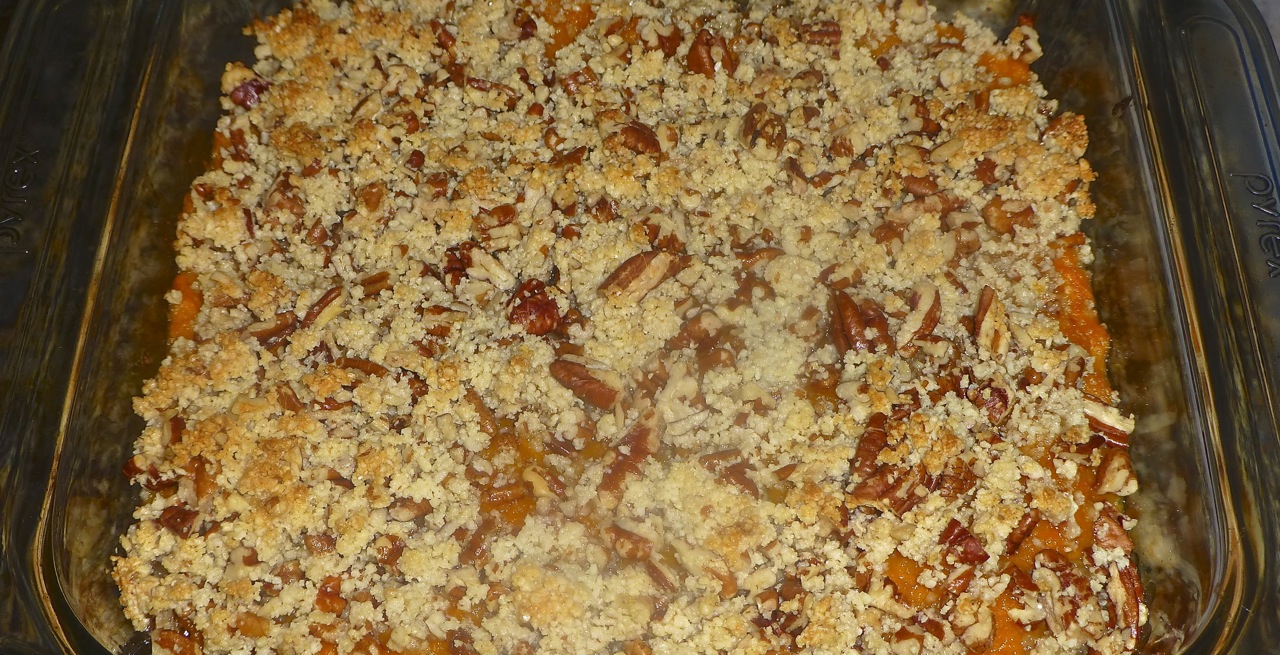
Sprinkle the topping mixture in an even layer over the sweet potatoes.
Bake for approximately 20 minutes.
My picture didn’t come out the best but this tasted great!
While working outside recently, I noticed that the side of the garage looked dirty so I took a water hose to it and sprayed it clean. The next day, I went to the basement to look for a box to mail a package and noticed that there was water on the basement floor. Ugh!
Fortunately the water was contained to the room that has a concrete cement floor and did not spill over into the carpeted room next door. I thought (for sure) I had caused this backup by hosing down the side of the garage. I called my husband at work to let him know of the problem and when he arrived home, he went downstairs and examined the area.
Thankfully, I had not caused the problem. It appeared to be caused by a backed up drain that the air conditioner and water softener flow into. I cleaned up all the water with a mop as we decided how to proceed.
Since we had recently had our septic tanks cleaned out and they had been quite full, I wondered if the backup might be related. The repairman who came out and cleaned the tanks was due to come back the following day as he had checked with the company who installed the tanks and learned that the effluent filter was the cause of the backup so he was coming to remove the filter along with the associated wire that ran to the alarm.
Anyway, when he arrived the next day I told him about the problem and asked him if he thought it was related. He said it wasn’t but that he would look at the backed up drain when he finished his work.
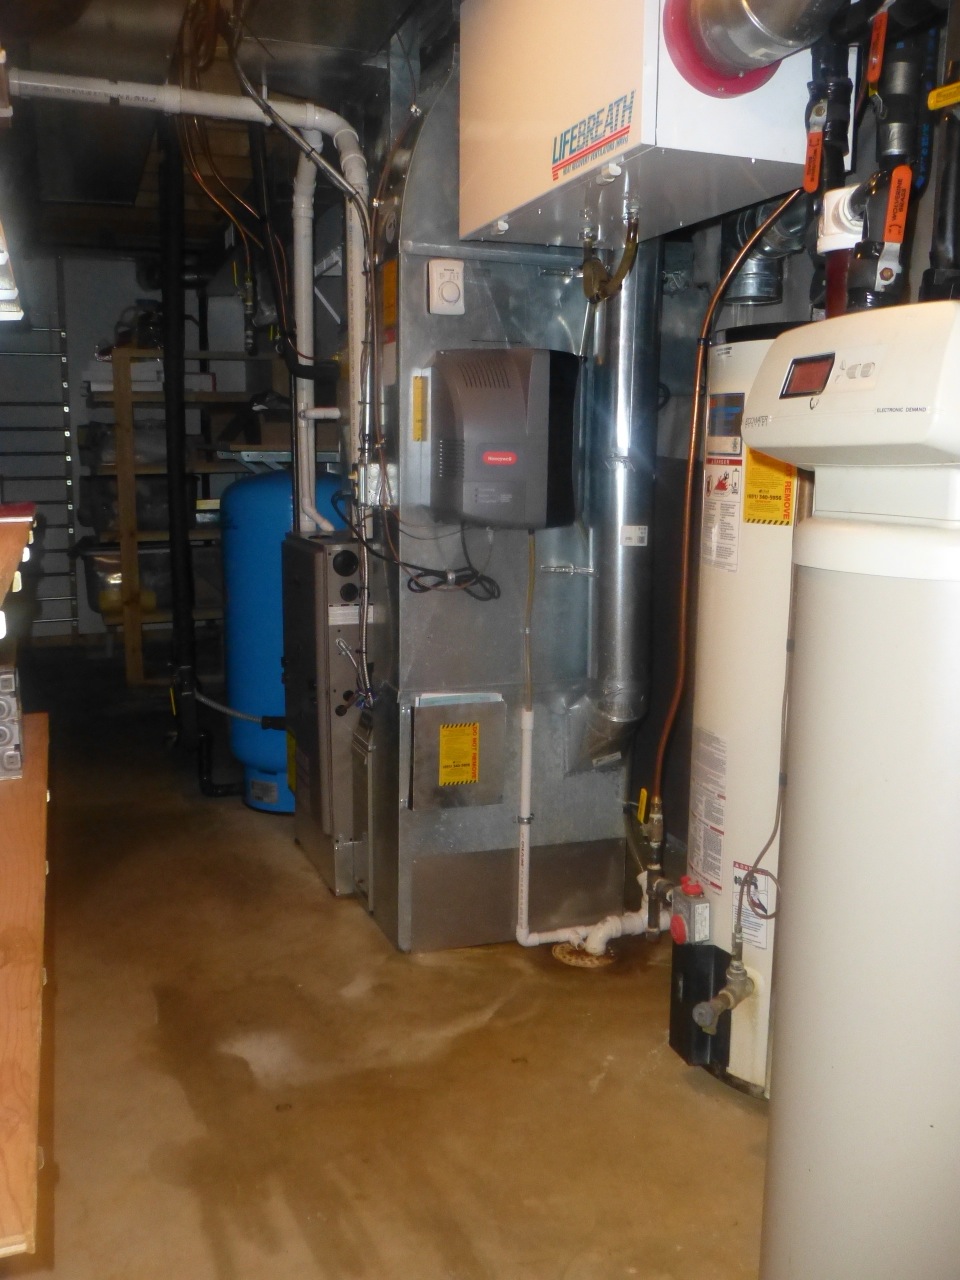
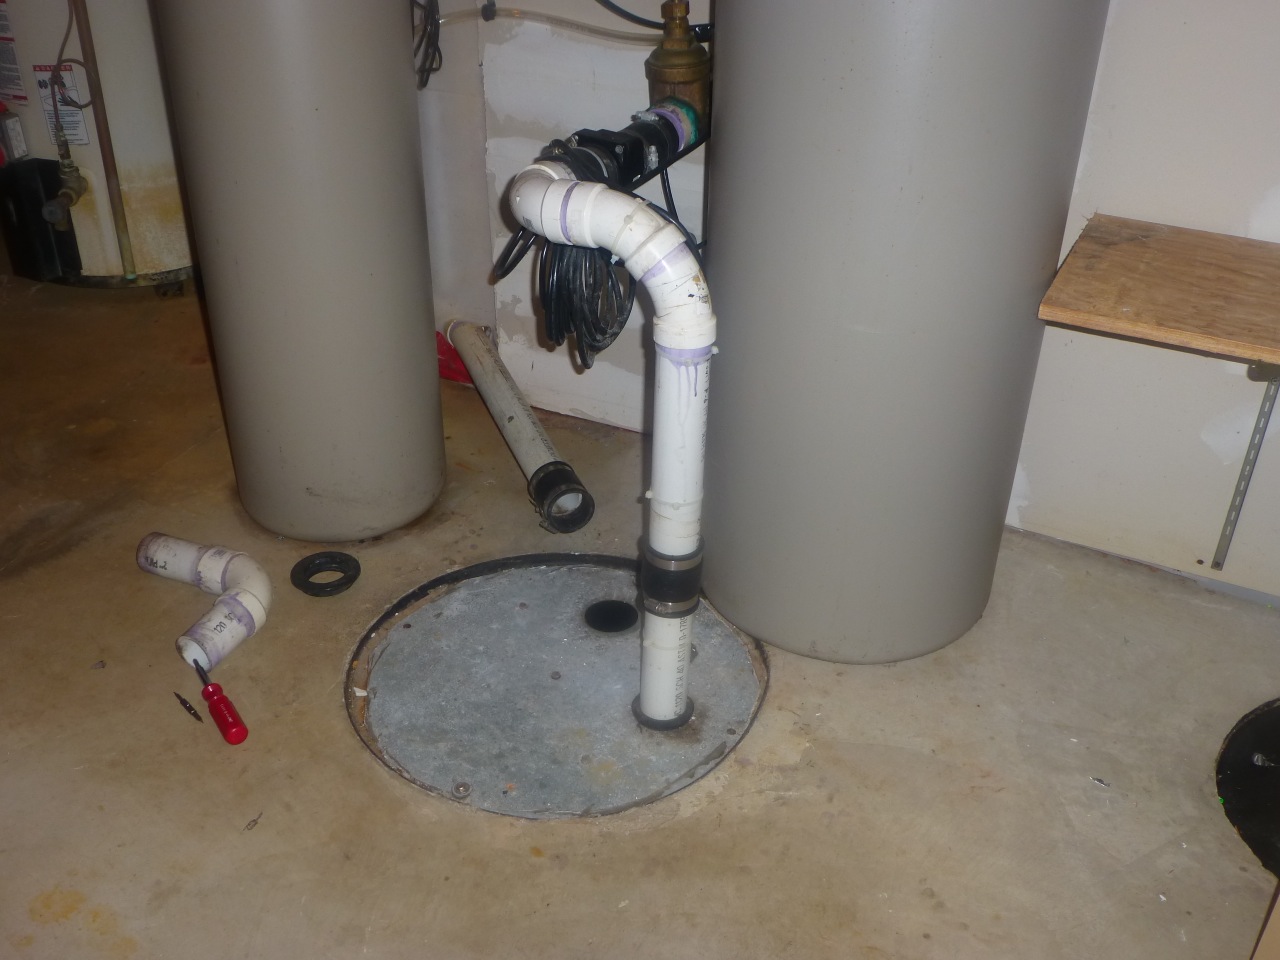
Once downstairs, he unplugged the sanitary lift station and ran it manually. It worked fine. He said it was possible that the lift station had a faulty float. Apparently, this lift station has a float like what you see in a toilet tank. (I’m learning so many new things in this house.) Â Here’s a picture of the area we’re talking about. See the water stains?
Basement Drain
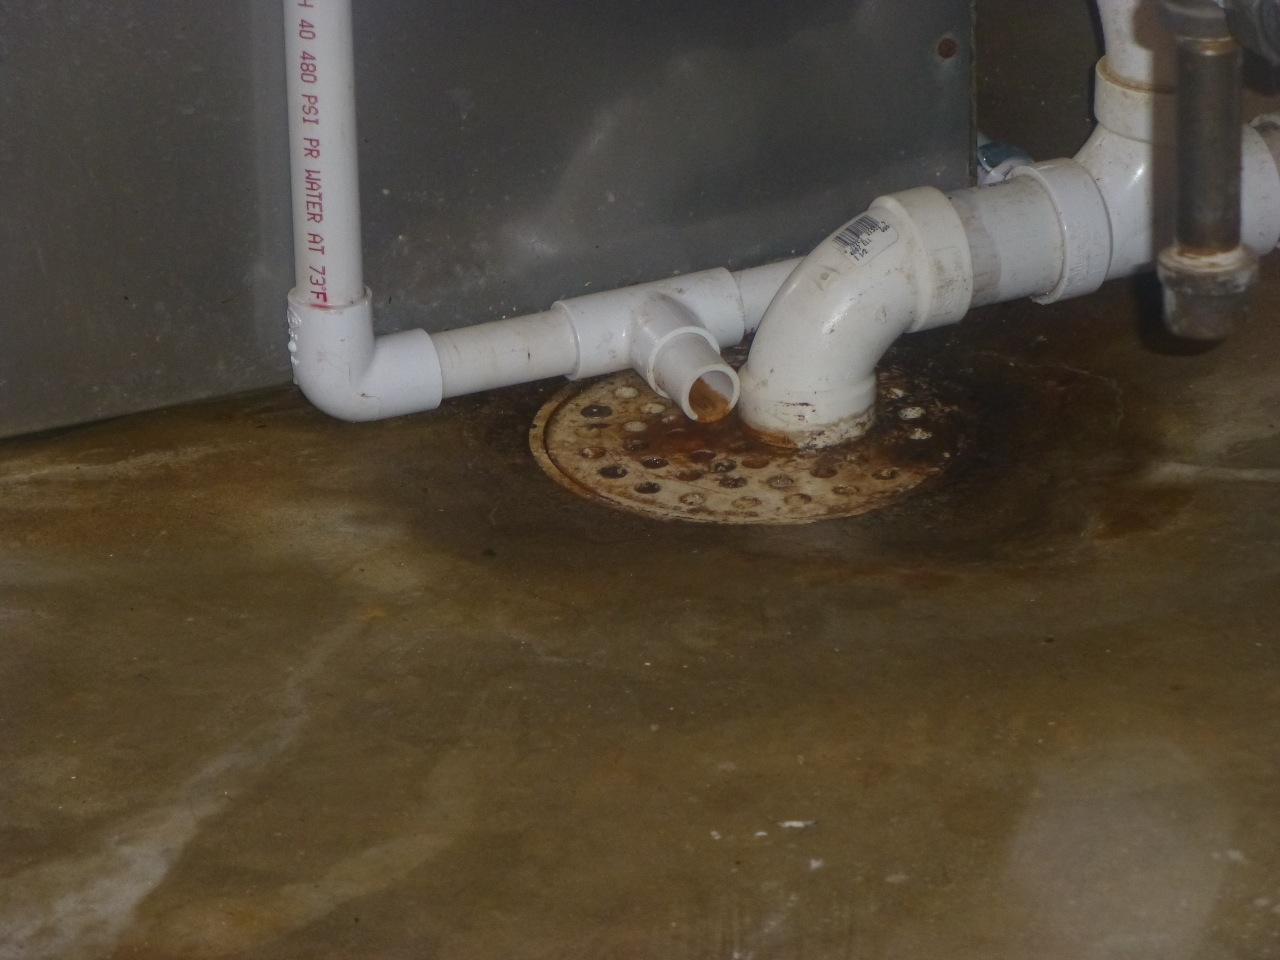
And a closer look of the drain …
Basement Drain
Our foundation seems to slope a little so none of the water made it to our sump pump but instead flowed down to where we had some boxes stored. Fortunately only the bottoms of the boxes got wet. Whew!
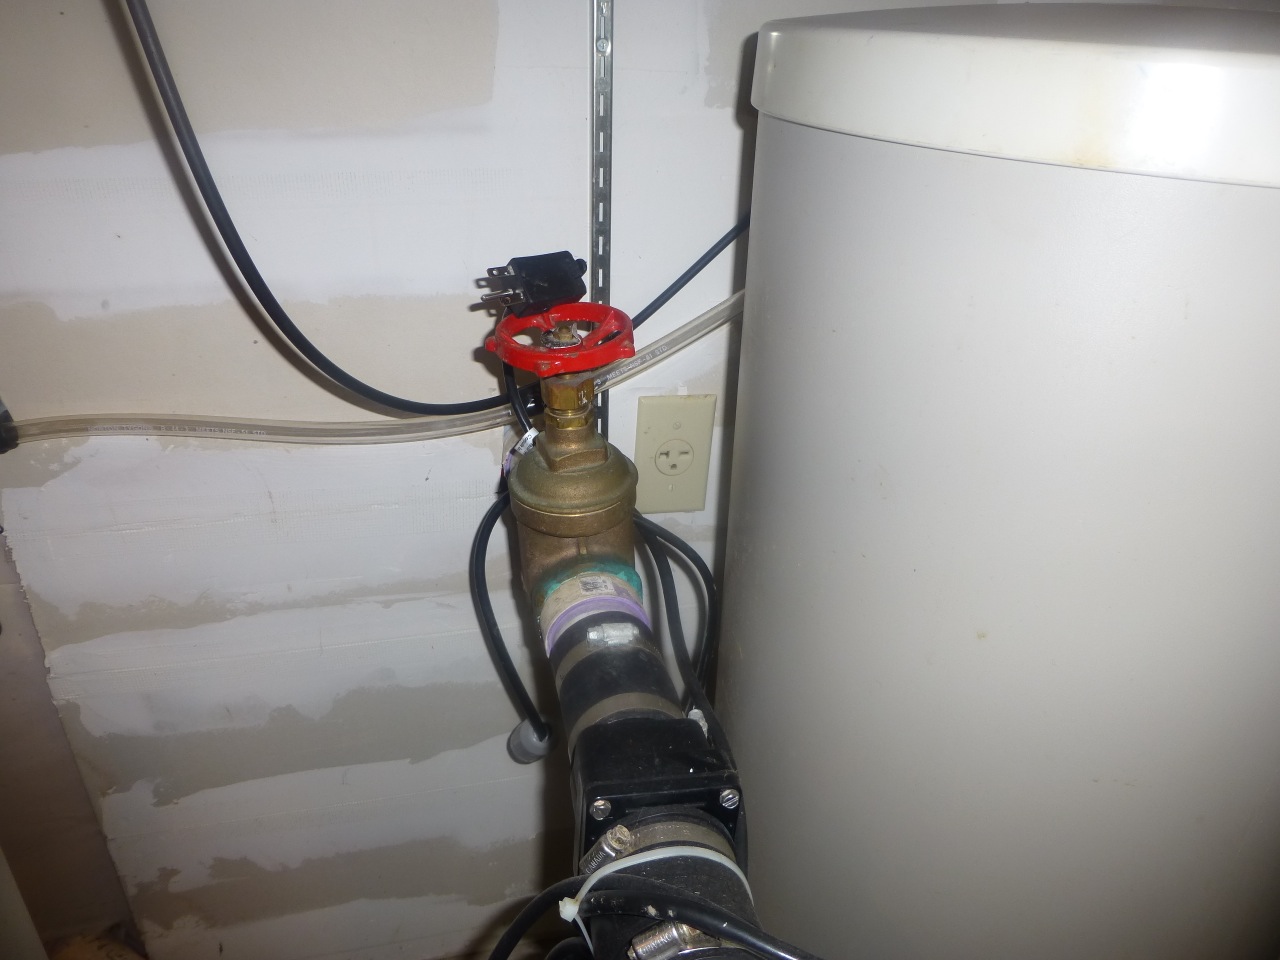
Here is what the sanitary lift station looks like (with the cover on, of course).
Sanitary Lift Station
The repairman had to test to make sure the pump was working. The pump and the float are both located inside this lift station in what is called a “well.” There is an electrical plug that runs to an outlet (see picture below). Well, actually, there are two (2) plugs. Both the pump and the float have plugs but the plug for the pump gets plugged into the float plug which gets plugged into the wall. Whew! That was a mouthful! (laughing)
So — basically, only one plug gets plugged into the electrical outlet.
Sanitary Lift Station Plug
The way the repairman tested the pump was to unplug the pump plug from the float plug and directly plug it into the electrical outlet so he could bypass the float. If it worked then the pump was fine. And … it did. (I was thankful for that because I didn’t want to worry about needing a new pump.)
So — now to determine the problem. The lift station cover was removed in order for the repairman to test to see if the float was working. With the cover off, he stuck his hand in the well and lifted the float and you could hear the lift station working.
After troubleshooting a little more, he determined that the pipe that goes into the well was rubbing on the float inhibiting it from working properly. He readjusted the pipe, used cable ties to hold them in place then put everything back together.
And — it works. It’s been a week since he performed the adjustment.
I usually am not interested in how things work but I’m finding myself more curious about the things in this house, especially since we have a well and septic system.
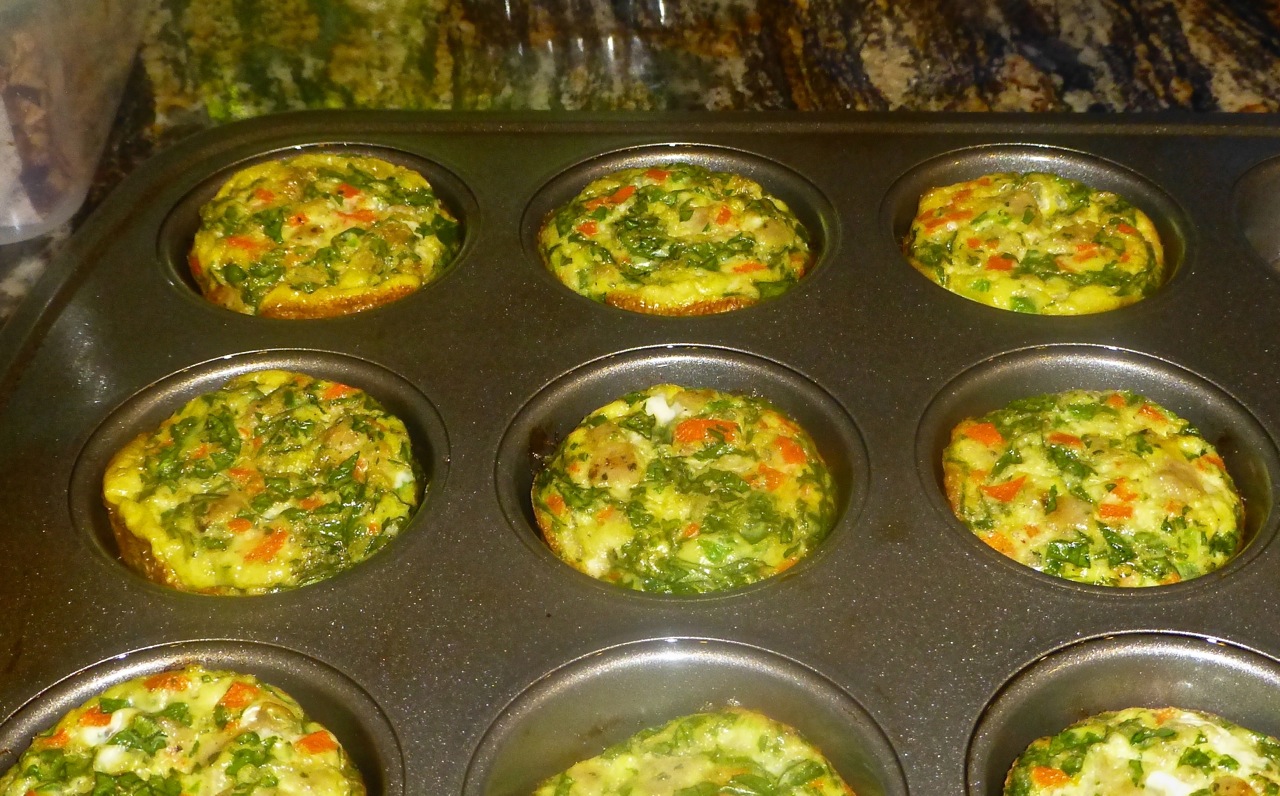
This paleo Egg Muffin recipe might seem boring to some but I like it because it’s a way to grab something really quickly in the morning when you’re in a rush or simply don’t want to take the time to make something.  Next time I make these I’ll add a little more “spice” to them — maybe even a few red chili flakes.  Ooh la la! (laughing)  That’s a big deal for me because I don’t normally like spicy foods.
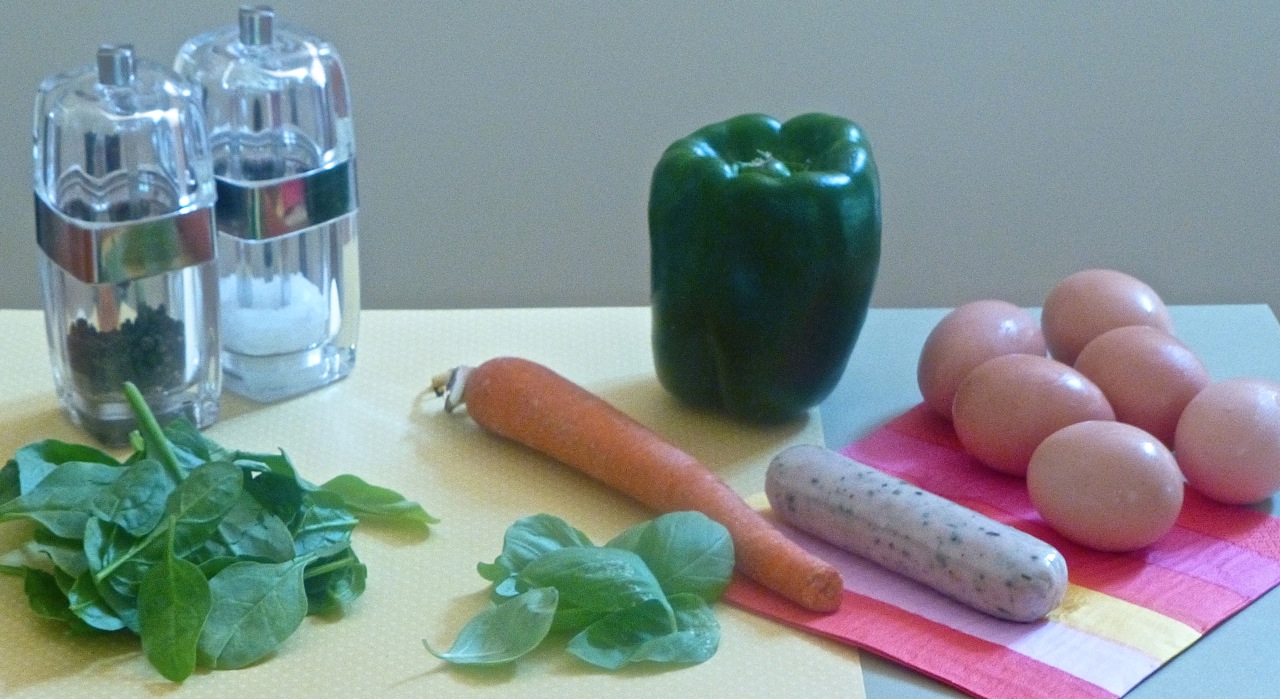
The ingredients are simple enough and can be varied according to your taste. For instance, you could add a really spicy sausage or add a jalapeno pepper to give it more oomph.
Ingredients for Egg Muffins
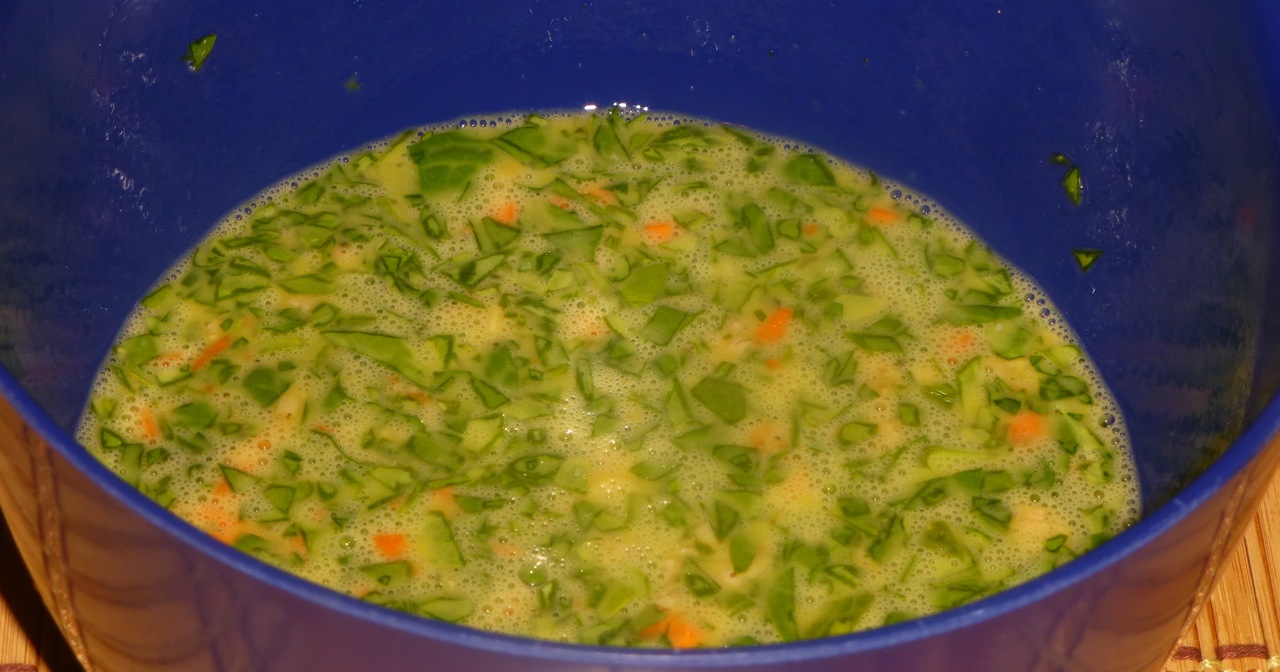
You’ll basically be adding all these ingredients together after prepping them some and then baking it in a muffin tin.
Mix prepared ingredients together
So — are you ready to try it? I halved the original recipe to make sure we would like them so that’s the measurements you’ll see below. Feel free to double it.
Ingredients
1Â mild chicken sausage (I use the ones with no pork casing)
1/8Â cup red bell pepper, diced (I used a green one)
1/8Â cup carrots, grated
1/4Â cup fresh spinach, chopped
1 to 1 1/2Â tablespoons fresh basil, diced
1/4Â teaspoon sea salt
1/8Â teaspoon fresh ground pepper
5 – 12 eggs (I used 6), beaten
Directions
Preheat the oven to 375 degrees.
Grease a 12-cup muffin pan with coconut or olive oil. If you’re not making 12 muffins, put a little water in the empty muffin spaces so it doesn’t burn.
In a skillet, cook the sausage until its cooked through then cut it up into small pieces.
In a medium bowl, combine the cooked sausage, bell pepper, shredded carrots, spinach and basil then set this aside.
In a large bowl, whisk together the eggs, salt and pepper.
Add the egg mixture to the sausage and veggie mixture then stir to combine it all.
Using a measuring cup fill the muffin cups with the egg mixture being sure not to fill it to the rim – about 1/3 cup.
Bake the egg muffins for 20 to 25 minutes or until the eggs are set in the middle.
This makes about 9 muffins, can be stored in the refrigerator and reheated the next morning for a quick breakfast. Very nice!
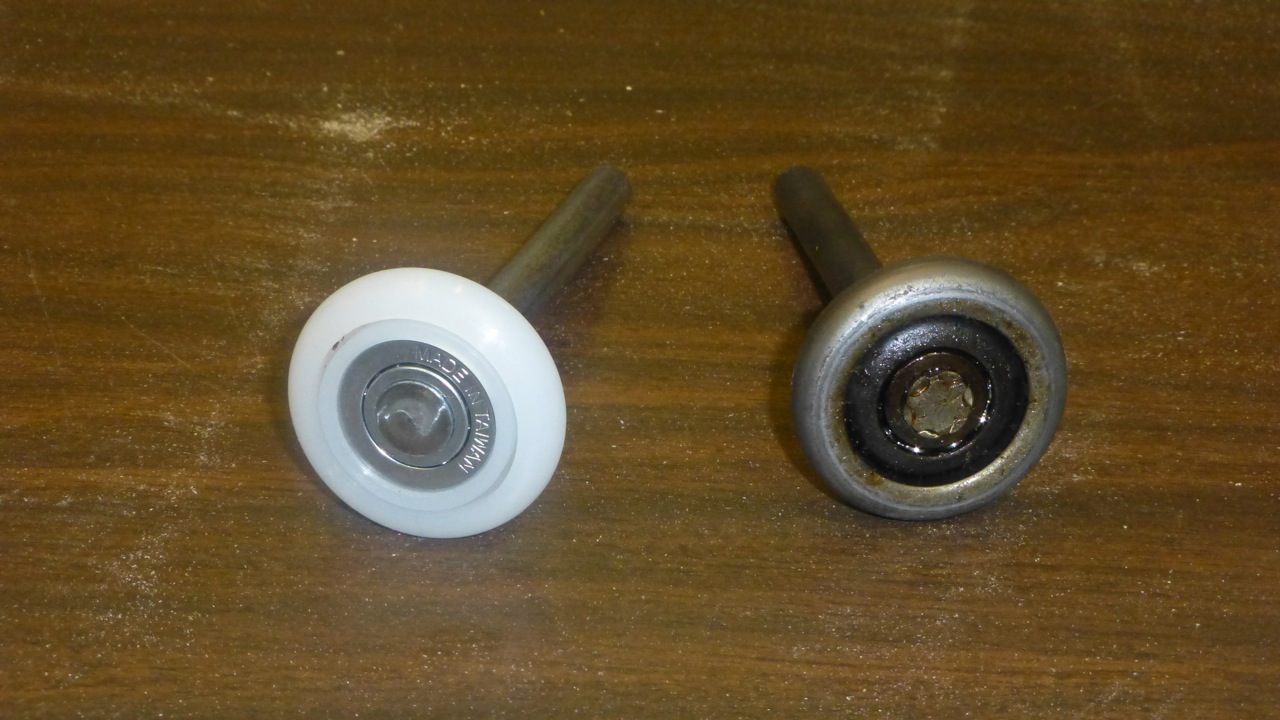
Our house is 20 years old — not very old in “house” years but things start creaking and falling apart right around this age.
So — my husband decided to be proactive and replace the metal garage door opener rollers with nylon ones so the “rolling” would be less noisy and (according to what he’s read) will last longer.
Well — I would have never, in a bazillion years, thought of changing out those rollers. The doors would literally have to be falling off before it would pop in my head. Thank God for husbands who think ahead.
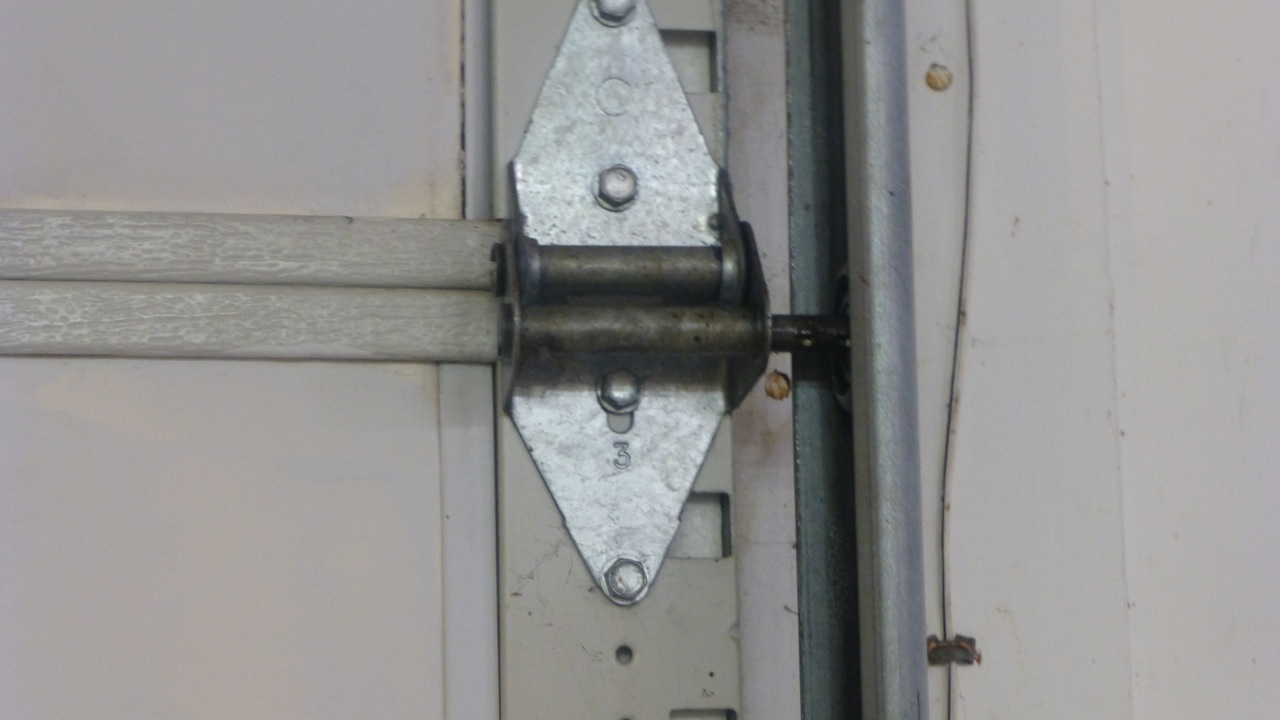
Here’s one of our garage doors … (you didn’t think I was just going to talk about it without pictures, did you?) Notice the metal on the sides of the door? I thought we were going to have to unscrew each latch but my husband said there’s an easier way.
Garage Door
Here’s a look up close. The roller is sitting in a groove in the door. My husband rolled the door all the way up and then, one by one, took the metal roller out and replaced it with a nylon one.
Metal Door Glide
Here are the two rollers side by side.
Garage Door Rollers
I don’t think the nylon one will stay nice and pretty for very long. Â (laughing)
Just a proactive chore in a regular house. Have you ever replaced yours?
Here’s a video that shows you how to do it both ways.
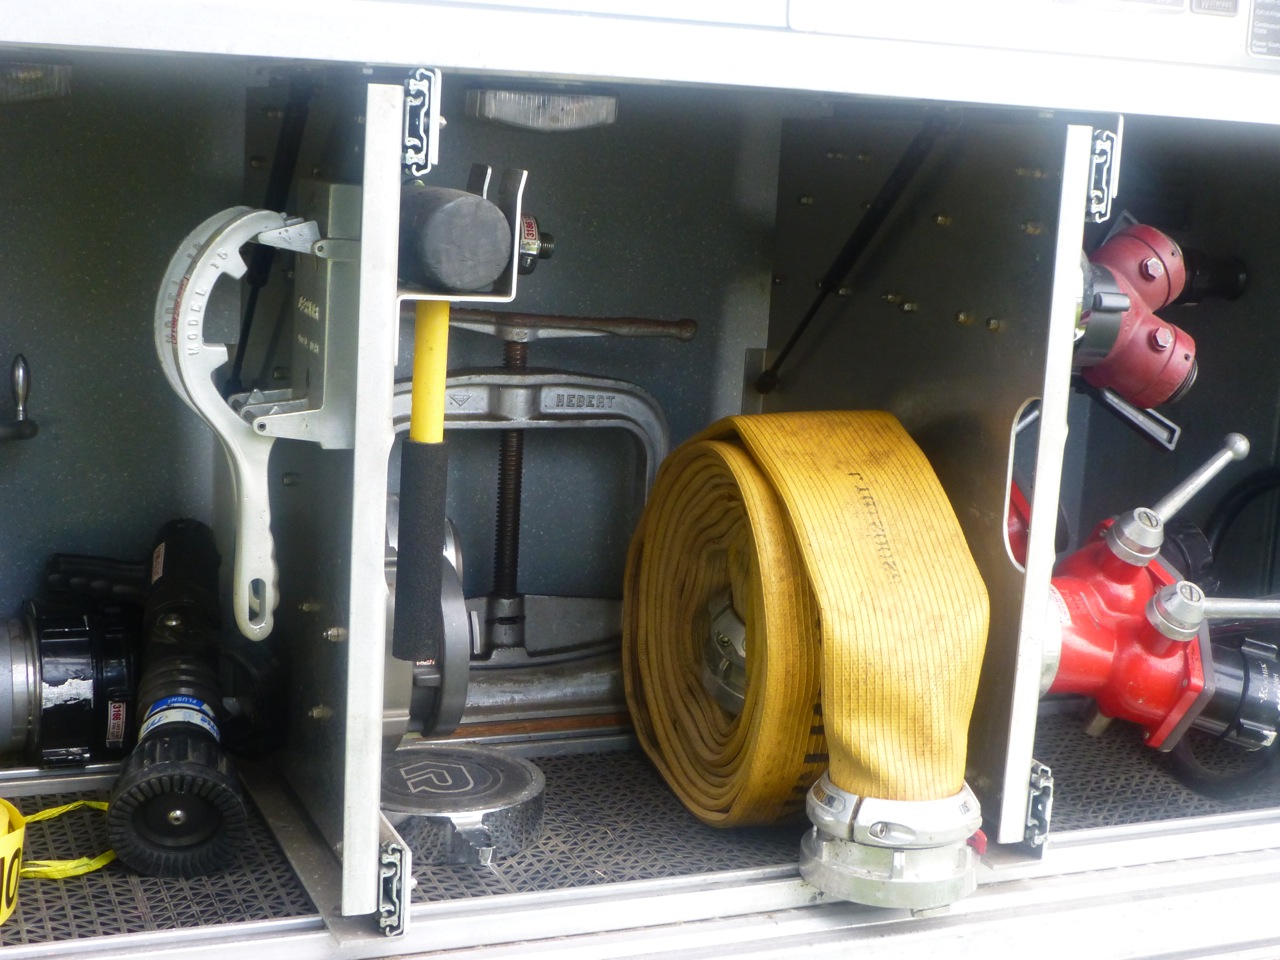
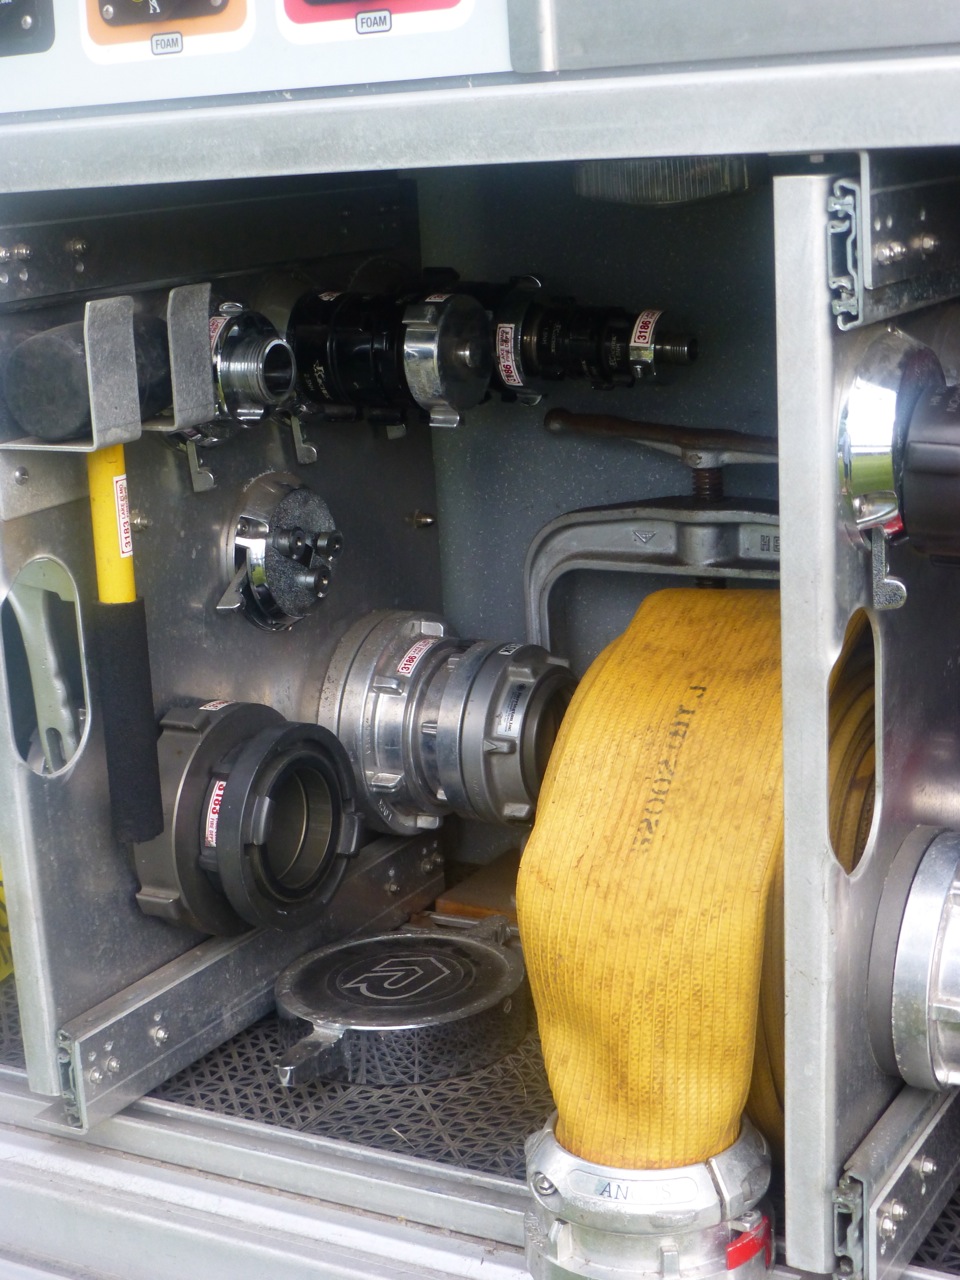
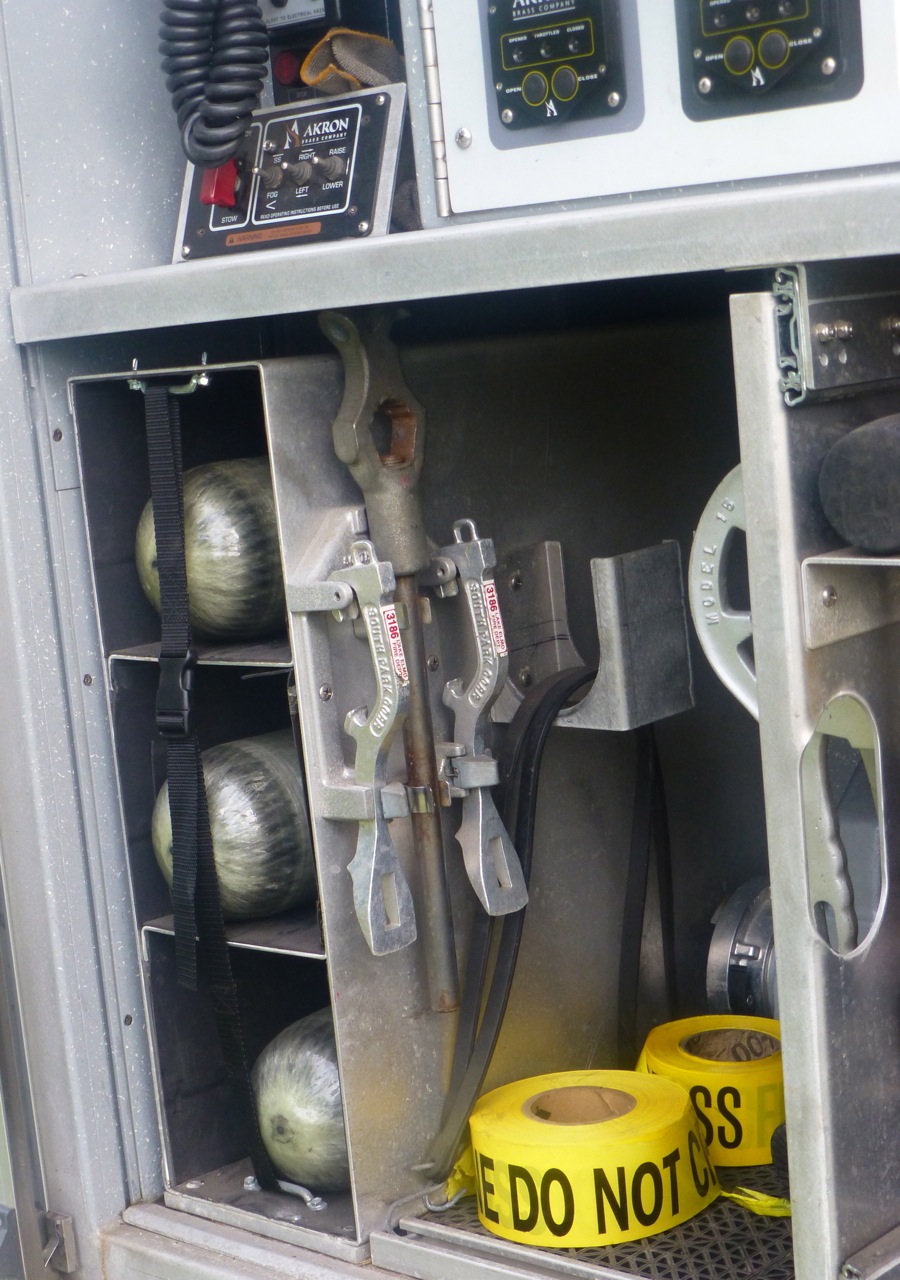
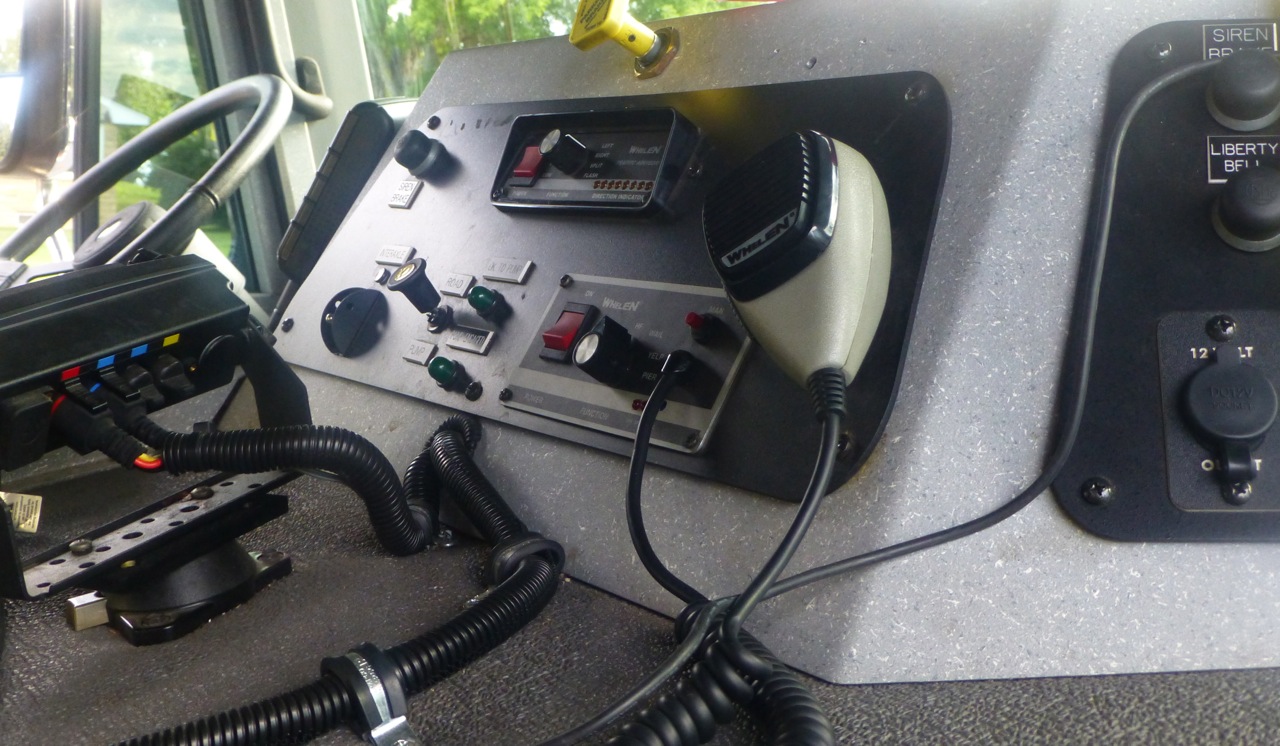
Our home owners association recently had a picnic and the local fire station representative was there. He came on the fire truck — woohoo! Have you ever checked one out? This was my first time. (Yes, I was deprived as a child. Â lol)
Fire TruckFire TruckFire TruckFire TruckFire TruckFire TruckLake Elmo Fire Truck
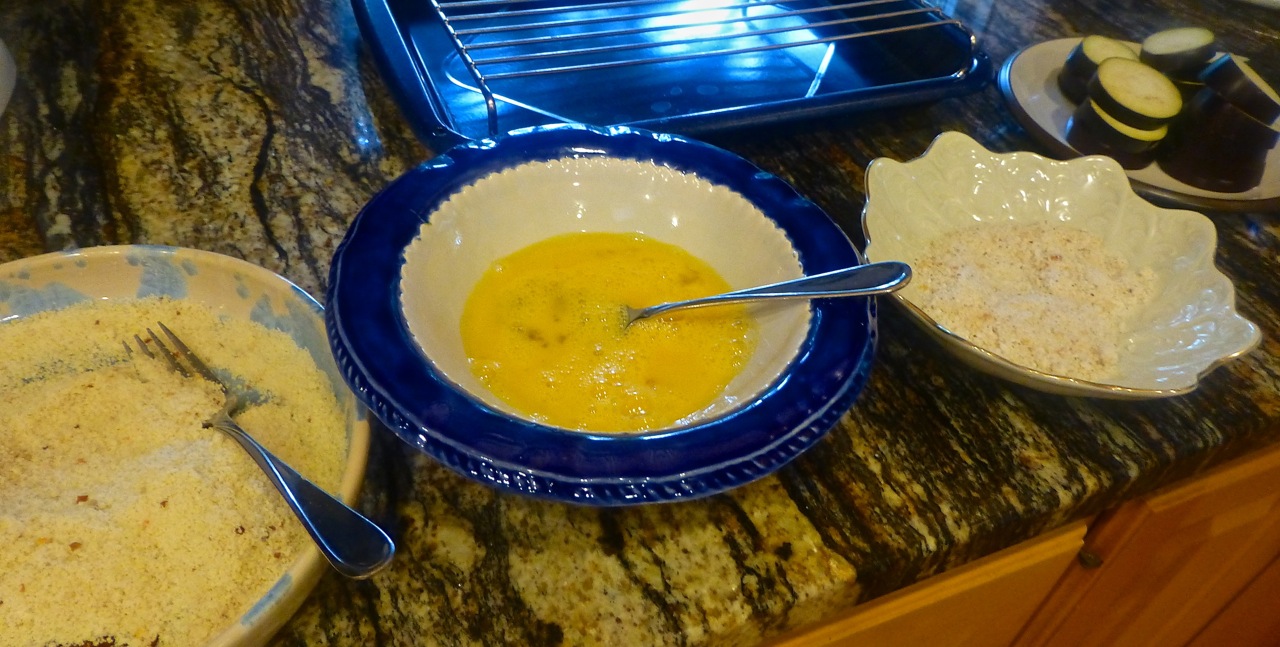
You’ll be setting up a dipping station that will look something like this …
Dipping Station
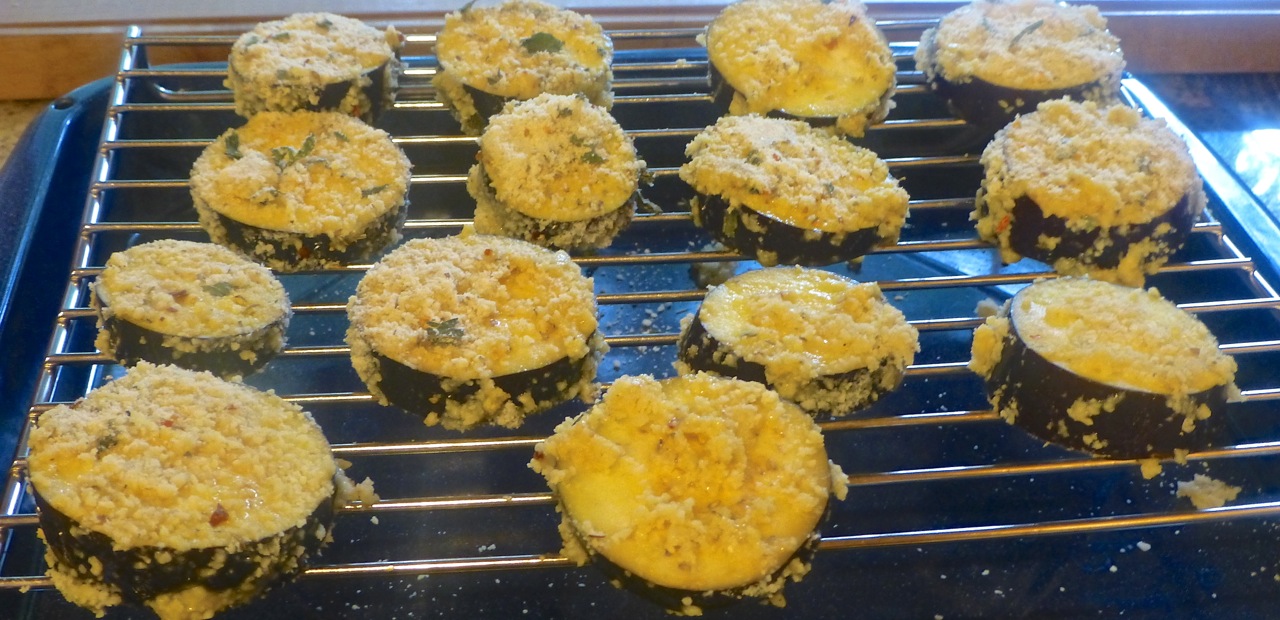
Then you’ll be putting them on a rack for baking after they’re prepared. (it’s a little messy but well worth it.)
Unbaked eggplant on a rack
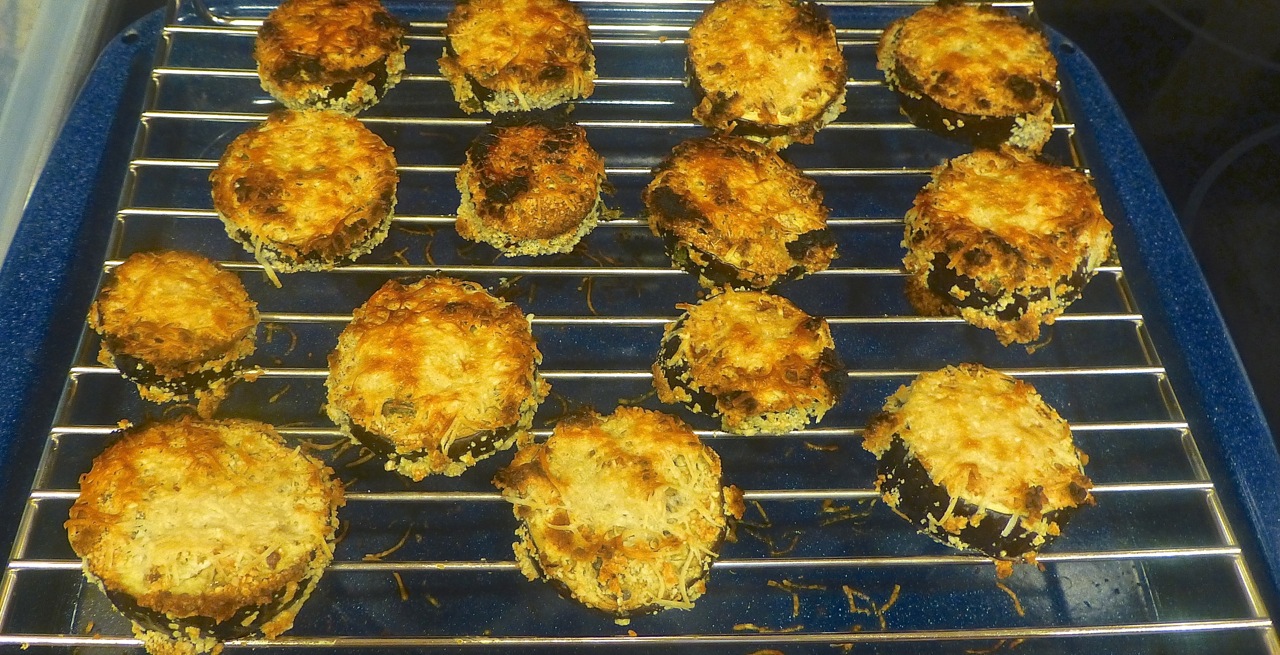
They’ll come out looking like this. Yes, yes, some of them look a tad crispier than others but that didn’t affect the taste.
Baked Eggplant Dippers
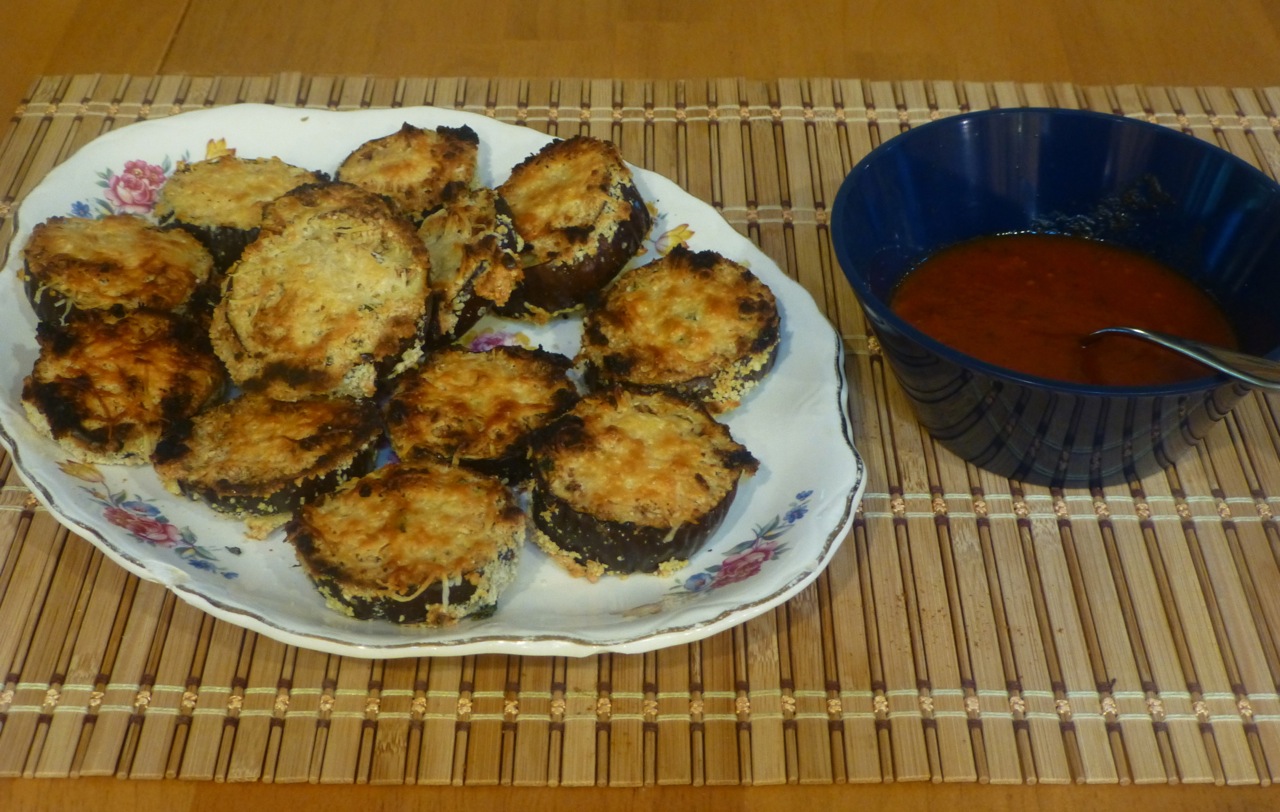
Remove them and place them on a platter. You’ll be serving this with a marinara sauce.
Baked Eggplant Dippers
Ready to try it?
Ingredients
1Â large eggplant, or 3 small
2Â large eggs, beaten
1/4Â cup coconut flour
Salt and pepper, to taste
1Â cup almond meal/flour
1/4Â tsp garlic powder
1/4Â tsp Italian Herb Seasoning (I left this ingredient out but you can add basil or oregano to the flour if you don’t have the seasoning)
red pepper flakes, to taste
1Â jar organic tomato sauce (I messed up a little on this as I forgot to check the ingredients on the sauce and it had added sugar. Bleh! Next time I’ll make my own.)
1/2 cup fresh shaved parmigiano-reggiano
Directions
Preheat the oven to 375 degrees.
Set up a “breading†station using 3 large bowls or plates. In the first dish, add the coconut flour and season with salt and pepper, to taste.
In the second dish gently beat the eggs.
In the third dish combine the almond meal, Italian herb seasoning (if using), and the garlic powder.
Slice the eggplant into 3/4-inch slices.
Coat the eggplant pieces in coconut flour, then in the eggs and finally in the almond meal.
Next, arrange the eggplant pieces on a rack over a cookie sheet (so you don’t have a mess).
Bake this in the oven until crispy about 25 minutes.
If you’re using the cheese, shave the parmigiano-reggiano in a small bowl.
When the eggplant has baked, remove it from the oven, turn them over and sprinkle the parmigiano reggiano on each piece of eggplant (about 1 tablespoon).
Set your oven to “broil” then put the eggplant back in on the middle rack for approximately 4 minutes or until the cheese is melted or bubbly.
Garnish with the red pepper flakes if you like.
Serve with a small dish of marinara sauce for dipping.
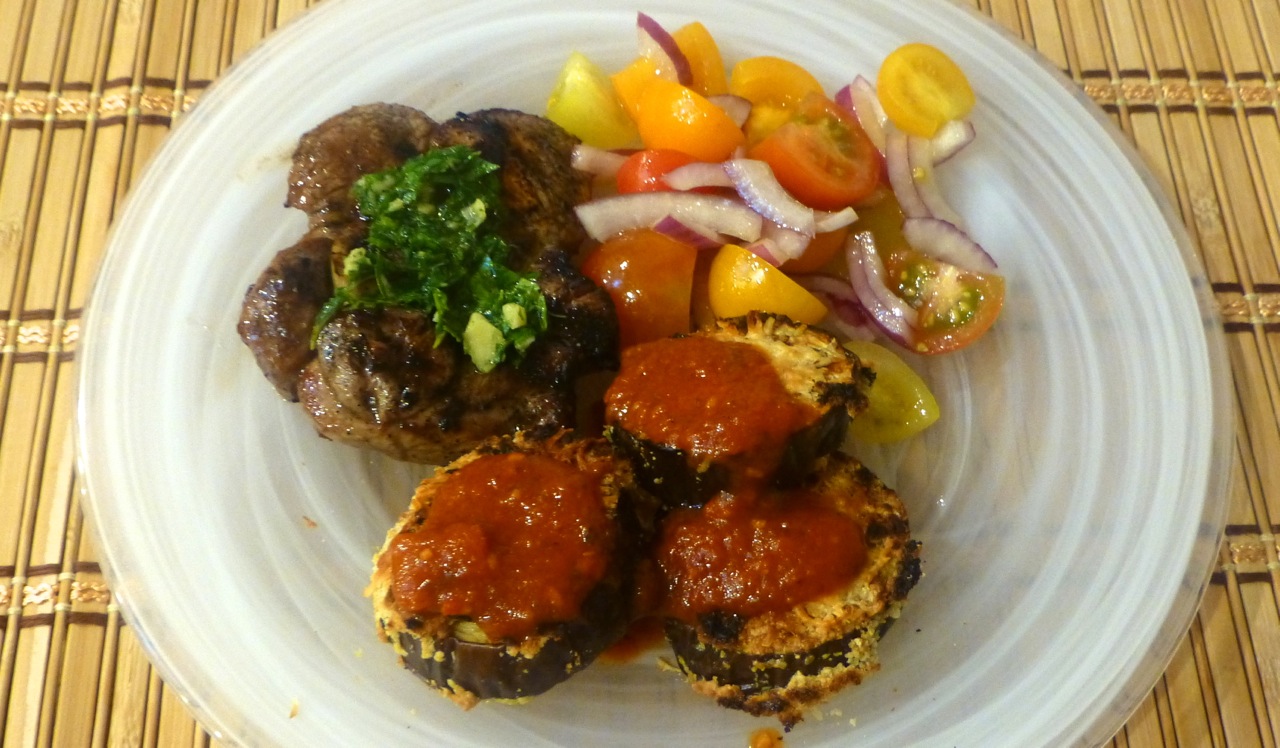
Whala! That’s it! Â Here’s what the final meal looked like.
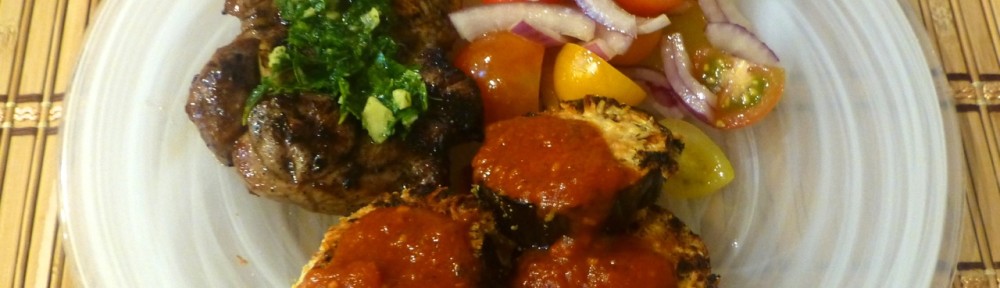
Lamb Chops with Herb and Garlic Sauce and Crispy Baked Eggplant Dippers