Beef Stew

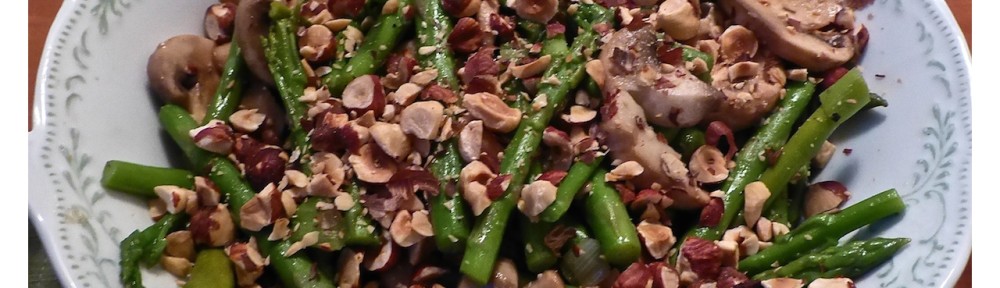
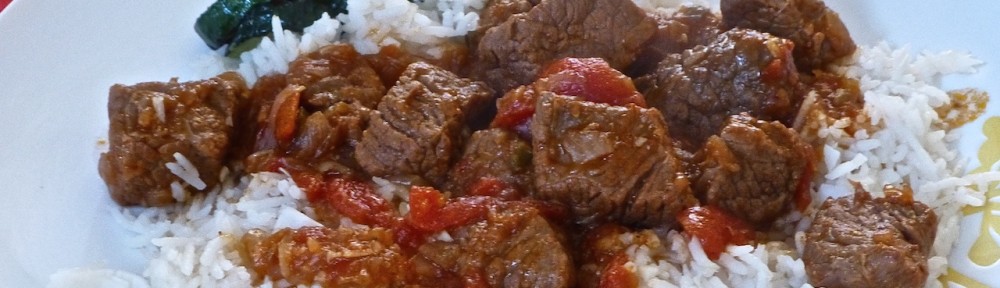
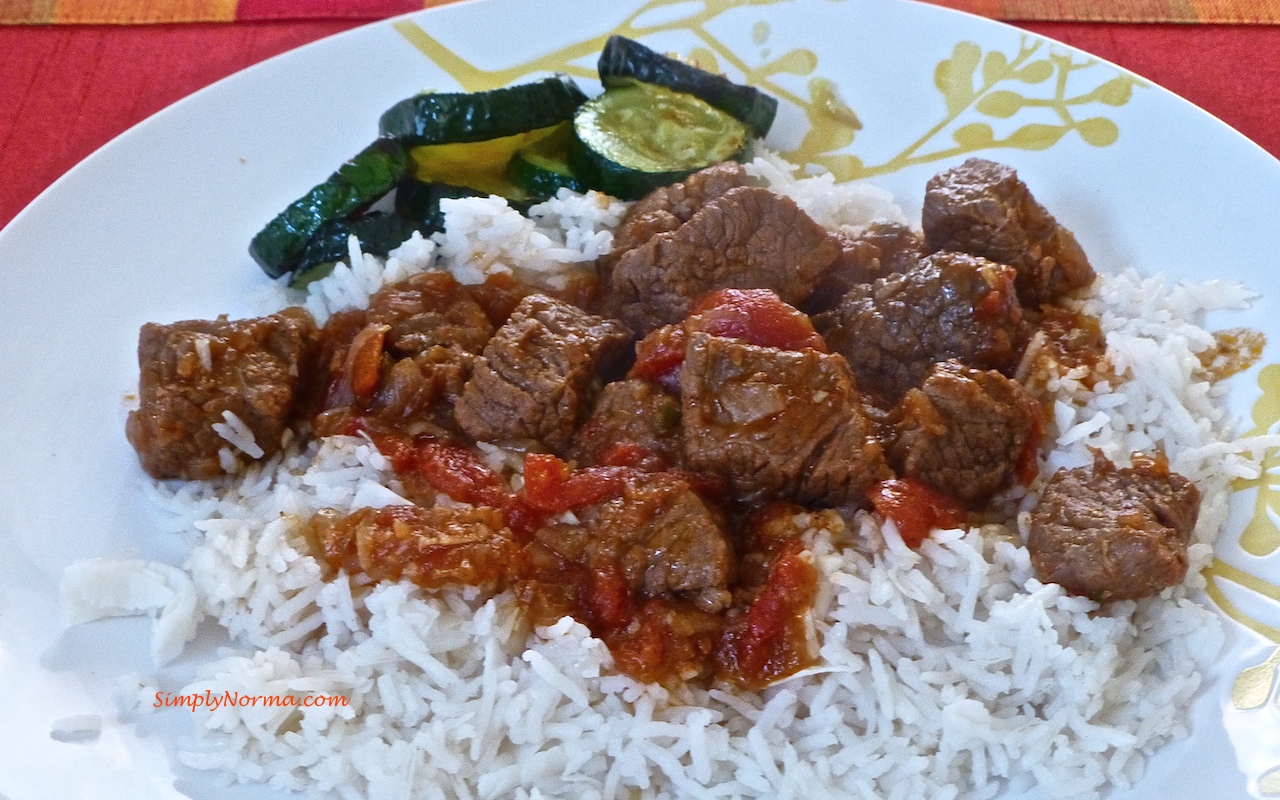
Here’s a paleo Beef Stew recipe that is truly a keeper. The flavors melded so well together and my palette was truly satisfied.

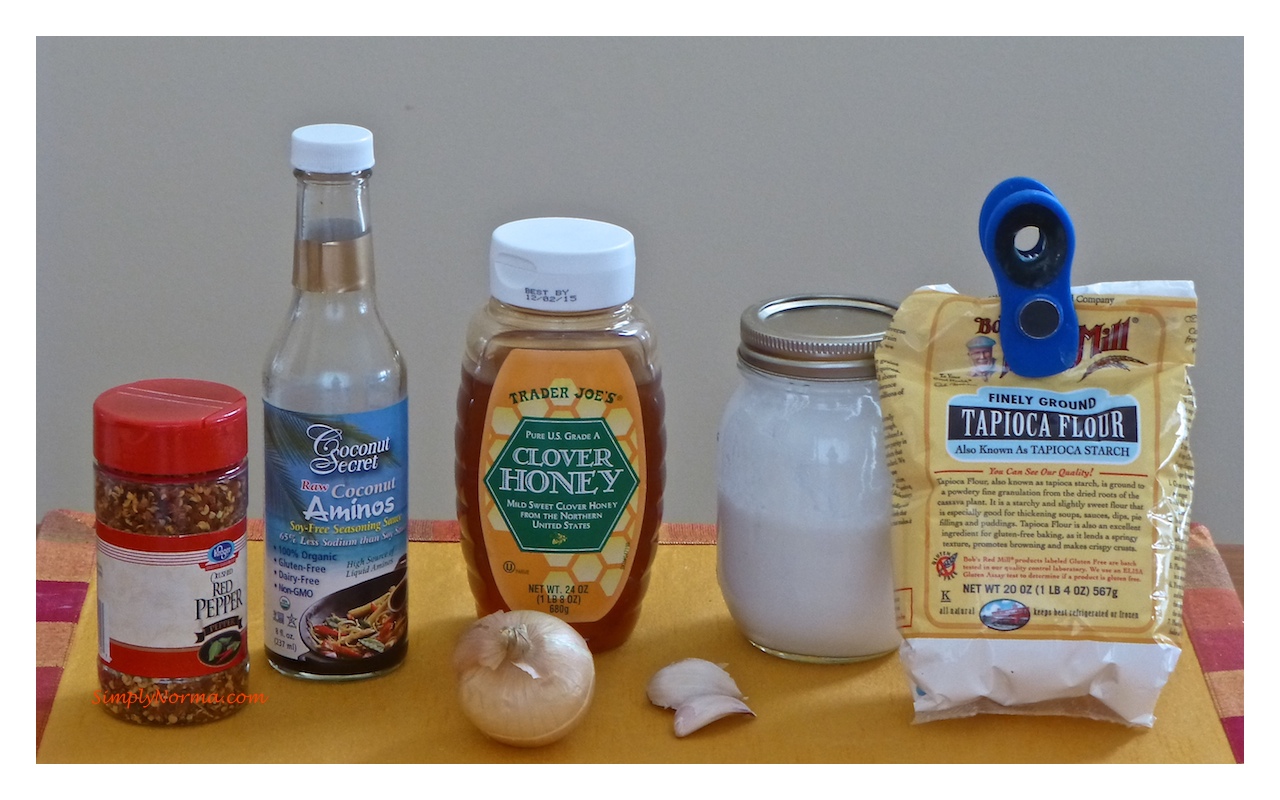
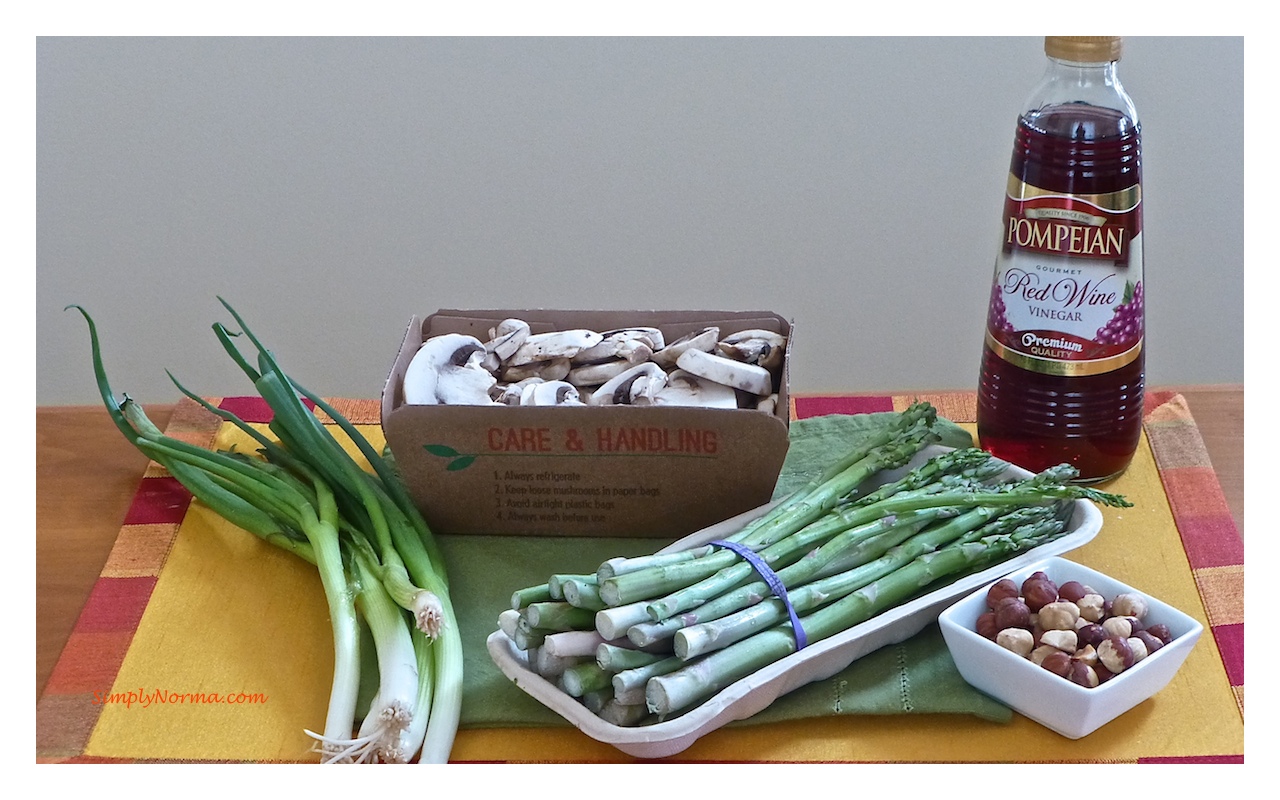
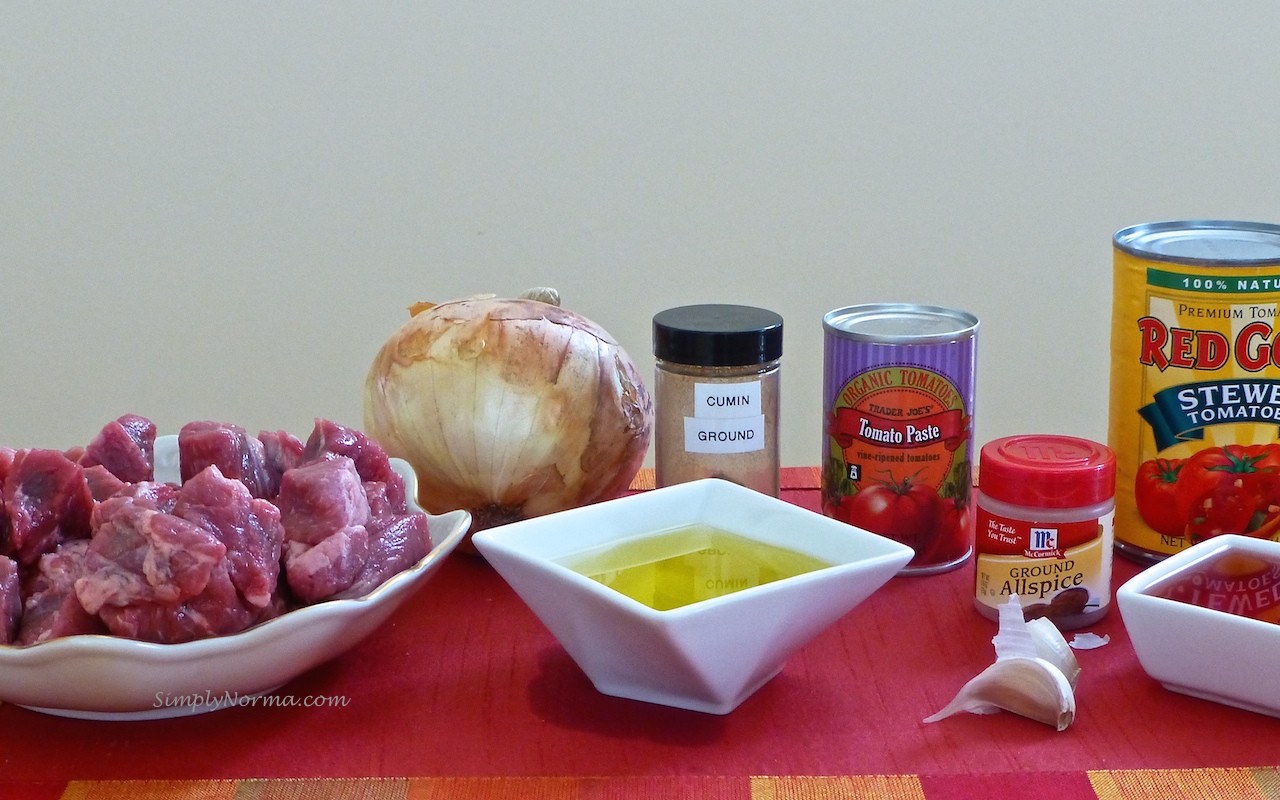
So … let’s look at the ingredients that are needed, shall we? (I did not include a picture of the salt and pepper.)

Ingredients
Ingredients

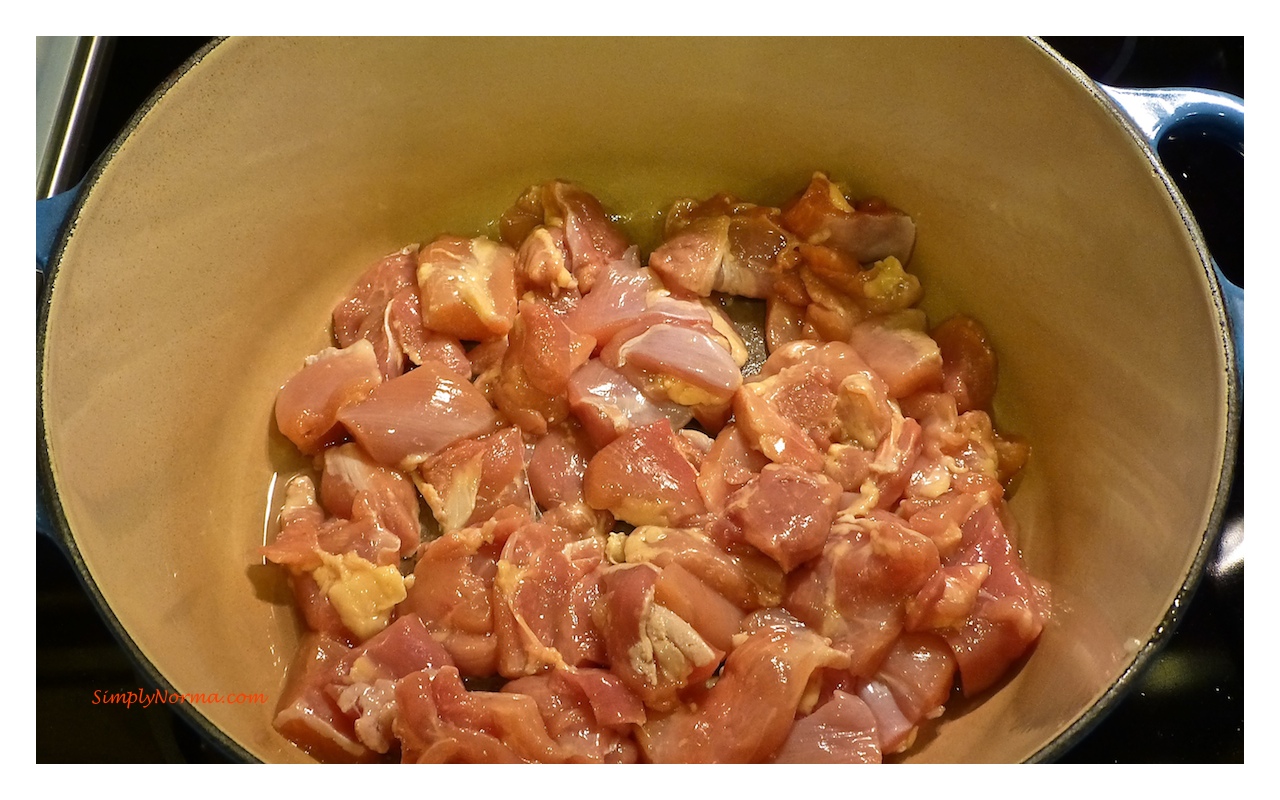
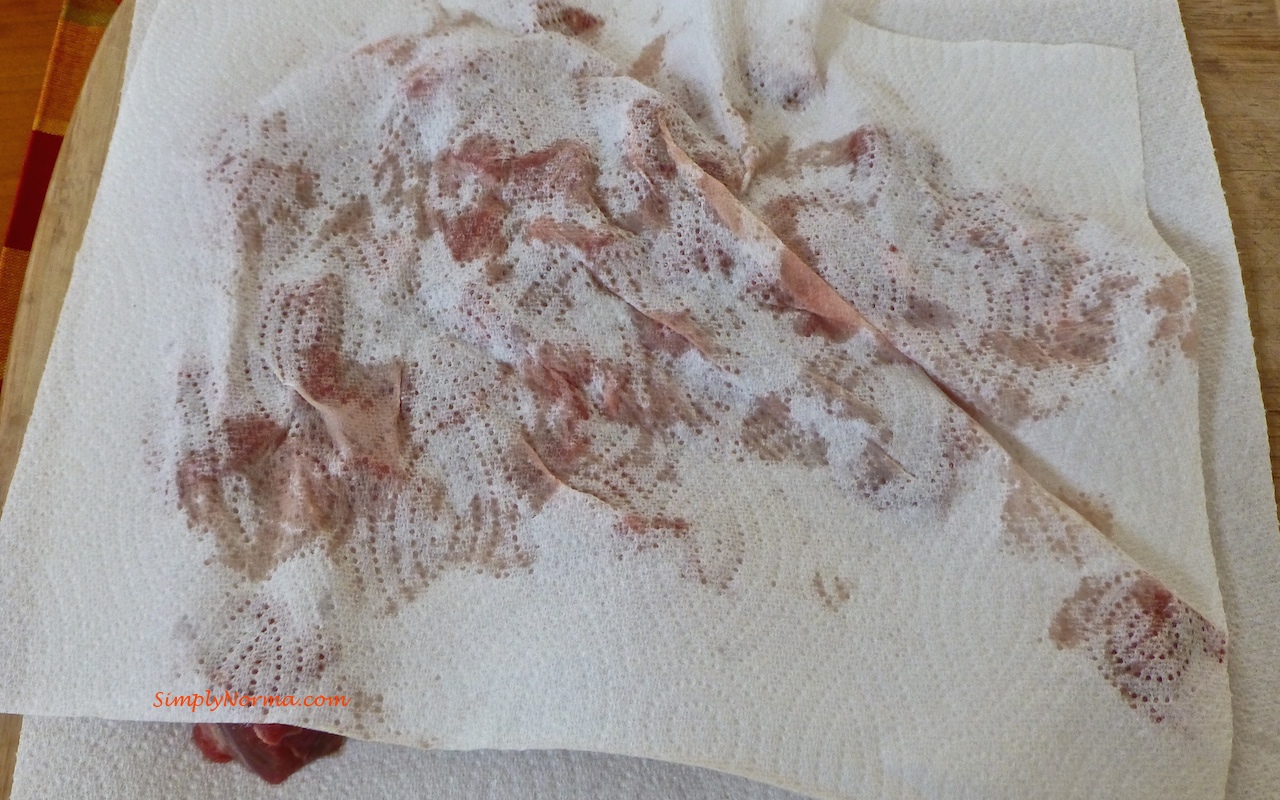
After making sure your beef stew meat is cut into bite size pieces, you’ll be drying the meat to make sure it will brown properly.  I laid the meat on a paper towel to let it absorb any excess water.

Dry the meat
Dry the meat

Then I put another paper towel over the meat to remove the excess water from the top of the meat.

Dry the meat
Dry the meat

You’ll be using a large pot to brown the meat on one side — make sure not to add two many pieces in the pot so the meat can brown properly.

Brown the meat on one side

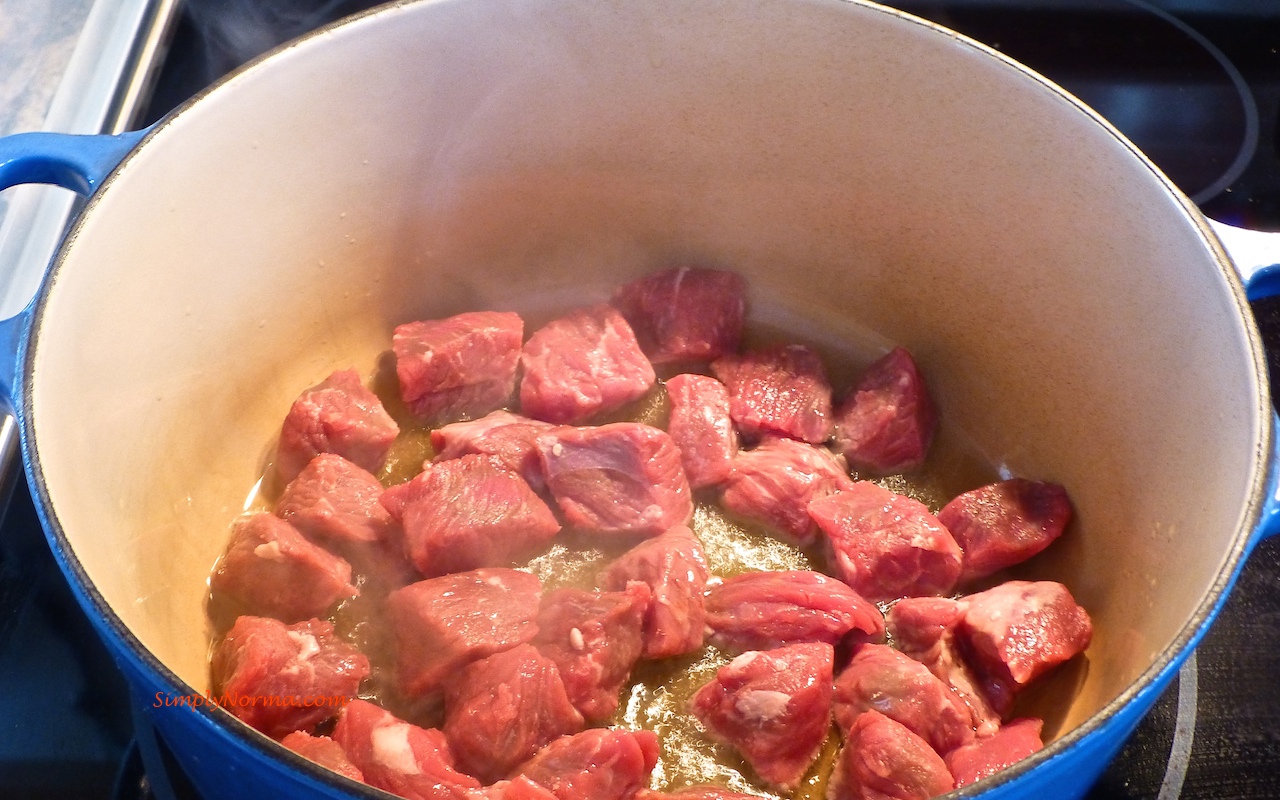
Next turn the meat over and brown the other side.

Brown the other side of the meat

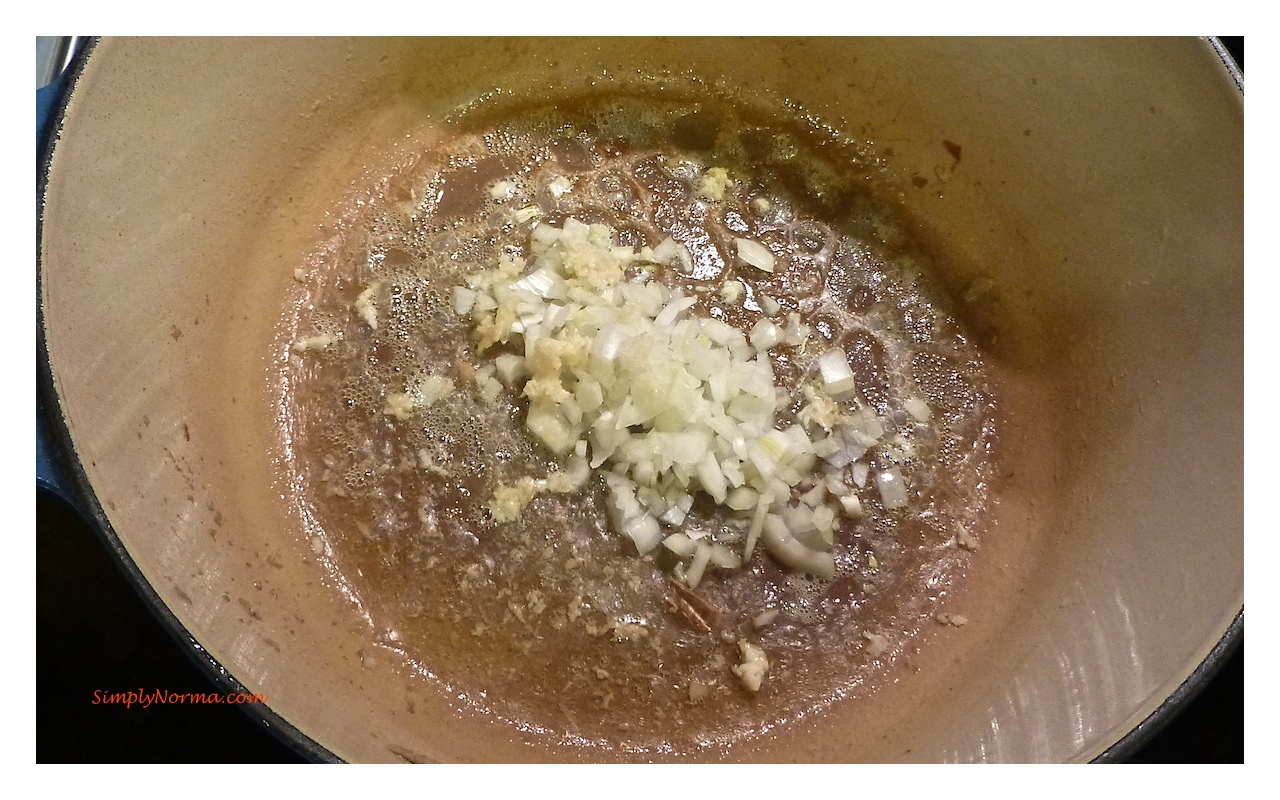
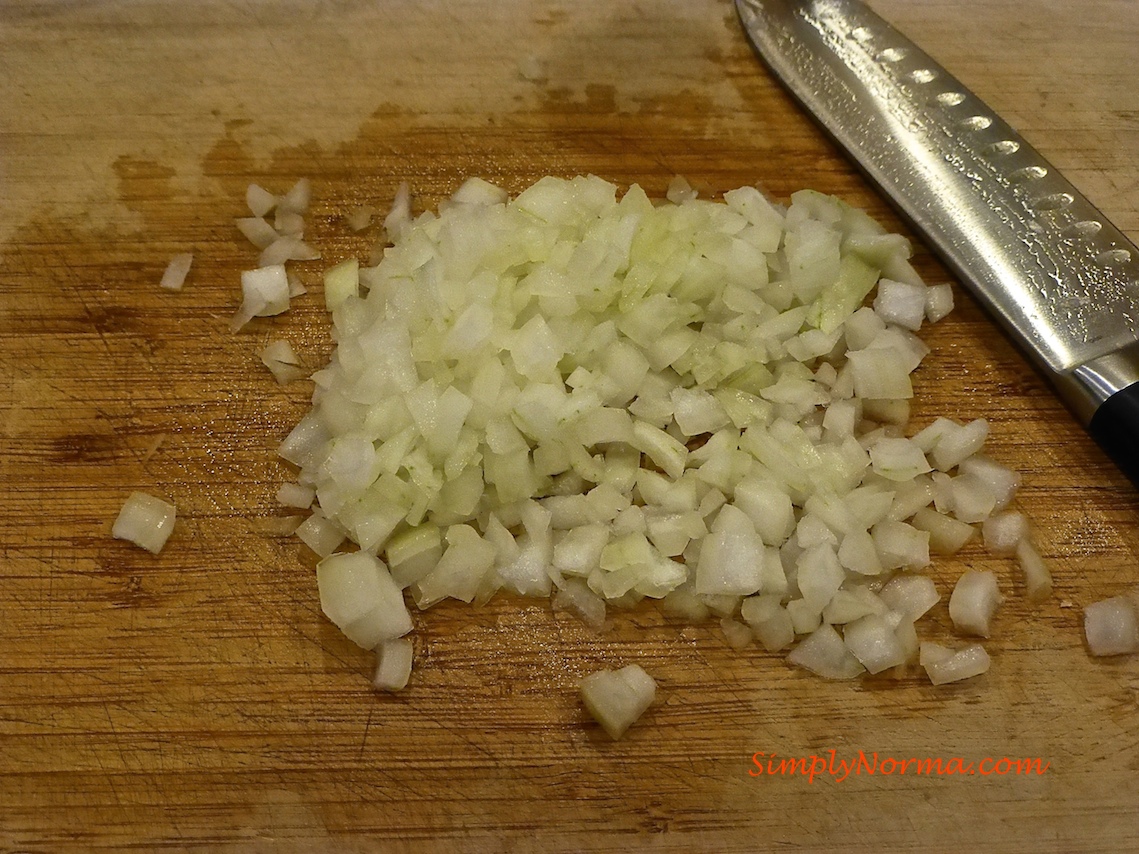
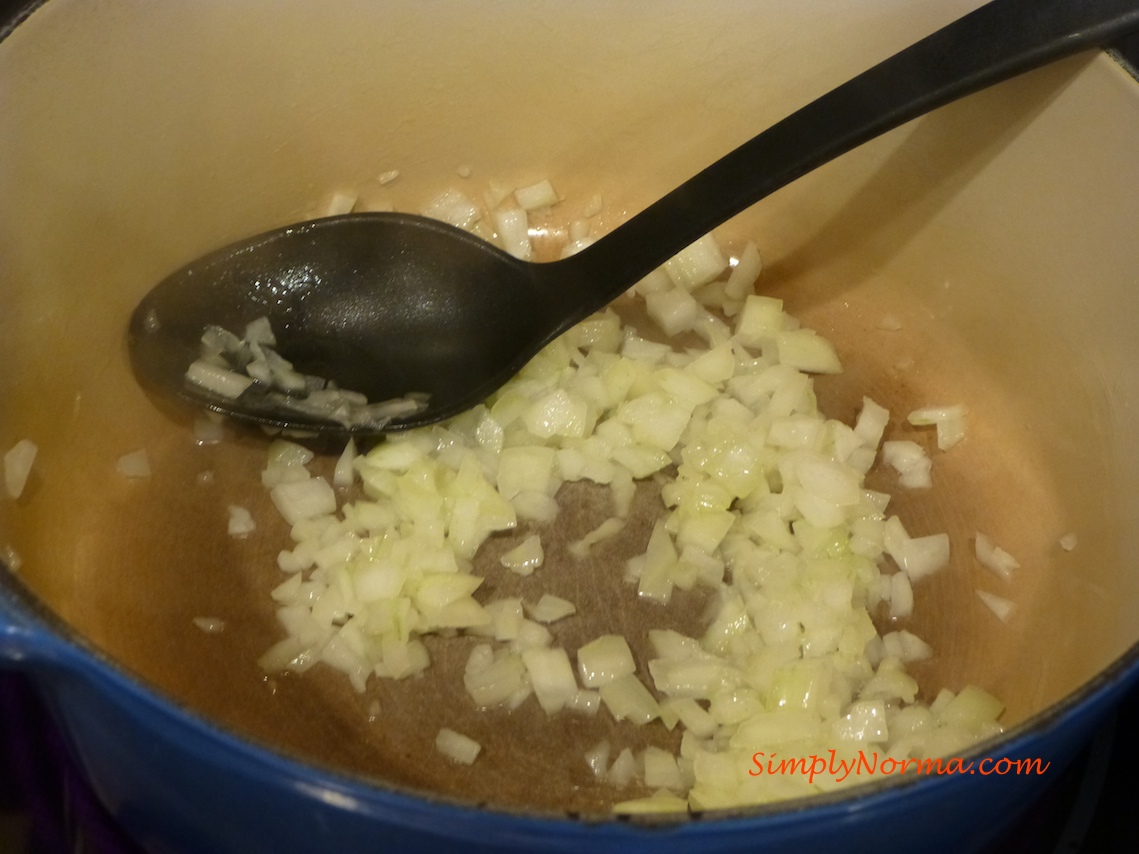
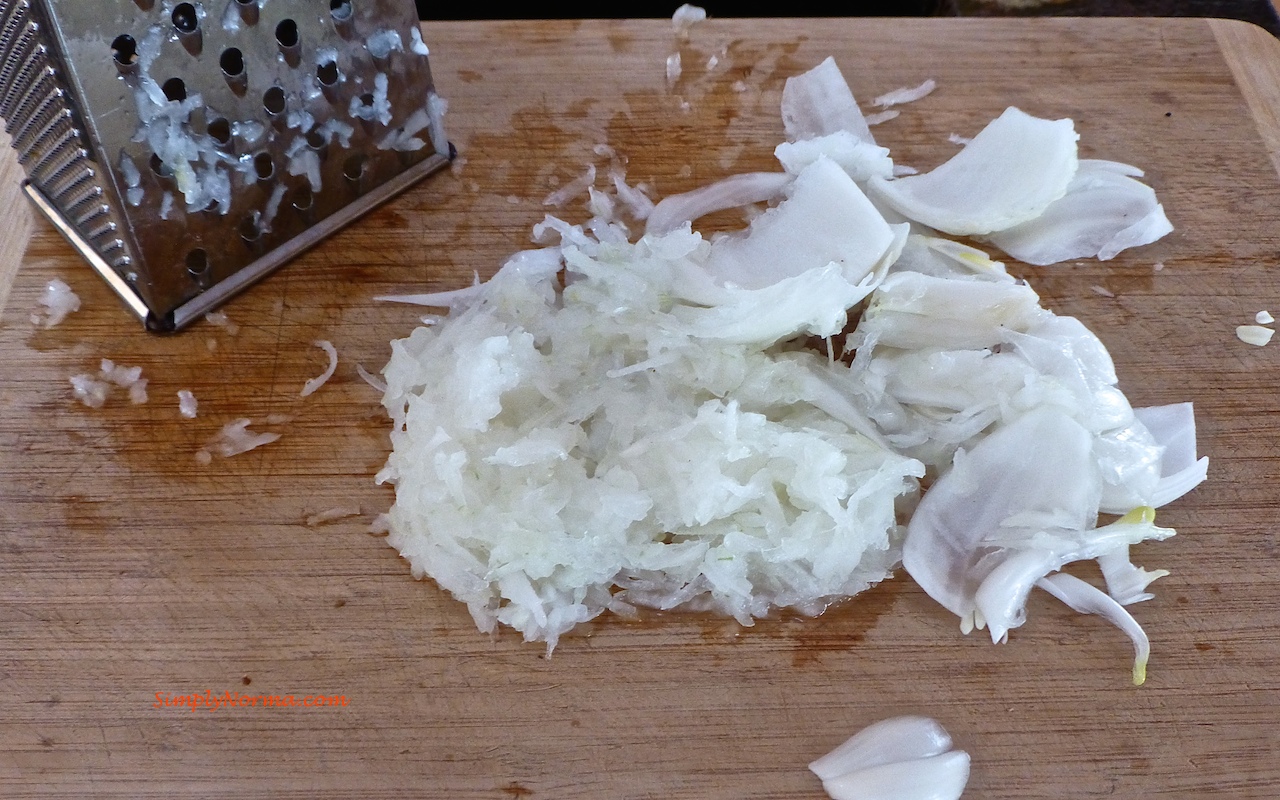
Once the meat is browned, place it in a bowl while you prepare the rest of the stew. Let’s grate the onion now …

Grate the onion
Grate the onion

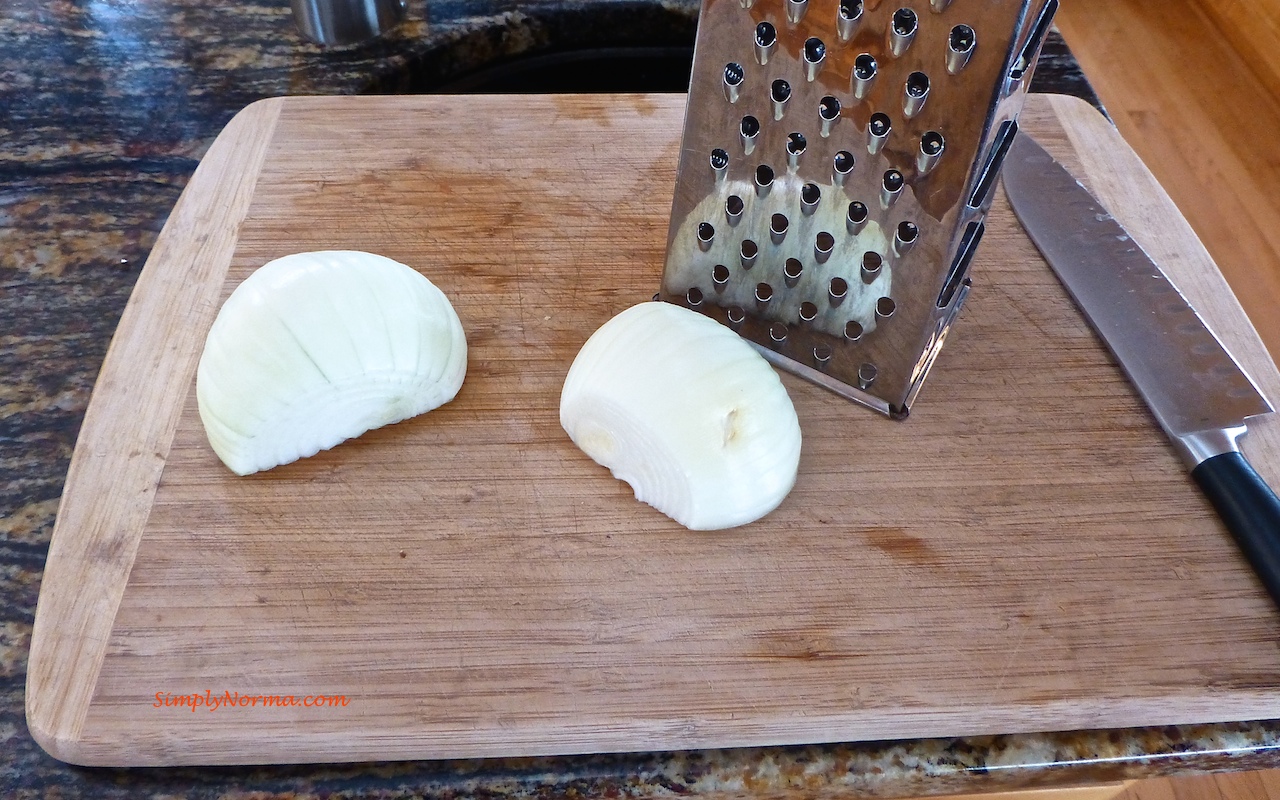
I grated as far as I could but still had some large pieces left over so I simply chopped the rest of the pieces finely (that way pieces of finger won’t be in our stew — yuck!).

Grate/dice the onion

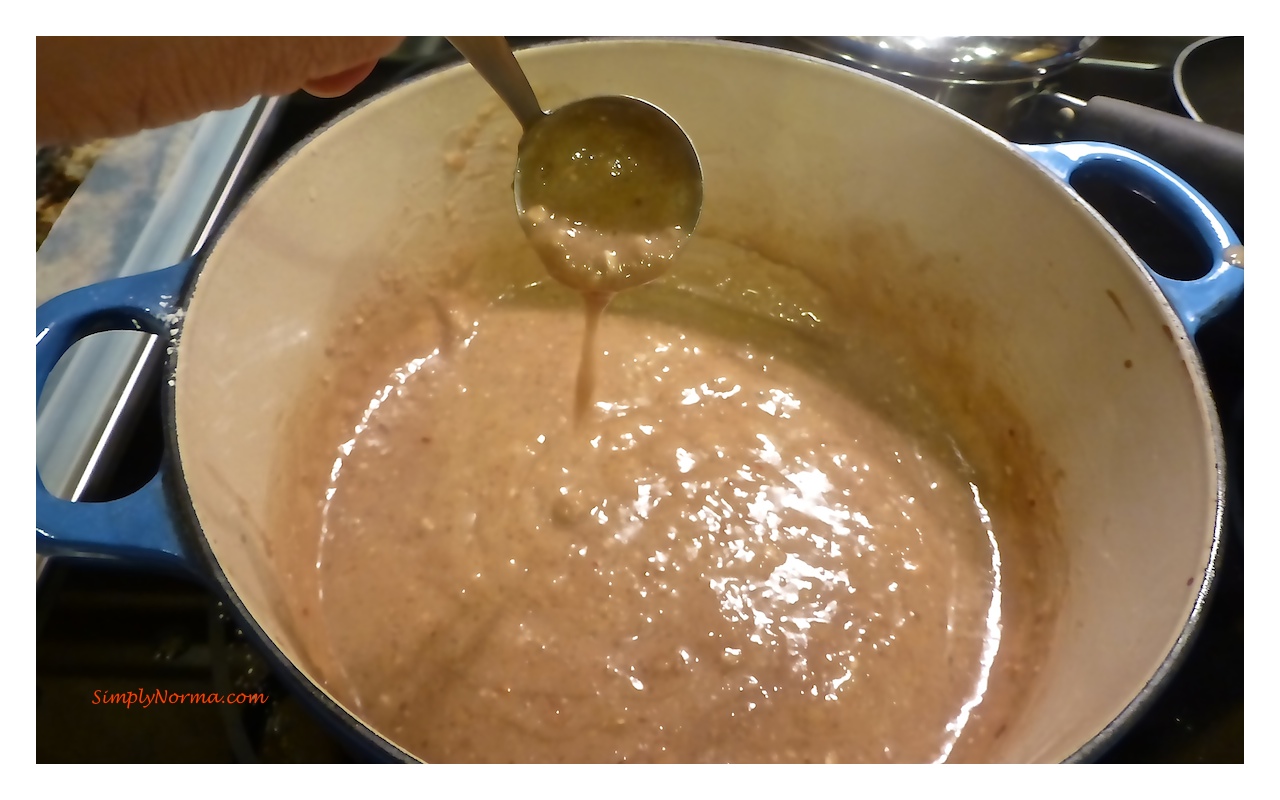
Next you’ll be putting everything in the pot little by little to allow the flavors to meld together.

Prepare the stew
Add ingredients little by little to meld the flavors

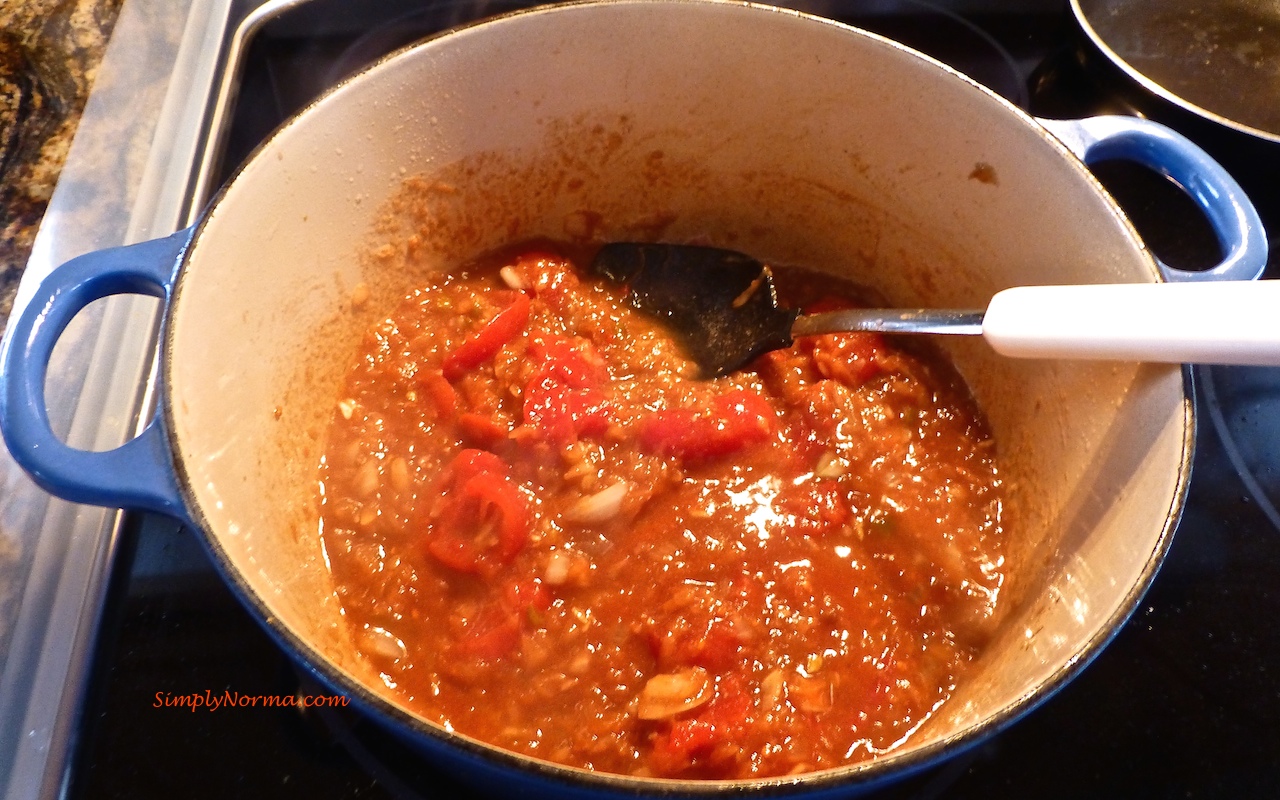
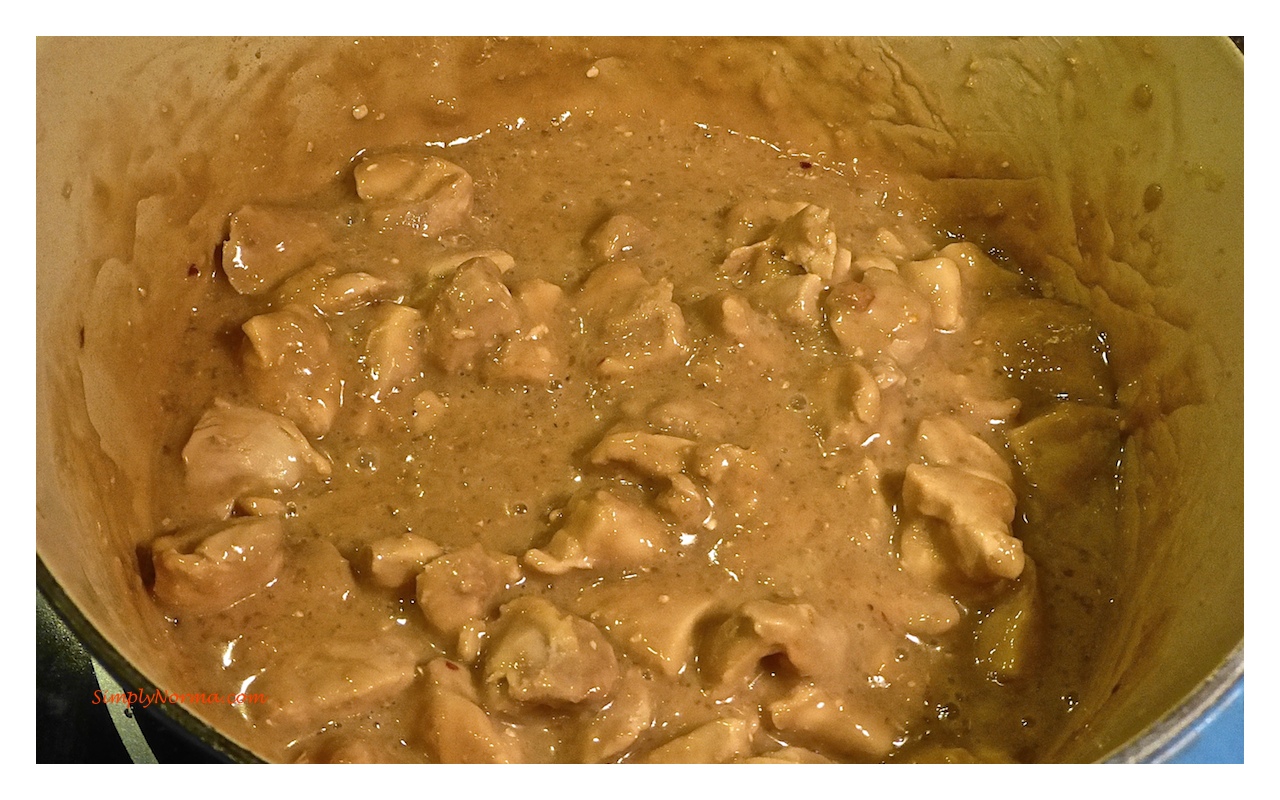
Once that is complete add the browned stew meat.

Add browned stew meat

This will be simmering and simmering and simmering. Don’t rush this process — really, nice and slow is best.

Okay … so let’s try this wonderfully delicious recipe, shall we?

Ingredients

  • 1 pound boneless beef stew, cut into bite-sized pieces
  • 1/2 cup olive oil
  • 1 large onion, grated or diced finely
  • 2 large garlic cloves, minced
  • 1/2 teaspoon ground allspice
  • 1/2 teaspoon ground cumin
  • 1 can (14.5 ounces) stewed tomatoes
  • 1 Tablespoon tomato paste
  • 1/8 teaspoon ground black pepper
  • 1/4 cup blended apple/grape juice
  • 1 cup hot water (must be hot)
  • 2 teaspoons kosher salt

Directions

  1. Place your cut up meat pieces on paper towels and pat them dry.
  2. In a large Dutch oven or pot, add the olive oil and heat over medium-high heat.
  3. When the oil is hot, add enough meat pieces to cover the bottom of the pan (do not overcrowd the pan because the meat will boil rather than brown).
  4. When one side of the meat is browned, turn and brown the other side.
  5. Remove the browned pieces from the pan, place them in a bowl and set aside.
  6. Add the onions and garlic to the pan and sauté on medium heat for about 4 minutes, stirring continuously.
  7. Add the ground allspice and cumin then stir continuously for a couple minutes.
  8. Add the canned tomatoes and tomato paste and stir continuously for a couple more minutes.
  9. Now, add the browned meat pieces, stir well and add some freshly ground black pepper.
  10. Turn the heat up to medium-high and add the grape-apple juice along with the hot water then stir well.
  11. Let everything come to a boil then turn the heat down to the lowest setting, put the lid on and let the meat stew for 1 1/2 hours or until it is tender. (I checked and stirred the meat every 15 minutes.)
  12. Lastly, season with salt.

And there you have it! It is delicious and well worth the wait.

Beef Stew
Beef Stew

(Click here for a list of other paleo friendly recipes.)

Maple Walnut Sweet Potato Mash

This Maple Pecan Sweet Potato Mash was really really good. I’d serve it any day and it would also be a nice side for Thanksgiving.

The original recipe is very sweet and even though I like sweet tasting food it was a tad too much for me. I was glad that I had decided to pour the syrup on slowly and taste it before pouring the whole thing over it. You can use your own judgment …

Here are the ingredients you’ll be using (I used walnuts instead of pecans).

Ingredients
Ingredients

Ready to try it?

Ingredients

  • 1/4 cup chopped walnuts (or nut of your choice), toasted
  • 4 tablespoons pure maple syrup (original recipe calls for 6)
  • 1/4 teaspoon orange zest
  • 1 cinnamon stick
  • 1/4 teaspoon ground cloves
  • 2 large sweet potatoes, baked (375° Fahrenheit for about 45-60 minutes or until soft in the middle all the way through – use a wooden stick to test)

Directions

  1. Bake your sweet potatoes (see above) and set aside to cool.
  2. Bring the oven heat down to 300° Fahrenheit.
  3. Place the walnuts in a single layer on a baking sheet and bake for about 5 minutes (convection oven).  When toasted, set them aside in a small bowl.
  4. In a small saucepan on the stovetop, combine the maple syrup, orange zest, cinnamon stick, and the ground cloves and gentle simmer for a couple of minutes.
  5. Remove the syrup from the stovetop and set it aside.
  6. After the potatoes have cooled, gently scoop out the insides, discard the peel, put the insides in a large bowl and mash them thoroughly.
  7. Remove the cinnamon stick from the warmed syrup and discard it then pour the syrup over the mashed sweet potatoes.
  8. Top the mashed potatoes with the toasted walnuts and serve warm.

Pretty simple recipe … yet delicious.

Maple Walnut Sweet Potato Mash

This recipe was very slightly adapted and the changes are already included above.

(Click here for a list of other paleo friendly recipes.)

Paleo Herb Crackers

While shopping at one of the local health food stores called Tailor Made, I saw a box of crackers that I thought would complement a soup I was going to make. I picked up the box and the picture of the crackers looked delicious. Then I looked at the price — ugh! $9 and change. Then it dawned on me — why not make crackers myself?

So, I searched the world wide web and found this recipe for Paleo Herb Crackers that has good reviews.

The ingredients are simple enough (I normally don’t include pictures of the oil, water, salt and pepper as I figure most people have those items in their cupboard already) To help facilitate this recipe you should use parchment paper, a rolling pin and a pizza cutter.

Ingredients
Ingredients (less salt, water and oil)

You’ll be combining all your ingredients to make a dough. I used my KitchenAid mixer for this.

Make Doug
Make Dough

Next, you’ll need 2 pieces of parchment paper (same size and cut large). Place one of the pieces on your counter or cutting board and plop your dough on it.

Plop dough on parchment paper

Then you’ll be putting another piece of parchment paper on top of the dough and then giving the dough one large palm squish.

Cover dough with parchment paper and squish

Then you’ll use a rolling pin (or you could use a large drinking glass) to flatten out the dough.

Flatten the dough
Flatten the dough

Next, remove the top piece of parchment paper and transfer the dough (with the bottom piece of parchment paper) to a large cookie sheet.

Transfer flattened dough to cookie sheet

Now, using your pizza cutter, slice the dough into small cracker pieces.

Slice the dough
Slice the dough

(With me so far? It’s actually a very fun recipe to make.)

Now you’ll be plopping this in the oven to bake. Make sure you pay attention (I didn’t) to how you flatten the dough. If possible, you want the dough to be the same thickness all the way through so it will cook evenly otherwise you’ll have your edges crispier than the rest of the dough.

Ready to try this easy recipe?

Ingredients

  • 2 cups almond flour
  • 1/2 teaspoon sea salt
  • 1 tablespoon rosemary
  • 2 tablespoons water
  • 1 egg white
  • 1 tablespoon olive oil
  • 1/4 teaspoon coconut oil

Directions

  1. Preheat the oven to 350° Fahrenheit.
  2. Combine the almond flour, salt, and rosemary in a mixer and mix on low until everything is combined.
  3. In a small bowl, whisk together the water, egg white, olive oil, and melted coconut oil.
  4. Pour the wet ingredients into the dry one and mix until you get a fairly stiff dough.
  5. When the dough is ready, put a large piece of parchment paper on the counter and plop the dough on it.
  6. Then place another same sized piece of parchment paper on top of the dough and give it one good squish with your palm. (No need to get your hands dirty if you don’t have to.)
  7. Using a rolling pin, roll out the dough to about 1/8 of an inch making sure as far as possible that your dough is the same thickness throughout.
  8. Remove the top piece of parchment paper then transfer the bottom piece of parchment paper with the dough on it to a cookie sheet (no need to grease the cookie sheet).
  9. Using a pizza cutter, cut the dough into cracker sized pieces — round, square, triangle — whatever you desire.
  10. Plop the cookie sheet in the oven and bake for about 10 minutes (at the 7 minute mark my edges were starting to get quite crispy but that’s because I didn’t make sure my dough was rolled evenly).
  11. Turn the oven off and let the crackers sit inside the oven for another 10 minutes (but keep your eye on them to make sure they don’t turn too crispy).

Whala!  That’s it! They came out very good. I will use this recipe again. It did remind me of the time I use to make communion wafers at church.  Ready to see the final product?  Drum roll please!

Paleo Herb Crackers
Paleo Herb Crackers

Served with paleo Chicken Soup, these Paleo Herb Crackers were delicious.

Special thanks to Heather at Multiply Delicious.  Head on over to her website to see what else she’s got cooking.

(Click here for a list of other paleo friendly recipes.)

Banana Bread – Paleo

Surprisingly, this paleo Banana Bread came out quite delicious. How do I know? Because my husband likes it and he doesn’t much like the coconut flour that is used in paleo baking.

So — this is a “must try” for you.

I did change the recipe a tad — but only a tad.

First — the ingredients …

Ingredients
Ingredients

But, of course, we can’t forget the main ingredient which are the bananas. What’s interesting about this recipe is that you don’t have to use ripe bananas.

Bananas
Bananas

I did remember that I had frozen bananas in the freezer so what I did was swap out the yellow bananas for the frozen thawed ones. (I just put them in the microwave for 30 seconds or so to thaw them.)

Thawed Bananas
Thawed Bananas

The recipe calls for four eggs. I have a little compulsion about bringing the eggs to room temperature before using them in recipes. I believe they make a big difference in the flavor of the recipe. So, what I do is put hot water in a pot and put the eggs in them for a couple of minutes.

Bring eggs to room temperature

I also decided to use 1/3 cup of walnuts. Just because (smile).

Walnuts
Walnuts

Here’s what the batter will look like before it goes into the oven …

Uncooked Banana Bread

So … ready to check out the recipe?

Ingredients

  • 4 ripe bananas (or yellow ones if you wish)
  • 4 eggs, at room temperature
  • 1/2 cup almond butter
  • 4 tablespoons butter, melted
  • 1/2 cup coconut flour
  • 1 tablespoon cinnamon (or more if you’re a cinnamon lover)
  • 1 teaspoon baking soda
  • 1 teaspoon baking powder
  • 1 teaspoon vanilla
  • 1/3 cup of walnut pieces
  • pinch of salt
  • Olive oil spray

Directions

  1. Preheat your oven to 350° Fahrenheit.
  2. Combine the bananas, eggs, almond butter and regular butter in a food processor then mix at medium speed until everything is combined.
  3. Add the coconut flour, cinnamon, baking soda, baking powder, vanilla, and salt to the banana mixture and mix well.
  4. Grease a loaf pan with olive oil spray then pour the batter into the pan.
  5. Bake for 55 minutes or until a toothpick inserted in the middle of the loaf comes out clean. (Note: I used my convection oven and it still took 55 minutes.)
  6. Take the loaf out of the oven when completely baked and allow it to cool for 30 minutes then remove the loaf from the pan and place onto a platter.

And here is how my banana bread turned out …

Paleo Banana Bread
Paleo Banana Bread

Hope you enjoy this as much as we did.

Special thanks to Civilized Caveman Cooking for this recipe.

(For a list of recipes by categories, click here.)

Balsamic Green Bean Salad

Everything that could go wrong in trying to make this Balsamic Green Bean Salad recipe — went wrong. It wasn’t the recipe’s fault — truly.

Let me start in the beginning (okay, okay, not that far back — laughing).

I had prepared everything to start making the recipe assuming that life was not going to give me any twists and turns. I took my picture of the ingredients for ya’ll and it came out quite good, no? So few ingredients = my kind of recipe. (Salt and pepper not shown)

Ingredients
Ingredients
Prep Ingredients
Prepare Ingredients

Things were going along well. I was going to serve this with some Fine Chicken and a baked yam so I was juggling the different recipes — nothing unusual so far.

So, now I’m ready to start the pot of water that the beans will blanch in. I added the cold water from the sink into the pot and put it on the stovetop to boil. Well, it boiled quite nicely to a very brown rusty color with sediment on the bottom. So, I put my ingredients aside and continued working on the rest of the meal. I came back to this recipe a week later as we had “water” issues.

I put the green beans in the freezer as I didn’t think they would hold up for a week until we figured out the water problem. When I finally made the recipe I was using the frozen green beans and it didn’t work too well. It tasted okay but it should have come out great.

I had allowed the green beans to thaw, blanched them in the boiling water, drained them then added them to ice water (yes, ice water to stop the cooking process).

Put drained blanched beans in ice water

So — the problem arose when I drained the beans from the ice water. (Yes, I know, I know, that is a LOT of ice — laughing.)

The green beans came out limp-y.  Boohoo!  That’s how I felt. I went ahead and put the rest of the salad together and, like I said, it came out good but it should have been great. So — let’s look at this recipe, shall we?

Ingredients

  • 1 pound green beans, trimmed and cut in half
  • 1/2 red onion, finely chopped
  • 3 tablespoons olive oil
  • 1 tablespoon balsamic vinegar (original recipe calls for 2 tablespoons)
  • 1/3 cup chopped walnuts
  • Salt and pepper to taste

Directions

  1. Bring a medium sized pot of salted water to a boil.
  2. Add the green beans and blanch for 2-3 minutes.
  3. Prepare a large bowl of ice water while the beans are cooking.
  4. Drain the beans in a colander then promptly add them into a bowl of ice water for a minute or so.
  5. Drain the beans again.
  6. Add the green beans and the red onion in a bowl.
  7. Toss the olive oil in and toss to coat everything together.
  8. Add the balsamic vinegar, salt and pepper to the bowl with the green beans then toss to coat everything again.
  9. Toss the bean mixture with the chopped walnuts.

And here is the final product (in spite of them coming out a bit limp-y.)

Balsamic Green Bean Salad

I served mine with baked drumsticks and a baked yam.  Delicious!

Baked Drumsticks with Green Bean Salad

Special thanks to Paleo Grubs — check out their website!

(By the way, I found out that water wells should be purged once a year or so to avoid the problem of sediment build-up. The alternative is to attach a hose to your pressure tank, open a window and drain the pressure tank for 4 hours. Uh, not likely to happen since the temperatures have been quite cold and opening a window for 4 hours and running the water outside (we’d have a skating rink) is just not feasible.  For now, we keep draining the faucets and that seems to have worked.)

Life …

For a list of my categorized recipes, click here.

Cucumber Salad

It’s hard to think of eating something cold in February when one lives in Minnesota — we’re colder than Alaska this year for some reason. But, I wanted something refreshing to eat and thought this Cucumber Salad would fit the bill.  Twas easy to make and much easier to eat.

The ingredients are few … (not pictured: oil, red wine vinegar, salt and pepper). I changed the recipe a tad by substituting the white wine with red wine vinegar, the parsley & chives with dill and the sugar with coconut sugar (it’s not as sweet).

Ingredients for Cucumber Salad

It came out quite good and since the recipe is so simple, I’m sure I’ll make it again. Side note: if you want your dressing a little sweeter, I’d substitute the coconut sugar with a teaspoon of maple syrup.

Ready to try it?

Ingredients

  • 2 tablespoons extra-virgin olive oil
  • 1 tablespoon red wine vinegar
  • 1 tablespoon fresh lemon juice
  • 1/4 teaspoon salt
  • 1/4 teaspoon freshly ground black pepper
  • 1/8 teaspoon coconut sugar
  • 1/2 cup sliced red bell pepper
  • 1/2 cup sliced green bell pepper
  • 2 tablespoon chopped fresh dill
  • 1 English cucumber, sliced

Directions

  1. Combine the first 6 ingredients in a medium bowl and stir it all with a whisk.
  2. Add the peppers along with the remaining ingredients to the liquid mixture then toss gently to coat.

See? I told you it was easy.

Cucumber Salad
Cucumber Salad

A keeper for sure!

For a list of my categorized recipes, click here.

Coconut Honey Chicken

Wow! Wow! and Wow! What a pleasant surprise to have this recipe, along with the cauliflower “rice,” come out so good. Juli from PaleOMG really outdid herself with this recipe. I did change it up just a tad because I don’t like overly spicy foods but feel free to add the sriracha which I didn’t add.

Let’s look at the ingredients that are used. There’s actually two different groups of ingredients (oil, salt and pepper not shown).

Ingredients
Ingredients
Ingredients
Ingredients

I like to have everything already measured and ready to go, don’t you?

First you’ll be getting your cauliflower “rice” ready. I don’t normally like this kind of “rice” but with this recipe, it tasted scrumptious. I was able to find a small cauliflower that was just enough to feed two people (strange, isn’t it, as normally cauliflowers are so large).

First you’ll prepare the cauliflower by washing it then removing the green leaves. You should have smaller pieces now.

Prepare cauliflower
Prepare cauliflower

Next you’ll be grating the cauliflower. It will look like this (I didn’t worry too much about making sure all the pieces were the same size).

Grate Cauliflower
Grate Cauliflower

Next you’ll be putting all of the cauliflower ingredients (cauliflower, chicken broth, garlic powder, salt) in a medium sized pot.

Put cauliflower ingredients in a pot

Next you’ll be turning the heat to medium and cooking the cauliflower “rice” for about 10 minutes, covered. Then you’ll be putting that aside.

While the “rice” is cooking, get a large dutch oven or pot and put it on medium heat. You’ll be adding coconut oil and then 1 inch pieces of chicken thighs.

Add chicken to pot
Add chicken to pot

You’ll be cooking the chicken pieces until they become white on one side then turning them over and cooking them until they are white on the other side making sure they are cooked all the way through. Then, remove the chicken pieces from the pot and set them aside. Put the heat to your pot on low now.

Remove chicken when cooked

Next you’ll be adding the chopped onions and the garlic to the pot. Cook until the onions are clear.

Add chopped onions to pot

After adding the rest of the ingredients, your sauce will look like this — it should be somewhat thick but pourable.

Chicken Sauce
Chicken Sauce

After the sauce is ready, add the chicken pieces back to the pot with the sauce in it.

Add chicken to sauce

Yeah, I know — it doesn’t look too scrumptious but I guarantee you, this was absolutely delicious.

Here’s what the final dish will look like …

Coconut Honey Chicken

Ready to try it?

Ingredients (for the cauliflower “rice”)

  •  1 small head of cauliflower, grating the florets into small pieces
  • 1/3 cup chicken broth
  • 1 teaspoon garlic powder
  • 1/4 teaspoon salt

Ingredients (for the chicken and sauce)

  • 4 tablespoons coconut oil
  • 2 pounds chicken thighs cut into 1 inch cubes
  • 2 garlic cloves, minced
  • 1/2 small yellow onion, chopped finely
  • 1 (14 ounce) can of full fat coconut milk
  • 1/4 cup honey
  • 1/2 cup coconut aminos
  • 1/4 teaspoon red pepper flakes
  • Salt, to taste
  • 1/4 cup tapioca flour

Directions

  1. Grate the cauliflower florets into small pieces.
  2. In a medium saucepan over medium low heat, add the cauliflower, chicken broth, garlic powder and salt to the pan, stir then cover to let it steam for about 10 minutes.
  3. In a large dutch oven or pot, add 2 tablespoons of coconut oil. When oil is hot, add the chicken pieces to the pan.
  4. Once the chicken begins to turn white on one side, flip the pieces over to cook the other side. Make sure the chicken is cooked through then remove the chicken pieces and put them on a plate while you make the sauce.
  5. Lower the heat to the pot (medium low) then add 2 more tablespoons of oil to it.
  6. Add the onion and garlic.
  7. When the onion becomes clear, add the coconut milk, honey, coconut aminos, red pepper flakes and salt. Whisk it all together and let it come to a low boil then reduce the heat to low.
  8. (Don’t forget to check on your “rice” … remove it from the heat and set it aside keeping it covered.)
  9. Next, take a whisk and, a little at a time, start adding the tapioca flour into the pot while stirring vigorously so you it doesn’t get clumpy. (Note, I did not have to use the full 1/4 cup of tapioca so keep an eye on yours.)
  10. Once the mixture thickens, add the chicken to the pan with the sauce and stir it all together to coat the chicken.
  11. Let this cook through for a couple minutes to make sure your chicken is warm again.
  12. Now serve the chicken over your cauliflower “rice.”

I served the Coconut Honey Chicken with the cauliflower “rice” and Paleo Crispy Brussel Sprouts.

Yum! This will go on my “favorites” list.

For a list of recipes by category, click here.

Asparagus with Mushrooms and Hazelnuts

This Asparagus with Mushrooms and Hazelnut recipe is a really nice paleo side dish. I was a little hesitant about the vinegar mixture as I was afraid that it would be too bitter but it came out great!

Here are the ingredients you’ll be needing (minus the olive oil, salt and pepper):

Ingredients
Ingredients

Next you’ll be prepping your vegetables by cleaning and trimming the asparagus and cleaning and chopping the green onions.

P1070777

Then — clean your mushrooms.  Give them a nice shower! (Note: I like to prep and wash my veggies first so they can air dry while I work on everything else.)

Wash the mushrooms
Wash the mushrooms

Next — chop the hazelnuts. (Notice the Minnesota chopping board in the background? Pretty cool, eh?  That was a Christmas gift.)

Chop the hazelnuts
Chop the hazelnuts

After chopping the hazelnuts, you’ll be toasting them.  I did this on the stovetop.  Keep an eye out on them though as you don’t want them to burn.

Toast the hazelnuts
Toast the hazelnuts

Now, you’ll want to combine the red wine vinegar with some salt and pepper. It will look like this:

Combine red wine vinegar, salt and pepper

To prepare for the next few steps, you’ll need a colander, a medium pot of boiling water (enough to put your asparagus in), a large skillet and a medium sized bowl of ice water.

Once your water is boiling, put the asparagus in for about 4 minutes or so. It should be a “soft” boil not a roaring one. You want your asparagus to blanch (should be crisp when you take it out).

Blanch the asparagus

Okay so — things are moving quickly now. In a large skillet, add 1 tablespoon of olive oil and when it’s heated, add the mushrooms. You want them to be semi-soft.

Add mushrooms to skillet

Next you’ll be adding the green onions to the mushrooms and tossing it all together. Ahhh, so pretty!

Add the green onions

By now you should be checking the asparagus as it should be done. Drain the asparagus in the colander and quickly cool them off by tossing the ice water over the asparagus. A nice cold shower for them!

Make sure the asparagus is drained well then add them to the skillet with the mushrooms and green onions …

Add blanched asparagus to the skilelt
Add blanched asparagus to the skillet

Looking good!  Toss it all together now. The mushrooms should be getting nice and soft. Next you’ll be pouring your red wine vinegar mixture into the skillet.

Add the red wine vinegar mixture

Combine it all together and put it in a nice bowl then toss your hazelnuts on top. Ready to try it?

Ingredients

  • 2 Tablespoons red wine vinegar
  • 1/4 teaspoon sea salt
  • Ground black pepper, to taste
  • 1 pound fresh asparagus, washed, ends trimmed and cut in half
  • Olive oil
  • 1 pound of mushrooms, washed
  • 1/2 cup green onions, washed and sliced
  • 1/4 cup hazelnuts, toasted and finely chopped

Directions

  1. Prep your veggies and lay them off to the side.
  2. Prepare a medium sized bowl of ice water (I used a salad bowl but you can use any container) – lay this off to the side til needed.
  3. Chop the hazelnuts and toast them on the stovetop or in the oven (they don’t take long to toast so keep an eye on them) – then lay this off to the side.
  4. Add the vinegar, 1 tablespoon of the oil, salt, and pepper to a small bowl and lay this off to the side.
  5. Fill a medium sized pot with water and boil it. Once boiled, add the asparagus for approximately 3-4 minutes to blanch them.
  6. While the asparagus is blanching, put a 1-2 tablespoons of oil in a large skillet and heat on medium high.
  7. Add the mushrooms to the skillet and saute until they are almost soft.
  8. Add the green onions to the skillet with the mushrooms.
  9. At this point, the asparagus should be ready. Taste one to make sure — it should be crisp but not raw.
  10. Drain the asparagus in a colander, pour the ice water over them immediately then drain the cold water from the asparagus.
  11. Add the asparagus to the skillet mixture, toss then cook for another 3 minutes or until the mushrooms are soft.
  12. Turn the skillet heat off then slowly add the vinegar mixture into the skillet. Toss everything together.
  13. Put the vegetable mixture in a bowl and sprinkle the toasted hazelnuts over the top.

Whala!!! You’re finished and it tastes absolutely delicious!

Asparagus, Mushrooms and Hazelnut Side Dish

I found this recipe at Paleo Plans which has a really neat section that includes recipes they have tried — very similar to the page I have that has a list of recipes.

Hope you enjoy this one!

Chive Baked Sweet Potatoes

So, this Chive Baked Sweet Potato came out surprisingly good.  The original recipe calls from a regular potato but I paleo-ized it (somewhat). Instead of using a regular potato I used a sweet potato. And instead of soy cheese, I used grated aged parmesan cheese.

This recipe is a keeper — it’s easy, filling and quite tasty. It also uses few ingredients.

So — here’s what you’ll be needing:

Ingredients
Ingredients

You’ll be making a sauce with the cashews and a little bit of water. I was a little skeptical as to whether or not I would like the taste but it turned out quite well.

Cashew Sauce
Cashew Sauce

So … let’s try this simple recipe, shall we?

Ingredients

  • 2 Sweet Potatoes (you could also use yams)
  • 1/2 cup of water
  • 1 cup of raw cashews
  • 1 tablespoon lemon juice (I used freshly squeezed)
  • 3 cloves of garlic, minced
  • Salt (to taste)
  • Handful of Aged Parmesan Cheese, grated
  • Chives, chopped

Directions

  1. In a blender, add the cashews, water, lemon juice, garlic and salt then blend it all until it’s creamy.
  2. Poke holes on the top of the sweet potatoes.
  3. Wet 2 paper towels and wrap your sweet potatoes in them.
  4. Put the potatoes with the towels on a microwave safe dish and microwave them for 6-8 minutes (mine took 8 minutes but I had thick potatoes).
  5. After removing the potatoes from the oven, poke them with a skewer or fork to make sure they are cooked all the way through (the skewer/fork should go through easily).
  6. Put a large slit in the top of each potato and add some of the cashew sauce along with some grated parmesan cheese on top.
  7. Put the potatoes back in the microwave (without the towel) for 2 minutes to melt the cheese.
  8. Remove from the microwave and top with chives if you wish.

That’s pretty much it!  Here’s the finished product:

Chive Baked Sweet Potatoes

Yum, yum, yum! Special thanks to the Vegan Stoner for the original recipe.

Roasted Parsnip Pear Soup

This Roasted Parsnip Pear Soup has two of my favorite ingredients. Can you guess what they are?  (laughing)  You’d be right if you guessed parsnips and pears.

Although I love pears, they don’t like me very much. It’s not the pear really — it’s the pesticide they use on the pear. I can scrub the pear well, peel it and still have a tingly feeling on my tongue.

This time what I experienced was a tad different.  I actually had bumps that came out on my hand from handling the pear. Isn’t that odd? Here’s what it looked like:

Allergic Hand
Allergic Hand

You’re probably wondering why I’m making a recipe with pears if I’m allergic to the pesticide they put on them, right? Well, I have found that when the pear is cooked it doesn’t bother me. Another odd thing, no?

This soup was a surprise in some ways and not so much in another.  First, my husband did NOT like it. He’s not a fan of creamy type soups anyway and this one looks like Farina/Cream of Wheat. It also has the same texture and came out very very thick. I added some light coconut milk to make it creamier and that seemed to work well.

So — here’s what you’ll be needing (olive oil, salt, pepper and coconut milk not shown):

Ingredients
Ingredients

You’ll be preparing your vegetables …

Prepare the vegetables
Prepare the pears and parsnips (see below)
Chop the onions
Chop the onions

After chopping the onions you’ll be putting them in a pot with a little bit of olive oil and cooking them until they are clear.

Cook Onions
Cook Onions

After preparing the pears and parsnips, you’ll be adding them, along with everything else, into your large pot.

Preparing the Soup
Preparing the Soup

You’ll also need to caramalize your nuts — I used pecans.

Caramelize the nuts
Caramelize the nuts

Let’s get started on this, shall we?

Ingredients

  • 1 lb. parsnips, peeled and chopped
  • 4 ripe pears, peeled, cored and chopped
  • Olive oil
  • 1 medium white onion, peeled and chopped
  • 2 cups vegetable bouillon
  • 1/2 teaspoon thyme
  • 1 teaspoon rosemary
  • 1/2 teaspoon sage
  • Cinnamon
  • Salt
  • Pepper

Ingredients for the caramelized pecans

  • 3/4 cup pecans, chopped
  • 3 tablespoons pure maple syrup

Directions

  1. Preheat the oven to 400° Fahrenheit.
  2. Place the prepared parsnips and pears in an oven-proof baking dish.
  3. Drizzle with a little olive oil, sprinkle with salt and toss well to evenly coat.
  4. Place the baking dish in the oven15 minutes to roast the parsnips and pears.
  5. Heat 3 tablespoons of olive oil in a large soup pot and add the onion.
  6. Sauté the onion until its soft and clear.
  7. Add the vegetable bouillon and stir to mix.
  8. When the pears and parsnips have roasted, add them to the vegetable bouillon in the soup pot.
  9. Add the rosemary, sage and cinnamon to the soup.
  10. Allow everything to cook together until the parsnips are soft.
  11. When the parsnips are soft, puree the soup in a blender to a creamy mixture.
  12. Prepare the caramelized/candied pecans. Click here for instructions on how to do that (very simple).
  13. Season with salt and pepper.
  14. Serve the soup with some caramelized pecans on top — a nice touch!.

The soup was not bad — not scrumptious but not bad. It was “heavy” in the belly. Next time I would strain the soup to make it more liquid-y and I wouldn’t serve it as the main dish but as a side to another dish.

If you decide to try it, let me know if you make any adaptations. I did adapt the original recipe, i.e. didn’t use white wine, used pecans instead of walnuts and added a wee bit of coconut milk.

And this is the final product … (I took the picture late in the evening so the natural light was all gone — thus the strange lighting.)

Parsnip & Pear Soup
Parsnip & Pear Soup

Served with a salad, this would make a nice light lunch or dinner.