Chicken & Broccoli Alfredo

I can’t tell you exactly where this recipe came from. All I know is I saw it in the newspaper and cut it out so I could try it. It’s very easy to make and tastes just fine.
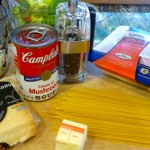
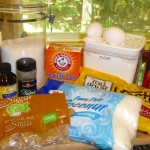
Ingredients

  • 1/2 lb linguine pasta
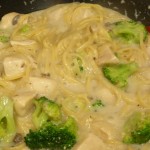
  • 1 cup fresh or frozen broccoli florets
  • 2 tablespoons butter
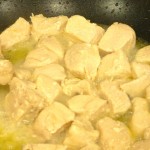
  • 1 1/4 lb skinless, boneless chicken breast halves, cut into 1 inch size pieces
  • 1 can (10 3/4 oz) Campbell’s Condensed Cream of Mushroom Soup
  • 1/2 cup of milk
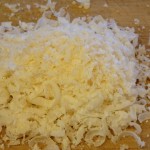
  • 1/2 cup grated Parmesan cheese
  • 1/4 teaspoon ground pepper

Directions

  1. Prepare the linguine according to the directions on the package.
  2. Add the broccoli during the last 4 minutes of cooking.
  3. Drain this mixture in a colander and rinse in cold water so the noodles don’t stick together.
  4. Heat the butter in a large skillet over medium-high heat.
  5. Add the chicken and cook until it’s well browned and cooked through, stirring often.
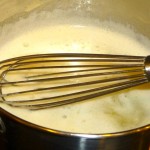
  6. Add the soup, milk, cheese, black pepper and linguine to the chicken and mix it thoroughly.
  7. Cook until the mixture is hot and bubbly, stirring occasionally.

If you like, you can have some extra shredded cheese on the side to put on top of the servings.

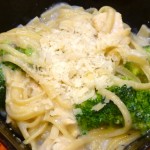
It actually tasted pretty good. I also added a wee bit of salt but other spices can be added if you think it might be too bland for you. I found it perfect just the way it was.

Enjoy!

Oatmeal Coconut Chocolate Chip Cookies

Yes indeed! This is a wonderful cookie recipe. I have made it twice now and took some over to a neighbor and their adult son came over with the empty container and told me he really liked them.

The first time I made them I added pecans and halved the recipe but this second time I left the pecans out and made a full recipe.

Ingredients

  • 1 cup (2 sticks) unsalted butter
  • 1 1/2 cup all-purpose flour
  • 1 teaspoon salt
  • 1 teaspoon baking soda
  • 1 teaspoon cinnamon
  • 1/2 teaspoon nutmeg
  • 1 cup brown sugar, packed
  • 1/2 cup white granulated sugar
  • 2 large eggs, lightly beaten
  • 1 teaspoon vanilla extract
  • 2 Tbsp water
  • 1 1/2 cups semi-sweet chocolate chips
  • 1 cup chopped pecans (optional)
  • 1 cup sweetened, shredded coconut (optional)
  • 3 cups Old Fashioned rolled oats (Quick oats are okay, but not steel cut or instant)

Directions

  1. Brown the butter by putting the sticks in a thick-bottomed medium sized stainless-steel saucepan. (It’s important to use a saucepan that has a light, reflective interior like stainless steel, otherwise you won’t be able to see the butter browning.) Heat on medium. Melt the butter, whisking so that the butter melts evenly. As it cooks, the butter will foam up then the foam will subside. Whisk frequently to check underneath the bubbly surface as eventually browned bits will form at the bottom of the pan and the butter will begin to smell nutty. At this point it’s very easy to burn the butter so be careful to watch not to burn it. When the browned bits begin to form, remove the pan from the heat. Pour the melted butter, with the browned bits, into a glass or metal bowl and allow it to cool while you prepare the other ingredients.
  2. Blend the flour, salt, baking soda, nutmeg, and cinnamon together in a large bowl.
  3. Preheat the oven to 350°F. Place the browned butter (along with the browned bits) in a mixer bowl then add the brown and white sugars. Beat this on medium high speed for about 3 minutes until its smooth. Add the eggs and vanilla then beat for three more minutes on medium speed until smooth and light.
  4. Using a wooden spoon (the mixture will be sticky), stir the flour mixture into the butter mixture. Stir in 2 tablespoons of water (note that if you are using jumbo eggs, and not large eggs as the recipe calls for, you will probably not need this much extra liquid.)
  5.  Stir in the chocolate chips, pecans and shredded coconut. Stir in the oatmeal. (Note: the recipe then says you can refrigerate this dough up to a day and a half if you don’t want to bake the cookies right away.)
  6. Butter two large cookie sheets or line them with parchment paper.
  7. Spoon out a heaping tablespoon of cookie dough and lay it on the cookie sheet. The dough does not spread very much so you don’t need to have too much room between the cookies (maybe an inch?).
  8. Bake at 350°F for 11 minutes, or until they are just brown around the edges but soft in the center. The cookies will continue cooking a little bit more while they are cooling. If you want crispier cookies, you can bake them from 12-14 minutes.
  9. When you take the cookies out of the oven let them cool for 2 or 3 minutes on the baking sheet. Then, using a metal spatula, carefully transfer the cookies to a wire rack to cool.

Then — enjoy!!! I was so happy to come across this recipe from simplyrecipes.com.

Note: I tried using my hands to make the cookie into balls but it was too messy so using a tablespoon is your best bet.


Vegetarian Gandules (Pigeon Pea) Soup

What are gandules, you ask?  They are pigeon peas and my mother gives me a few cans every time I visit her because she says she can buy them cheaper in Chicago than I can in Minnesota (it’s true). Unfortunately, I don’t cook arroz con gandules (rice with pigeon peas) as much as many Puerto Ricans do so I tend to have cans pile up in  my cupboard.

Goya Gandules (Pigeon Peas)

Since my mother will be coming to visit next week (along with her two sisters) I was brainstorming with other people on what to feed them. One relative suggested making gandules soup. So I scoured the internet for recipes but found that most of them had ham in them and since I don’t eat ham, I had to concoct my own recipe.

So I ventured where no man, er, woman, has gone before (well, not really but it sounds good!) … I made up my own recipe. And so I will share my vegetarian gandules soup with you. I have to say that the soup tasted “the day after.”

Ingredients

  • 1 can Goya gandules
  • 2 cups vegetarian broth
  • 4 red or white potatoes, peeled and cut into bite size pieces
  • 1/2 package Sazon (if you don’t have sazon you can omit it and just add other seasonings like salt, pepper, thyme, etc.)
  • Sofrito (to taste), this can be purchases already made or click here for my homemade recipe
  • 1 cup of cooked rice
  • Salt and pepper to taste

Directions

  1. In a medium sized pot, add the vegetarian broth, potatoes, sazon and sofrito and stir everything until it’s well blended. Cook through for about 20 minutes or until the potatoes are tender.
  2. Open the can of gandules and drain the water from it. Rinse the gandules under cold water then add them to the pot.
  3. Add the cooked rice to the pot.
  4. Season with additional salt and pepper if needed.
  5. Cook through for about 15 minutes.
  6. Add additional water if you feel it’s getting too thick but make sure you adjust the seasonings also.
Vegetarian Gandules Soup

That’s pretty much it!  A very simple soup to make. Serve it with crackers or bread. Yum!

[amazon_link id=”7842953813″ target=”_blank” container=”” container_class=”” ]Goya Gandules Verdes - Green Pigeon Peas 15-ounce Unit (Pack of 9)[/amazon_link]

[amazon_link id=”B0004MXOFM” target=”_blank” container=”” container_class=”” ]Goya Sofrito, 12-Ounce Jars (Pack of 3)[/amazon_link]

[amazon_link id=”B001M073SO” target=”_blank” container=”” container_class=”” ]Goya Sazon Jumbo Pack, 6.33-Ounce Packages (Pack of 3)[/amazon_link]


Blueberry Buttermilk Pancakes

These blueberry buttermilk pancakes have become my Sabbath (Saturday) morning go-to breakfast.  I’ve made this recipe several times in the past few months. The pancakes always come out light, fluffy and they can be made with apples, blueberries or anything else you want to add to them — even nothing at all.

Ingredients

  • 1 cup all purpose flour
  • 2 tablespoons yellow cornmeal
  • 2 tablespoons (packed) brown sugar
  • 1 teaspoon baking powder
  • 1 teaspoon baking soda
  • 1/2 teaspoon salt
  • 1 cup buttermilk
  • 1 cup plain whole-milk yogurt
  • 1 large egg
  • 1 1/2 tablespoon unsalted butter, melted, plus a little more for the griddle

Directions

  1. Combine the flour, cornmeal, brown sugar, baking powder, baking soda and salt in a medium sized bowl.
  2. In a separate bowl, add the buttermilk, yogurt and egg and blend them together.
  3. Add the liquid ingredients to the dry ingredients and stir until everything is blended together. It will still be lumpy but avoid over-mixing it.
  4. Add the melted butter to the mixture.
  5. Add whatever else you’d like to the pancakes such as blueberries, bananas, nuts, etc. then fold them into the pancakes.
  6. On a heated nonstick griddle over medium heat, spread a thin coating of butter and let it melt.
  7. Drop approximately 1/3 cup of the batter on the griddle per pancake.
  8. Cook the pancakes until they are brown on the bottom and bubbles form on top (about 4 minutes but check to make sure).
  9. Turn the pancakes over and cook on the other side.

As the pancakes are ready, I place them in a casserole dish and put them in the oven (set to warm) until it’s time for all to eat.

The really nice thing about these pancakes is that you can serve them with or without syrup as they are delicious either way.

Yum!

I found this recipe at the strangest place — a bed and breakfast called the Azalea Inn & Gardens. Click here to go to their website.


Quinoa Stuffed Zucchini

Awhile back, I bought a large bag of Quinoa so I’ve been looking for new recipes to try. The one challenge I have is that I like quinoa but my husband has more of a “I’ll eat it if it’s served” mentality. That’s a big difference in how one looks at this “perfect” food (so called by a nutritionist I know because of its low carb high protein properties).

The Quinoa Stuffed Zucchini recipe that I’m posting was good and it serves two (2) people which was even better as I didn’t have to worry about leftovers sitting in our refrigerator. If you try it, let me know how you like it. My husband (who likes spicy foods) said it was too bland whereas I (who don’t like spicy food) thought it was perfect.

Ingredients

  • 1 cup water
  • 1/2 cup quinoa, well rinsed
  • 4 medium zucchini, halved lengthwise and ends trimmed
  • 2 tablespoons olive oil
  • 1 small onion, minced
  • 1 garlic clove, minced
  • Salt & fresh pepper
  • 1/3 cup chopped pitted black olives
  • 1/2 cup pimientos
  • 2 tablespoons minced fresh parsley
  • 1/2 cup of dry bread crumbs

DIrections

  1. Lightly oil a 9 x 13 inch baking pan and set it aside
  2. In a large saucepan, bring the water to a boil over high heat
  3. Add the quinoa and salt the water (if you wish) then return to a boil
  4. Reduce the heat to low, cover the pot and simmer until the quinoa is tender (about 15-20 minutes)
  5. While the quinoa is cooking, scoop out the zucchini flesh but leave the shells intact and chop it up
  6. Steam the zucchini shells until slightly softened, about 5 minutes, then set aside to cool
  7. In a large skillet, heat one tablespoon of oil over medium heat then add the onions, garlic and chopped zucchini. Add salt and pepper to your taste. Cover and cook until the vegetables are tender, approximately 10 minutes
  8. Preheat the oven to 350 degrees Fahrenheit.
  9. In a large bowl, combine the cooked quinoa with the onion and zucchini mixture. Add the olives, pimentos and parsley to the mixture. Mix everything together.
  10. Stuff the zucchini shells with the quinoa mixture then sprinkle the top with bread crumbs and arrange the zucchini in the pan.
  11. Add 1/4 inch of water to the bottom of the pan. Cover the pan with foil and wrap it tightly. Bake until the filling is hot approximately 20- 30 minutes.
  12. Uncover the pan and bake 10 minutes longer to lightly brown the topping
  13. Serve immediately.

The original recipe called for sun-dried tomatoes but I used pimentos instead as I don’t particularly care of the tomatoes. Also, I halved the quinoa in the recipe as I had a LOT of quinoa left over so I’m not sure why the original recipe called for so much.

Let me know what you think if you decide to try it.

The original recipe was found in the cookbook called 1000 Vegan Recipes.

Enjoy!

[amazon_link id=”B0036FB6FY” target=”_blank” container=”” container_class=”” ]Earthly Delights Organic Premium 100 Percent Quinoa Whole Grain 4 Pound Resea[/amazon_link]

[amazon_link id=”0470085029″ target=”_blank” container=”” container_class=”” ]1,000 Vegan Recipes (1,000 Recipes)[/amazon_link]


Pad Thai

I found another delicious recipe. This one is vegan and the recipe made quite a bit for two people (for those who aren’t vegan, you can add chicken to the recipe). My husband thought this recipe needed more flavor but I thought it was fine the way it was.

Ingredients

  • 12 ounces dried rice noodles
  • 1/3 cup soy sauce
  • 2 tablespoons fresh lime juice
  • 2 tablespoons light brown sugar
  • 1 tablespoon tamarind paste (see note below)*
  • 1 tablespoon tomato paste
  • 3 tablespoons water
  • 1/2 teaspoon crushed red pepper
  • 3 tablespoons canola oil
  • 1 pound extra firm tofu, drained, pressed and cut into 1/2 inch pieces
  • 1 small red onion, quartered and sliced into 1/4 inch slices
  • 4 green onions, minced
  • 2 garlic cloves, minced
  • 1/3 cup coarsely chopped dry-roasted unsalted peanuts
  • 1/4 cup chopped fresh cilantro
  • 1 cup bean sprouts (for garnish)
  • 1 lime, cut into wedges (for garnish) 

Directions

(I made the mistake of not starting with the tofu first which made dinner a lot later than it should have been,  so … here’s the directions for preparing the tofu first.)

Tofu Preparation

  1. Remove the tofu from the package
  2. Cut the block into slabs and place the slabs on a baking sheet lined with paper towels
  3. Weigh down the slabs with a baking sheet topped with heavy canned goods and let it sit for an hour
  4. After the hour (when most of the water has been removed from the tofu) cut the tofu into 1/2 inch pieces
Food Preparation
  1. Soak the noodles in a large bowl of hot water until softened which takes anywhere from 5 to 15 minutes depending on the noodle you’re using
  2. Drain the noodles well and rinse them under cold water
  3. Transfer the noodles to a bowl and set them aside
  4. In a small bowl, combine the soy sauce, lime juice, sugar, tamarind paste, tomato paste, water and crushed red pepper. Stir this together and set it aside.
  5. In a large skillet, heat 2 tablespoons of the oil over medium heat. Add the tofu and stir-fry until golden brown (5-10 minutes). Transfer this to a plate and set it aside.
  6. In the same skillet, heat the remaining 1 tablespoon oil over medium heat then add the onion and stir-fry for 1 minute.
  7. Add the green onions and garlic then stir-fry for 30 seconds.
  8. Add the cooked tofu and cook about 5 minutes tossing occasionally.
  9. Add the cooked noodles and toss to combine and heat everything through.
  10. Stir in the sauce and cook through, tossing everything together so it’s evenly coated with the sauce. (You can add additional water if it seems too dense for you — a tablespoon at a time …)
  11. When the noodles are hot, put them on a platter and sprinkle with peanuts and cilantro.
  12. Garnish with the bean sprouts and lime wedges.
  13. Serve this meal hot.
*I wasn’t able to find tamarind paste locally so I used the substitution they recommended which was 1 teaspoon brown sugar (or you could use molasses) with 1 teaspoon of lime juice.

Quite a delicious meal! I decided to add some more veggies to the meal also — brocolli and carrots.  My husband had to wait an hour longer than normal for this meal as I thought I had read the recipe all the way through but didn’t account for the tofu preparation time.  Oh well … live and learn.

This recipe is from the 1000 Vegan Recipes Cookbook that I have found to be quite useful because of its tasty recipes.

[amazon_link id=”0470085029″ target=”_blank” container=”” container_class=”” ]1,000 Vegan Recipes (1,000 Recipes)[/amazon_link]


Chicken Fajitas

This recipe for chicken fajitas is quite tasteful but be careful if you don’t like your food spicy. I adjusted the ingredients for myself (because I don’t like spicy food) and it still had a wee bit of a kick to it. So feel free to adjust as you go along …

Ingredients

  • 4 chicken breasts, boneless and skinless
  • 2 green bell peppers, halved and sliced
  • 2 medium onions, halved and thickly sliced
  • 1 tomato, quartered
  • Cilantro (optional)
Marinade
  • 3 cloves of garlic
  • 2 teaspoons salt
  • 3 teaspoons cumin
  • 1/2 teaspoon chili powder
  • 1/2 teaspoon crushed red pepper
  • 3 tablespoons olive oil
  • 6 tablespoons lime juice
Directions
  1. Combine all marinade ingredients in a small bowl.
  2. Place the chicken in a resealable plastic bag and add the marinade then toss to coat and refrigerate for two to three hours. (Leave about a teaspoon of the marinade to add to the skillet with the vegetables)
  3. In a large skillet (on medium high heat) add the 2-3 tbsp of olive oil.
  4. Place peppers, onions, and tomatos in the skillet and grill until cooked well but not soggy.
  5. Add some of the marinade to the mixture for flavor.
  6. When cooked, remove from the skillet and set aside.
  7. In the skillet, grill the chicken for 6-8 minutes each side or until juices run clear.
  8. Place the chicken and vegetables on a hot plate or a hot cast iron skillet, squeeze the lime juice over the mixture and sprinkle with cilantro. Serve immediately.
The recipe I received from my son adds a jalapeno (seeded and sliced) to the marinade but I knew up front that it would have been too spicy for my taste so I left it out. I also adjusted the crushed red pepper along with the chili powder.  Experimentation is a good thing!
Chicken Fajita Marinade
Grill vegetables in skillet
Chicken Fajitas 

I hope you enjoy it as much as my family did.

Note:  Not sure where the original recipe came from …

Spicy Peanut Chicken Quesadillas

Whew! This recipe was a wee bit spicy although I ate it so it’s probably won’t be too spicy for those of you who like spicy foods. Definitely a keeper.

This recipe assumed that I had everything prepared ahead of time so get your ingredients ready before following the directions.

Ingredients

  • 6 Flour Tortillas
  • 1/2 cup jack cheese, shredded
  • 1/2 cup cheddar cheese, shredded
  • 2 skinless chicken breasts, boiled til cooked, then shredded
  • 2 tablespoons spicy peanut sauce (see below)
  • 2 green onions, sliced

Directions

  1. Place a tortilla in a pan then sprinkle cheese, chicken, onion and spicy peanut sauce over half of it.
  2. Fold the tortilla in half so it covers the filling and cook this until the quesadilla is golden brown on both sides (turn once) and the cheese is melted.

Spicy Peanut Sauce Ingredients

  • 1 tablespoon peanut oil
  • 1 tablespoon green curry paste (red can also be used)
  • 1/4 cup coconut milk
  • 1/4 cup chicken or vegetable stock
  • 3 tablespoons fish sauce
  • 2 tablespoons lime juice
  • 2 tablespoons brown sugar
  • 2 tablespoons peanut butter
  • 1 teaspoon sesame oil
  • 2 tablespoons peanuts (roasted and crushed)
Directions for Peanut Sauce
  1. Heat the oil in a pan
  2. Add the curry and saute until fragrant
  3. Add the remaining ingredients and simmer it all until it thickens
A very easy recipe to follow. The Thai Coconut Milk can be found at just about any grocery store in the Asian section. Hope you try it and enjoy it as much as I did.
[amazon_link id=”B000GZSDZI” target=”_blank” container=”” container_class=”” ]Thai Kitchen Pure Coconut Milk, 13.66-Ounce Cans (Pack of 12)[/amazon_link]
[amazon_link id=”B0035AV5II” target=”_blank” container=”” container_class=”” ]Mae Ploy Green Curry Paste (Pack of 3)[/amazon_link]
This recipe is courtesy of a blog I follow called Closet Cooking. Click here to see the recipe at their website.

Honey Soy Broiled Salmon

Well, I have to admit that I don’t really know how to cook salmon. My husband normally takes care of it for me as I’ve had an aversion to trying it since I didn’t want to fail. He has a really nice garlic sauce he adds on top of the salmon before broiling it.

But I got bold! I took a hold of my salmon cooking fears and moved forward in my cooking adventures. Did it work?  Yes! I found this great marinade that I absolutely love.  I did have a bit of an adventure though. First, here’s the recipe.

Ingredients

  • 1 scallion, minced
  • 2 tablespoons soy sauce
  • 1 tablespoon rice vinegar
  • 1 teaspoon minced fresh ginger
  • 1 pound salmon cut into 4 portions
  • 1 teaspoon sesame seeds

Directions

  1. Whisk scallion, soy sauce, vinegar, honey and ginger in a medium bowl until the honey is dissolved
  2. Place salmon in a sealable plastic bag then add 3 tablespoons of the sauce and refrigerate to marinate for at least 15 minutes. Reserve the remaining sauce.
  3. Preheat the broiler
  4. Line a small baking pan with foil and coat the foil with cooking spray like Pam
  5. Transfer the salmon to the pan, skinned-side down. (Discard the marinade.)
  6. Broil the salmon 4 to 6 inches from the heat source until cooked through for about 6 to 10 minutes.
  7. Drizzle with the reserved sauce and garnish with sesame seeds.
Yum!

Simple, eh? Everything went well until I set the oven to broil and put the salmon in. I set my timer for 4 minutes thinking that I’d check it early since the recipe calls for 6 to 10 minutes. Well, I was fortunate to stick around in the kitchen as my smoke detectors started going off. At 4 minutes the salmon was done and the broiler let me know it.

Lesson learned?  When trying a new recipe make sure you set your timer for less time than what it calls for “just in case.”

But what a great marinade!

[amazon_link id=”B001BIXKLQ” target=”_blank” container=”” container_class=”” ]Pam Original No-Stick Cooking Spray 100% natural Canola Oil (2 pack - 12oz each can)[/amazon_link]

(Note: Click here to be directed to the original recipe)

Black Bean Casserole

I received this recipe from a friend of mine, Yoko, and have been making it off and on for awhile as it is quite tasty. The original recipe feeds quite a few people so I have adjusted it accordingly to feed two with a little bit of leftover.

Ingredients

  • 1 cup chopped onion
  • 1 green pepper
  • 1-14 ounce can tomatoes, cut up, keeping only half of the juice
  • 1 clove garlic, minced
  • 1 teaspoon ground cumin
  • 1/4 cup Salsa (I used mild)
  • 1 15 ounce can black beans or red kidney beans, drained
  • 6  6-inch corn tortillas
  • 1 cup shredded low-fat Monterey Jack cheese

Directions

  1. In a large skillet, combine the onion, green pepper, canned tomatoes, garlic salsa and cumin.
  2. Bring the ingredients above to a boil then reduce the heat and simmer uncovered for approximately 10 minutes.
  3. Stir in the beans.
  4. In a medium size baking dish, spread 1/2 of the bean mixture on the bottom.
  5. Top with 1/2 of the tortillas.
  6. Add the other 1/2 of the bean mixture on top of the tortillas.
  7. Top with the last 3 tortillas.
  8. Spread the cheese on top.
  9. Bake in a 350 degree oven for 30-35 minutes.
  10. Remove from oven and let stand 10 minutes so the casserole can set while cooling.
  11. Top with tomato slices and olives if you desire.

Whala! This is a very easy dish to make.