Paleo Apple Cinnamon Breakfast Cake

This paleo Apple Cinnamon Breakfast cake was pretty good for a paleo cake (normally they don’t have much taste — perhaps that’s a cook problem?).

Because the recipe calls for 9 eggs (yes, you read that right), we refrigerated it after we ate some. The next day for breakfast, it still tasted good.

Because my husband doesn’t like coconut flour too much, he was not overly fond of this cake — so, personal preference on whether one will like it or not (of course, that’s how it is with all recipes, eh?)

It was quite simple to make.

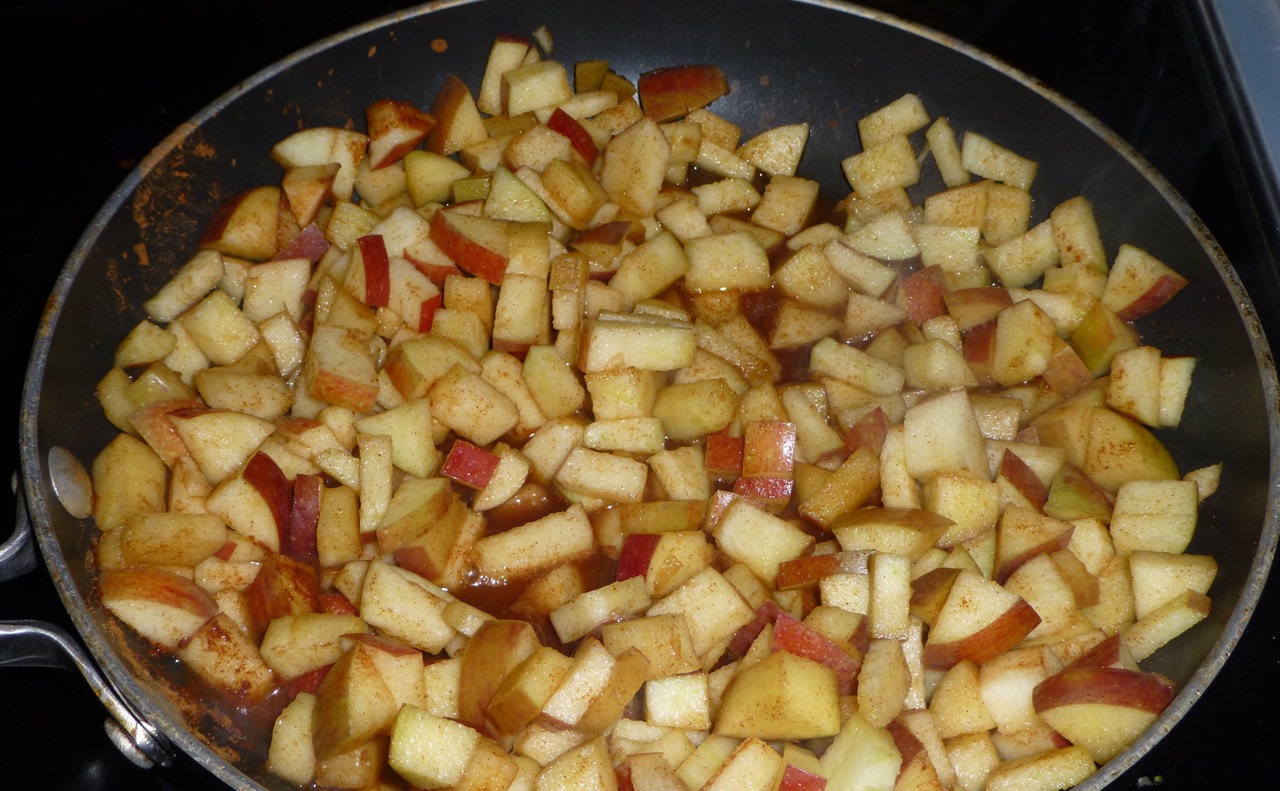
Saute the apples, water, vanilla and cinnamon in a skillet until the apples are the consistency of apple pie filling – approximately 10 minutes. Once the apples are finished cooking, add 2 tablespoons of coconut oil or butter to the mixture and stir until the oil or butter is melted. Allow the apple mixture to cool for a few minutes before adding it to the egg mixture.

This is what it will look like …

Sauteed Apples
Sauteed Apples

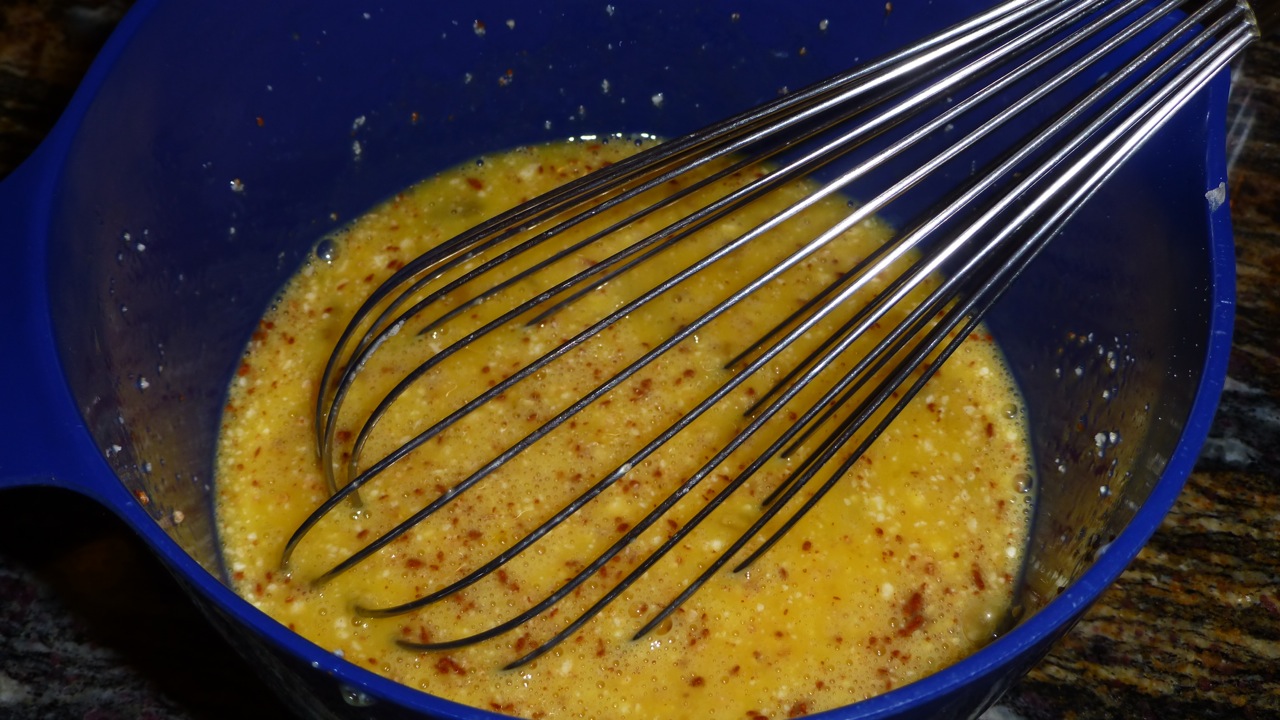
Next, you’ll be combining the eggs, coconut milk, coconut flour, ½ tsp cinnamon, maple syrup, baking soda and salt until its well whisked up.

P1040157

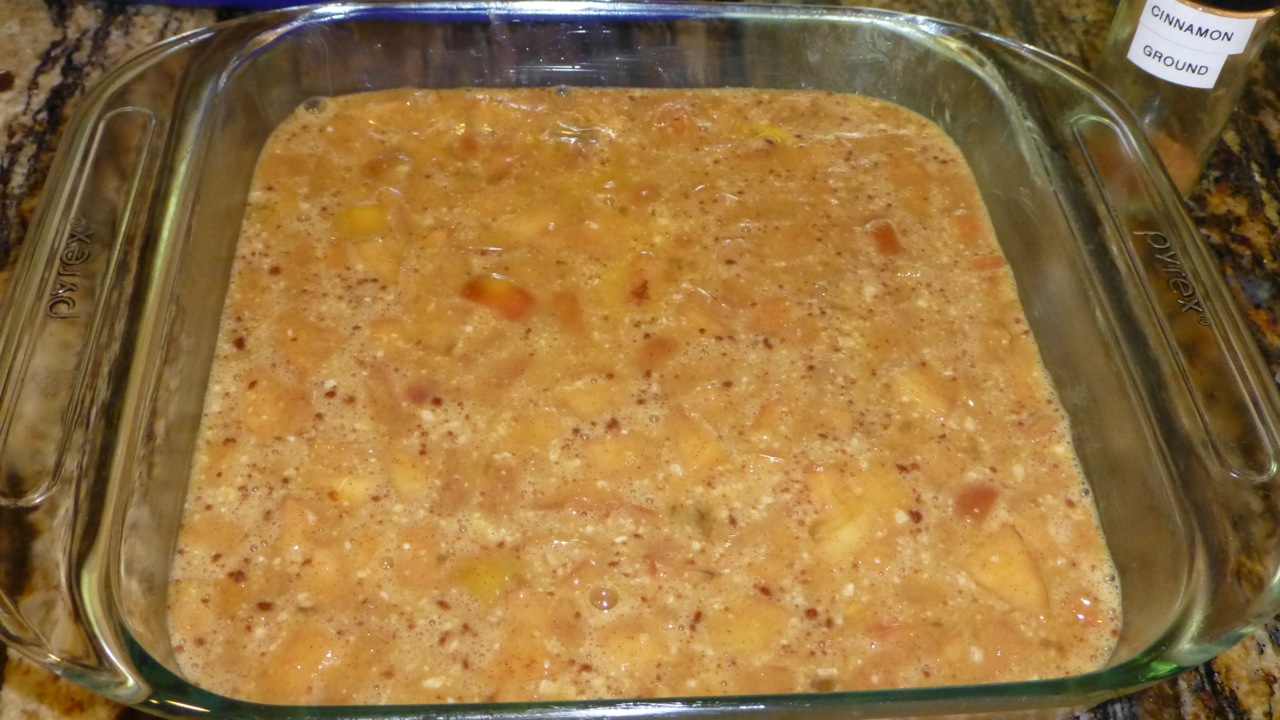
After combining the apple mixture with the egg mixture, pour everything into a greased 8×8 glass pan. Here’s what it looks like unbaked.

Unbaked Apple Cinnamon Cake

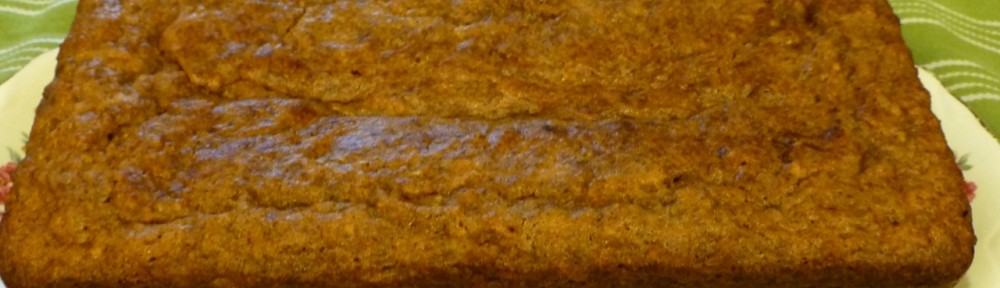
And, the finished product will look like this …

Baked Apple Cinnamon Cake

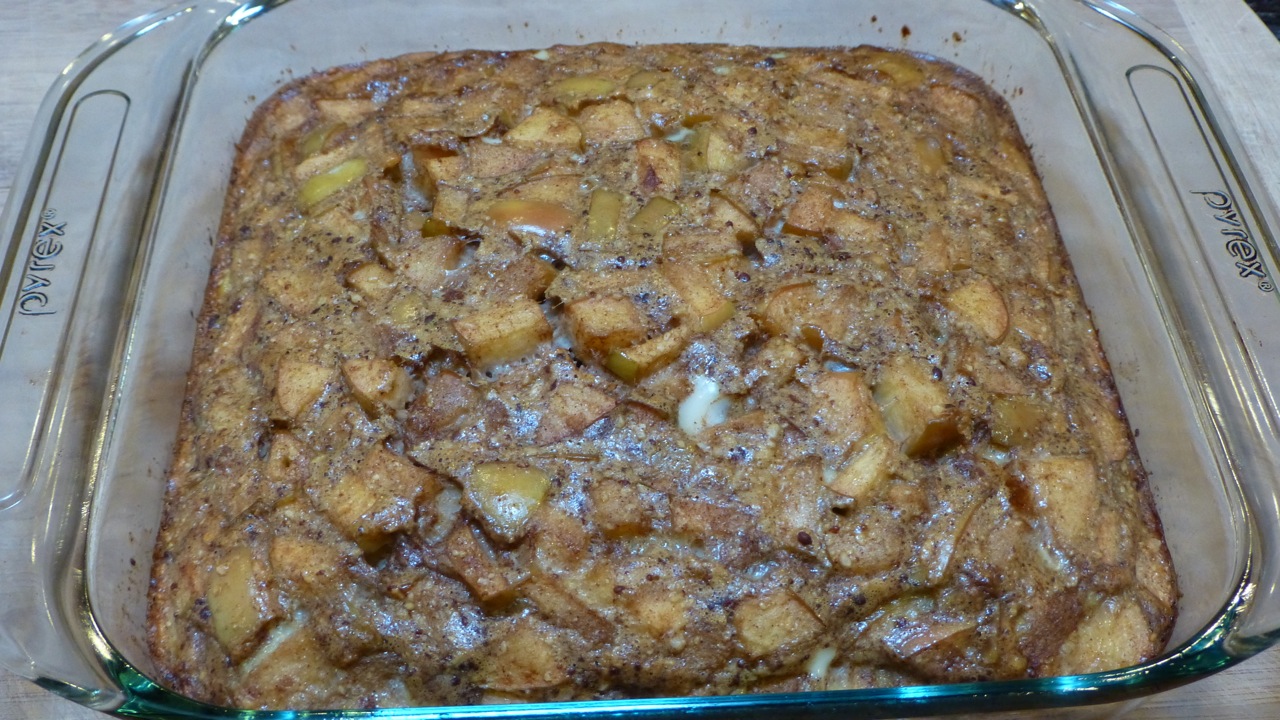
The apples rose to the top of the cake but in reading the reviews for this recipe, this is normal.

Okay then. Ready to bake? Here’s the recipe …

Ingredients

  • 4 cups diced apple (cored and peeled)
  • ½ cup water
  • 1 Tablespoon cinnamon
  • 1 teaspoon vanilla
  • 2 Tablespoons butter
  • 9 free range eggs
  • 2 – 3 Tablespoons pure raw honey
  • 3 Tablespoons coconut milk (if paleo) or milk of choice
  • 1 ½ Tablespoon organic coconut flour (no substitutions per the original recipe as it will not work correctly)
  • 1/2 tsp additional cinnamon
  • heaping ¼ tsp baking soda
  • pinch of salt

Directions

  1. Preheat oven to 350 degrees fahrenheit.
  2. In a skillet, saute the apples, water, vanilla and cinnamon until the apples are the consistency of apple pie filling – approximately 10 minutes.
  3. Add 2 tablespoons of butter to the mixture and stir until the butter is melted.
  4. Allow the apple mixture to cool for a few minutes before adding it to the egg mixture.
  5. In a bowl, whisk the eggs, coconut milk, coconut flour, ½ tsp cinnamon, maple syrup, baking soda and salt until its well combined.
  6. Combine the egg and apple mixture then pour it into an olive oil or butter greased 8×8 pan. Bake for 50 minutes or until the top is nice and golden and the middle is cooked through.

Even though this recipe has almost 1.5 tablespoons of cinnamon, it wouldn’t hurt to add more — if you’re a cinnamon lover like I am.

Enjoy!


Salmon with Strawberry Balsamic Glaze

This Salmon with Strawberry Balsamic Glaze was delicious. I loved the sweetness in the glaze that melded with the tenderness of the salmon. We used honey instead of agave syrup and it turned out just fine.

Salmon with Strawberry Balsamic Glaze

Served with a paleo Roasted Carrot & Blood Orange Salad with an arugula base (replace the brown sugar with honey), it made for the perfect meal.

Roasted Carrot & Blood Orange Salad

I enjoy trying different marinades/glazes and salads with salmon. For awhile, we were having salmon once a week and for some reason I started to get tired of it. I wanted a different kind of fish. But the feeling soon wore off as salmon is one of my favorite meals.


A Minnesota Blue Jay

The first time I saw this beautiful blue jay, he/she took my breath away.

There are two of them, male & female, who appear to live in one of the trees in our front yard. Occasionally, they come to the back deck and eat the seeds that fall from the bird feeder that we have out. They are a tad too large to eat from the feeder itself.

Minnesota Blue Jay
Minnesota Blue Jay

Did ya know … male and female blue jays are very hard to tell apart unless they are “handled” and a “breeding” patch is found under the female.

Interesting …


Baked Mustard Lime Chicken

I’m still catching up with some of the reviews on some paleo recipes that my son cooked for us while he was here.

This Baked Mustard Lime Chicken was very limey. The recipe calls for 1/2 cup of fresh lime juice. I would halve that amount so that it won’t make me pucker — unless, that is, you happen to really really like lime. I couldn’t get past the lime flavor in this recipe.

Baked Mustard Lime Chicken

Looks pretty juicy, doesn’t it?

My son served this with steamed broccoli which accompanied it very well. I dipped my broccoli in the chicken sauce and it tasted okay that way.

I will be trying this recipe again but, again, with less lime juice.

Any lime lovers out there?


Garlic Mustard Plant

A couple or so weeks ago I spotted a really pretty plant in my backyard, side yard and basically all around the yard (1/2 acre)– here and there and in large clusters. Hmmm … if I didn’t know any better, this has to be a weed, I said to myself.

So, I set out to pull this weed. The task was quite overwhelming. The plant pulls out quite easily, especially in the wet Minnesota weather that we’ve been having, but there is so much it.

My husband thought I should let this pretty plant grow wild but my gut told me differently.  One evening, while we were watching the evening news, a segment on an invasive noxious weed was being talked about. And guess what it was? Yup. The plant I had been pulling up that was all pretty looking was an invasive plant called the garlic mustard plant.

I’ve learned so much about this plant in the past three weeks but I was glad that I learned it early on.

Last year I had pulled some of these plants out on the west side of the house but they were the stalks and not yet mature. Surprisingly, most of those plants didn’t return so I must have caught them right on time — before they dropped their seeds which is quite important.

The plant is considered biennial. It comes up as a really pretty rosette (circles of leaves all the same height) and they have about 3-8 rounded kidney-shaped leaves. The plants can stay green all winter.

Once the plant “grows up” (matures) in the second year, it becomes stalk-like and produces a pretty cluster of white flowers — each with four petals. Shortly after this, seed pods form and they look like tiny green beans. These pods hold dozens of seeds that fall to the ground and, you guessed it, make many more plants, uh, weeds.

These seeds can be spread throughout the property by a person or animal walking through and transporting it on their shoes or paws.

Some seeds have been known to remain dormant from 5 to 10 years. Can anyone say ugh?

This is what my property looked like when I started the weed pulling …

Field of Garlic Mustard Weeds

Here’s another area of the same plant, uh, weed.

Field of Garlic Mustard Weeds

Fortunately for me, all the plants I pulled up did not have any pods yet. I must’ve pulled 15 large trash bags of weeds.

One mistake I made was pulling the weeds and laying them on the ground so I could gather them later since it started to rain. Unfortunately, the plant — really, should I call it a plant? — can continue growing while lying on the ground and seeds can fall to the ground while it lies there.

Since we use well water on our property, I’ve chosen not to use Roundup, a weed killer, that will knock it out quickly (although you have to make sure you spray all the leaves). The weed killer that must be used needs to have 2% glyphosate in it in order to be effective. If one is going to use a weed killer, they should do a spot application in early spring or late fall when the native plants are dormant (so you don’t kill everything else also).

Oh — a friend suggested I try spraying the plant with vinegar instead of with Roundup. Has anyone ever tried that?

It is very important to remove this weed because they produce a chemical that has been shown to inhibit the growth of other native plants.

It is possible to halt the infestation of the garlic mustard plant if it’s pulled out by the roots before the seeds set. Monitoring the area after you pull the plants out for additional weeds is very important as it could take several years to completely wipe it out.

Also, adding native plants to the area can help to crowd it out if you don’t have a large infestation but you still need to pull ANY garlic mustard plants that pop up or they will take over.

Recently I walked our property and found more immature stalks growing along with the first year plants. I will be using roundup on the first year plants since they are few and far between (so far) and won’t take too long to spray.

Unfortunately, next year I’ll have my work cut out for me again because the two neighbors uphill have large infestations that are heading my way.

Two other important things to remember:

1)  The plant is not supposed to be composted although when I checked with my garbage disposal company they told me to put it in the garbage or in the yard waste container. Do you suppose they don’t realize the problem? It is possible for the seeds to live through the composting process.

2) The plant is edible, or so I hear. No, I haven’t eaten it and I would strongly recommend that anyone check this out thoroughly before they put this plant in their mouth.

Here are a few other articles you might want to read regarding this plant:

If you have had any success in removing this plant from your property and there is anything you wish to add, I encourage you to comment.

[amazon_link id=”B0008309SW” target=”_blank” container=”” container_class=”” ]Roundup 5100720 Weed and Grass Killer Super Concentrate Bottle, 35.2-Ounce[/amazon_link]

Apple Cinnamon Bread

I made this Apple Cinnamon Paleo Bread that my son had given me his recipe for. It turned out okay but not great. It’s worth my giving it another try though as it’s paleo and I like both apple and cinnamon.

I served it with a Cabbage Soup and that turned out delicious. Not everything can be perfect, eh?

Ingredients

  • 2 ripe bananas
  • 1/2 cup apple sauce
  • 4 eggs
  • 1/2 cup almond butter
  • 4 tbsp coconut oil, melted
  • 2 apples, peeled, cored, and shredded
  • 1/2 cup coconut flour
  • 1 tbsp cinnamon
  • 1 tsp baking soda
  • 1 tsp baking powder
  • 1 tsp vanilla
  • pinch of sea salt

Ingredients

  1. Preheat the oven to 350 degrees fahrenheit.
  2. Combine the bananas, apple sauce, eggs, nut butter and oil in a mixer and mix well on medium speed until its fully incorporated. (Start slow then increase the speed.)
  3. Once all of your ingredients are blended together, add the coconut flour, cinnamon, baking soda, baking powder, vanilla and sea salt then mix well.
  4. Grease a 9×5 glass loaf pan with olive oil spray or butter. (I used a dark pan and that may be why I had a problem — see below.)
  5. Pour the batter into the pan and spread it evenly.
  6. Place the pan in the preheated oven and bake for 55-60 minutes or until a toothpick inserted into the center comes out clean.
  7. Remove from the oven and flip your bread out onto a cooling rack after it cools.
  8. Slice and serve.

I allowed the bread to cool for about 10-15 minutes before trying to remove it and this is what happened …

Ugh! Oh well, live and learn. I probably should have used (besides the glass pan) more olive oil spray on the bottom.

It was a pretty simple recipe to follow. I liked the bread but my husband did not. He’s not a big fan of coconut though and that probably made a difference.


Cabbage Soup

This recipe, called Veselka’s Cabbage Soup, was exceptionally good even though it had sauerkraut. Yes , you heard me right — sauerkraut. Now, before you move on from this post, let me tell you that I don’t like sauerkraut but this soup surprised me and was really delicious.

When my son gave me this recipe to try, I wrinkled my nose and automatically knew I would hate it. But I was wrong. So — for those of you who don’t like sauerkraut, I say “give it a try.” You can be proved wrong also. (We won’t tell anyone though.)

And look how easy it is to make — not too many ingredients.

Cabbage Soup Ingredients

Hey! How did the marjoram get turned around?

More ingredients
More ingredients

I used 2 boneless skinless chicken breasts instead of pork.

Chicken Breasts, Skinless and Boneless

Cut the breasts into small bite size pieces.

Cut up Chicken
Cut up Chicken

Slice the cabbage thinly …

Slice Cabbage
Slice Cabbage

Everything will be going into a large pot … but not all at once (see directions below).

This is what happened to me while I allowed the soup to simmer … my liquid evaporated so I had to add more water to cover the ingredients.

Ahhhh … this is much better.

Cabbage Soup
Cabbage Soup

It was perfect!

Cabbage Soup with Sauerkraut

Now that I’ve got you hooked, here’s a list of all the ingredients and the directions.

Ingredients

  • 1 pound of skinless, boneless chicken breasts, cut into bite size pieces
  • 1 1/2 quarts chicken stock
  • 4 cups water
  • 2 teaspoons allspice
  • 3 bay leaves
  • 1 tablespoon dried marjoram
  • 1 cup sauerkraut, plus around 4 tablespoons juice
  • 1 large sweet potato, peeled and diced
  • 2 carrots, minced
  • 3 stalks celery, minced
  • 1 small onion, diced
  • 2 cups fresh cabbage, shredded thin

Directions

  1. Place the chicken in a large pot with the chicken stock, water, allspice, bay leaves, and marjoram.
  2. Bring this all to a boil and simmer on low heat for about 2 hours.
  3. Remove the chicken and set it aside on a plate to cool. Skim fat from the stock, leaving a little bit of fat for flavor.
  4. Add sauerkraut and simmer for 20 minutes.
  5. Add the sweet potato and simmer for 5 minutes.
  6. Add the carrots, celery, onion, and cabbage and simmer for another 20 minutes.
  7. Add the cooked chicken and simmer for 10 more minutes.
  8. Season with salt and pepper then add the extra sauerkraut juice.

Keep your eyes on the pot to make sure your liquid doesn’t evaporate like mine did. You can add more water or chicken stock — whatever your preference.

Give it a try though. I really believe you won’t be disappointed. This recipe has been adapted to be paleo friendly.


Easy Baked Chicken with Cucumber Tomato Salad

Besides posting reviews on paleo recipes that our family has tried, I will be posting some new ones that I am making. (As you recall, my son was cooking for us before but he’s off to new adventures now.)

This entree and salad are very simple to make. The chicken does take a little time to bake (40 minutes or so) but it’s well worth it. Even though you use few ingredients for the chicken, it is quite tasteful.

Here are the recipes for both …

Ingredients for Baked Chicken Thighs

  • 4 chicken thighs, with skin and bones
  • 1  shallot, peeled and sliced thin
  • 3 cloves of garlic, crushed into a paste
  • Salt and pepper to taste
Ingredients
Ingredients

Simple, just like I said, right?

I used a mortar and pestle to make my garlic into a paste.

Mortar and pestle
Mortar and pestle

My paste wasn’t too pasty though …

Crushed Garlic
Crushed Garlic

Directions

  1. Preheat oven to bake at 425°F
  2. Rinse chicken thighs and place in a baking pan
  3. Pat the thighs dry with a paper towel
  4. Using your finger gently separate the skin from the thigh to create a pocket on top but make sure you don’t remove the skin
  5. Combine the shallot and garlic then use a butter knife or small spoon to spread the mixture under the skin
  6. Sprinkle the skin with salt and pepper
  7. Bake for 40–45 minutes, or until the juices run clear.

The chicken will look like this after its prepped.

Prepared Chicken
Prepared Chicken

And like this once it’s baked …

Baked Chicken
Baked Chicken

These were absolutely scrumptious. The original recipe calls for 8 chicken thighs but I don’t think there would have been enough of the pasty mixture to fill them and have them taste good.

Oh yes, the salad. (Don’t worry, I didn’t forget.) My husband used to make this salad when I would allow him into the kitchen. It’s easy, nutritious and quite goodly to the palette. It’s called a Cucumber, Tomato and Onion Salad and here are the ingredients you need.

Salad Ingredients
Salad Ingredients (not pictured olive oil, apple cider vinegar, salt and pepper)

Ingredients

  • 2 cucumbers, peeled and thinly sliced
  • 4 roma tomatoes (original recipe calls for pint cherry tomatoes) sliced thickly
  • 1/2 Vidalia onion, sliced thinly
  • 2 tablespoons chopped fresh parsley leaves
  • 1 tablespoon apple cider vinegar
  • 1 tablespoon olive oil
  • Salt and freshly ground black pepper (to your taste)

Directions

  1. In a medium sized bowl, combine the cucumbers, tomatoes, onion and parsley
  2. In a small bowl, combine the vinegar, olive oil, salt, and pepper.
  3. Add half of the oil mixture over the salad and toss lightly
  4. Refrigerate for approximately 10 minutes
  5. Set out the rest of the oil mixture to add if you need more dressing.

That’s it! And it’s a pretty salad.

Cucumber, Tomato & Onion Salad

This combination was perfect. I think it will become one of my staples.

[amazon_link id=”B004FRYBPY” target=”_blank” container=”” container_class=”” ]Fox Run Marble Mortar and Pestle[/amazon_link]

Cooking Again

A couple of days ago our son, who has been cooking for us for a few months, left to pursue life’s adventures. So, it’s time for me to get back on the cooking bandwagon. For the next few days, I’ll probably be using some of the paleo recipes that we’ve already tried and enjoyed. Occasionally I’ll throw in a new salad or entree recipe. We’ll see how it goes.

I am a couple of weeks behind in posting some of the recipes we’ve tried already so you will see some of those also.

To date, I’ve lost 20 lbs (almost 21 but I won’t count the extra lb until my scale shows it for 3 days). Not bad for eating paleo and not exercising, eh?

Yesterday we had Crock Pot Lamb Stew that we had before and it was a hit again. I cooked it on high for 4 hours and it was perfectly done.

I made a new salad to go with the stew — Honey Mustard Broccoli Salad. It was quite good! One gauge I use besides my own taste buds is my husband who took all of the leftovers with him for lunch today. Yea for me in finding a simple but tasty salad.

Ingredients
Ingredients (not pictured – lettuce, olive oil, salt & pepper

Ingredients

  • 1/2 lb broccoli (with stems)
  • 1 large apple (I used a medium one)
  • 3 leaves of lettuce (original recipe calls for mixed greens but I had lettuce at home so that’s what I used)
  • 2 tablespoons olive oil
  • 1 tablespoon whole grain mustard (sugar free if possible) – I bought the spicy brand so used 1 tablespoon instead of the 3 tablespoons that the original recipe calls for)
  • 2 tablespoons apple cider vinegar
  • 2 Tbsp. honey
  • salt & pepper (to taste)
  • 1/3 cup raisins
  • 1/4 tsp. sea salt

Directions

  1. Clean the broccoli and slice it into medium sized florets. (The original recipe says you can use the stems too but they are normally too chewy for me so I left them out.)
  2. Steam the broccoli for approximately 2 minutes (the broccoli should look “bright” but you don’t want it soggy).
  3. Remove the broccoli from the stovetop and immediately immerse it in cold water until cooled. Drain it thoroughly and then pat them dry with a towel so the florets won’t hold onto the water which will dilute the dressing.
  4. Core & slice the apple thinly then add it to a large bowl along with the broccoli and lettuce.
  5.  In a small bowl or liquid measuring cup, whisk together the dressing ingredients (mustard, olive oil, apple cider vinegar, honey, salt and pepper.) Taste and add more of any of the ingredients depending on what your preference is.
  6. Pour 1/2 of the dressing over the salad and toss everything together to blend it.
  7. Refrigerate the salad for 30 minutes.
  8. In a small bowl, toss the raisins with 1/4 tsp. salt and set aside.
  9. When you’re ready to serve the salad, add the raisins over the refrigerated ingredients and serve.

The reason I saved half of the dressing is because I don’t like to toss my salads in the dressing as most times it becomes soggy. This salad does need to marinate in this dressing so that’s why I added half of it. In addition, my husband likes spicy foods but I don’t so this gave him the option to add more dressing to the salad whereas I kept mine more mild.

Honey Mustard Broccoli Salad

This was quite simple and I would definitely make it again.


Sweet Potato and Leek Soup

The highlight of my paleo diet was this Sweet Potato and Leek Soup. Really and seriously. This was fantastico! I loved every bite of this soup and later had it for breakfast also. It has a smooth texture to it that reminded me of cream of rice. What?!!! Yes, it had the texture of cream of rice and I love that texture on my palette.

I will make this again and again, although my husband, who is not a fan of sweet potato, was not too thrilled with it, so we’ll see where life leads. What are we going to do with such husbands?

Sweet Potato and Leek Soup

My son served the soup with Ratatouille. An odd combination, no? I’m beginning to believe I’m not a fan of ratatouille. I mean, it was okay but it’s not on my “let’s make it again tomorrow” list.

Ratatouille
Ratatouille

Both entrees are chockfull of vitamins though so I say — go for it! But definitely try the soup — you won’t be disappointed.