A New Camera

Since my fall (literally) in the ocean back in January, I have been looking to replace the camera that fell in the water with me and it has not been an easy task although I basically had 3 requirements for purchasing a new one:

  • A point-and-shoot
  • Better zoom than my old one which was 10x (for taking pictures of wildlife)
  • Quick picture taking

I went to Best Buy and tried out some of the cameras they had which were okay but with so many options I still found it a little overwhelming as some cameras have a longer battery life, some have better picture quality and on and on so I didn’t purchase one at that time.

Later, on a recent trip to Costco, I saw a camera that was a newer model of the one that was recently damaged. It’s a Panasonic ZS10 Lumix and has 16x optical zoom and 14.1 megapixels. When I tried it at the store, it had the 3 things that I was looking for.

Panasonic ZS10 Lumix

Appearance-wise, the camera doesn’t look very pretty as it’s basic black. If “pretty” were important to me then this camera would not be on the top of my list but I’m more practical than that.  The camera is lightweight and sits comfortably in my hand, pocket or purse.

So I purchased it, started taking pictures almost immediately and was pleasantly surprised that they were coming out very clear. The next test was in taking pictures of food since I like trying new recipes and taking pictures of my work. The camera has a Food setting specifically for this which does not use a flash and actually has a note that recommends you NOT use a flash when taking pictures of food. A food blogger that I follow had once said that she didn’t use a flash when taking pictures of food so I didn’t find that too unusual. However, I assumed that if the lighting was too dark that the flash would automatically be enabled but that was not the case.

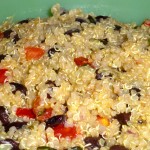
When I made my quinoa salad, I decided to use the Food setting and follow the directions — no messing with a flash, just shoot the picture with the setting as stated.

Boy, was I disappointed as my pictures started coming out dark and fuzzy. Here’s an example of what I mean:

Cooked Quinoa - using the Food setting as recommended with no flash

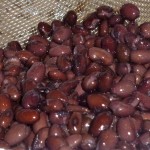
Here’s another picture using the same Food setting:

Soaking Quinoa - using the Food setting as recommended with no flash

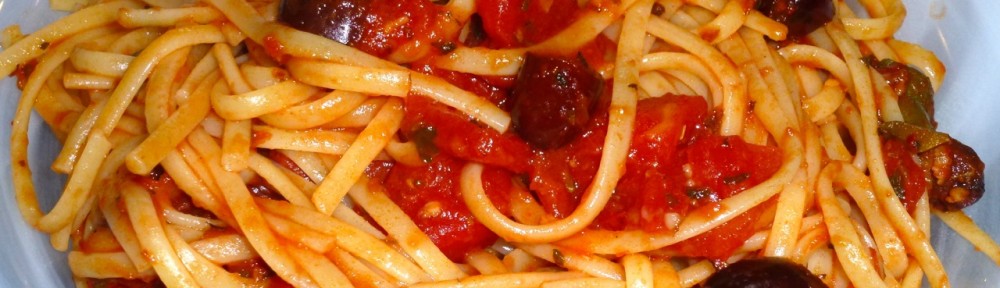
That was NOT going to work for me so I decided to take the same picture on the Auto setting which automatically adjusts for the lighting and, in this case, used the flash:

Quinoa Soaking - Auto setting that used the flash

Quite a difference, eh? I was getting more frustrated as I assumed the Food setting should know what it’s doing. (Okay, I know that I’m assuming a camera can think but really, all I’m assuming is that whoever set up the camera should know that the Food setting should adjust for whether a flash is needed).

As the days rolled by I kept trying the Food setting and every time I set it as instructed, I kept getting fuzzy pictures. Finally I decided to try something different (yes, I decided to think for myself) by turning on the flash when using the Food setting and guess what? It worked! The pictures came out pretty similar to if I was using the Auto setting.

I was on the verge of returning the camera to the store as I have a 90 day trial period but instead I’m thinking I’ll keep it. I did experience a little stress in figuring out how to turn the flash on while using the “Food” setting but things have settled down now.

I wonder why little things seem to stress me more often than not these days. Age? I hope not or I’m going to be a really cranky old lady.

[amazon_link id=”B004KKZ0I8″ target=”_blank” container=”” container_class=”” ]Panasonic Lumix DMC-ZS10 14.1 MP Digital Camera with 16x Wide Angle Optical Image Stabilized Zoom and Built-In GPS Function (Brown)[/amazon_link]


Spring Bulbs

The hyacinths are peeking out of the ground already since the weather has been in the 60’s and 70’s the past couple of weeks. We are still waiting for the daffodils and the tulips to come up but the weather has turned a wee bit colder at night — in the lower 40’s.

These bulbs are supposed to be deer resistant so I am hoping that the deer don’t decide to make their abode in my front yard to eat my autumn-planted bulbs.

An unfortunate event has happened though — I spotted the first mosquito of the season. Grrrrrr …  And, according to an article in the New York Times the tick season has already started due to the warm winter we’ve had.

My favorite seasons in Minnesota are still autumn and winter as there are no bugs.

I guess I’d better prepare myself mentally for working alongside the bugs that will be making an appearance shortly.


Removing Wallpaper

The removal of the wallpaper project is going quite well so far although I’m only working 2-3 hours at a time so as not to upset my injured hand and only 2-3 days a week.

It is a slow process though. One thing I had not anticipated was paper cuts. I noticed small cuts on my hand that were bleeding. I’m almost done — well, once I remove the mirrors and the toilet — but I hadn’t even considered wearing plastic gloves. Oh well …

I think removing the toilet is not going to be a big deal. I say this with a bit of humor as I’ve never removed a toilet before in my life. But, there is a first time for everything, isn’t there? Well, there doesn’t have to be I guess but there will be for me. For some unknown reason, I would like to say that I’ve removed a toilet.  (laughing)  What a goal to have in life! hehe

I’ll have to do some research on it and see how it goes. I think it’s a “next week” project though. Hmmm … maybe I should just replace the toilet. It is 19 years old after all. My fear is that I may have parts that I don’t know what to do with a new toilet. I can pretty much document what I do to remove it but putting a new one back in? I’ll have to see how much courage I can summon next week.

The large mirrors also have to come out as there is wallpaper behind them and we’re planning on replacing the countertop also which means removing the tiled backsplash. The real trick will be how to take them down and not break them in case we want to reuse them.

Large Bathroom Mirror

I’ve been reading on the internet that a lot of contractors glue these large mirrors on but in our case they have large bolts behind the mirrors so I’m hoping it will be easier to remove. Looks like I can slide them off so if I put tape on the mirror so it doesn’t shatter perhaps that will work.

Thinking out loud here …

These mirrors might be a bit much for me as I’m only 5’1″ tall and I don’t want to be splattered with glass. The “experts” say I’d have to wear gloves, long sleeves and safety goggles. I’ll tackle this after the toilet, I believe. One step at a time.


Wallpaper Removal

All the thoughts in my head haven’t made it to my blog yet but are sitting as drafts for the most part — incomplete. It’s not procrastination although I do work better under pressure and a deadline. I haven’t wanted to spend too much time using my left injured hand typing although it is doing much better even if occasionally I get twinges of pain.

This week I started a new bathroom project — removing wallpaper. My concern with this project was in using the already-made solutions that reek of chemicals that I’m sure would cause me to get sick. Fortunately, I was able to find something that is much better and works.

In searching the “world wide web” I came across the site called DIY (do it yourself) Network. I’ve been using their suggestion to use one part Downy to one part hot water in a spray bottle to remove the wallpaper.

So far — it has worked but I did have a few kinks. First, I’m only using one hand to work and that makes for very slow going. Second, the wallpaper has been on this wall since they built the house which means that it is being stubborn (can wallpaper have feelings?) about coming off.

I’m not sure what kind of wallpaper they had 19 years ago. I had always imagined all wallpaper was the same. But I don’t believe so. The wallpaper has a thin decorative layer on the top and underneath it is another thin cardboardy layer. In order for my homemade solution to work, I have to peel the thin decorative layer first, spray the cardboard with my solution then use the putty knife to scrape it off. (Thought: I wonder if they used the cardboard piece to protect the sheetrock???)

Wallpaper

Both pieces (the thin decorative layer and the thin cardboard layer) are sticky.

Underlaying (cardboard) piece under Wallpaper

Once I remove both layers, I put a little bit of dish detergent in a bucket, add some really hot water and take a cloth to wipe down the wall to remove any residue glue that may still be there. Then I use plain hot water to wipe the wall down again. Lastly, I wipe the wall down with a dry towel.

One step I did not follow (well I tried but it didn’t work) was to “score” the wallpaper. Apparently there is an instrument called a wallpaper scorer that creates small holes in the paper to allow the solution to penetrate to the glue. Instead, I used my putty knife to make small indentations. This was not successful as the “small” indentations made their way to the sheetrock and I found that with the type of wallpaper I have it wouldn’t have worked.

Completed removal of wallpaper

Anyway — the steps are as follows (not including the scoring part):

  1. Prepare the room by putting drop cloths on the base of the walls to be stripped. Remove all switch plates and outlet covers from the walls then cut the power to the room (you don’t want to get electrocuted while doing this work).
  2. Mix your solution — one part Downy and one part hot water. I used fragrance free Downy as my bathroom doesn’t have a window that I can open to air out the room while working and besides, who wants to inhale a bunch of fragrance that has made me sick in the past. Oh — make sure you keep the water hot. I microwaved the solution every 20-25 minutes to make sure it stayed hot as it works much better and made the scraping go faster.
  3. Soak the walls with the solution. I used a spray bottle for this. Let the solution soak for a few minutes and make sure the wall is saturated.
  4. Grab the wallpaper on the bottom and pull it off. This didn’t work for me as mine was a 2 step process — remove the outer decorative layer, soak the thin layer underneath and then scrape upward with the putty knife. But hey, it might work for someone else.
  5. Once the wallpaper is off, mix a tablespoon of dish detergent with very hot water. Use a sponge to wipe down the walls, scrubbing carefully to remove all traces of wallpaper adhesive.
  6. Rinse down the walls with a towel and clean water then dry the wall with a towel.
This project will probably take me a couple of weeks. One-handed work takes time …
Oh yeah — I did encounter one other problem. After removing the wallpaper above the shower stall area, I looked around to determine what the rest of my project was going to look like. Seeing as they put the wallpaper in when the house was built, I noticed that the wallpaper is behind everything. Meaning? I have to remove the toilet and the large mirrors in order to remove all the wallpaper.
My little project just became a medium sized project. Now I have to decide whether to remove the toilet myself (can I do that one-handed? hmmm …) or if I should ask for help.
[amazon_link id=”B003USKA7M” target=”_blank” container=”” container_class=”” ]Downy Ultra Fabric Softener Free and Sensitive Liquid, 120 Loads, 103-Ounce (Pack of 4)[/amazon_link]


Linguine Puttanesca

This is another wonderful dish from the 1000 Vegan Recipes cookbook that I’m hoping to try many recipes from. It is very tasteful but you do have to like olives — which I do! Even as leftovers the next day, it warmed up very well. The olives gave my palette a burst of flavor in my mouth.

Ingredients

  • 2 tablespoons olive oil
  • 3 garlic cloves, minced
  • 1/2 teaspoon (or less if you don’t like it too spicy) crushed red pepper flakes
  • 1 (14.5 ounce) can crushed tomatoes
  • 1 (14.5 ounce) can diced tomatoes
  • 1/2 teaspoon dried oregano
  • 1/2 teaspoon dried basil
  • Salt and pepper (to your taste)
  • 3/4 cup kalamata olives, pitted and halved
  • 1/4 cup green olives, pitted and halved
  • 3 tablespoons capers
  • 2 tablespoons minced fresh or dried parsley
  • 1 pound linguine
Directions
  1.  In a large saucepan, heat the oil over medium heat
  2. Add the garlic and crushed red pepper flakes then cook through for about 30 seconds
  3. Stir in both cans of the tomatoes, the oregano and basil
  4. Add salt and pepper (to your taste)
  5. Bring the sauce to a boil then reduce heat to low and simmer for 15 minutes stirring occasionally
  6. Add the olives, capers and parsley then cover and keep warm
  7. In a large pot, boil salted water and cook the linguine according to package instructions
  8. Once the linguine is cooked, put it in a bowl, pour the sauce over it and toss it gently to combine it all
That’s it! Pretty easy and very good.


Mating

Yes — it is mating season in Minnesota!

While sitting on my screen porch yesterday, I heard a raucous loud sound. Over and over again this sound pierced the still air til finally a wing flutter could be heard. Looking towards the sound, I could hear two wing flutters. And there they were! Two majestic looking hawks — male chasing female.

I quickly looked through my binoculars to get a good look at these two giant birds. Oops! I was looking at two mating birds. Sheeplishly I put my binoculars down. Hmmm … I never knew that … Well, I had never seen birds mate before.

Today, the cardinal that’s been flitting around our yard had brought his mate with him.

Minnesota Cardinal

Chasing each other through the trees, over and under, they sure looked like they were having a good time.

Yes — mating season has begun. I wonder why I have never noticed this time of year before.


Google History Workaround

With all the hoopla recently regarding Google and how it uses my search history, I decided to see if there was a way to turn off my history searches in Google. Sure enough, there is a little known workaround to stop Google from tracking our history. You have to “opt-in” though and I wish they would tell people about the option instead of us having to stumble upon it.

Here are the simple steps to follow:

  1. Go to google.com
  2. Go to “Account Settings.” (Mine was found by clicking on my name which gave me a drop-down menu)
  3. Scroll down to “Services”
  4. Next to the tab “View, enable, or disable web history,” click on “Go to web history”
  5. Click on “Pause” at the top of the page

That’s it! There is also an option to remove all your web history.

This isn’t something new but something new to me. And the funny thing is that I don’t “see” most of the personal ads that are supposed to be geared towards me. Perhaps it’s because I’m focused too much on what I’m doing.


Quinoa Salad with Black Beans and Tomatoes

Quinoa? What is quinoa? After buying a large bag of it (I like to try new things) I had better find out, eh?

Quinoa

Quinoa is sometimes considered a grain but it is actually a seed. It has a slightly nutty flavor and can be prepared like rice or barley. The texture is soft — almost like couscous. A nutritionist I know called it “the perfect food” and says it is filled with vitamins, proteins, amino acids, minerals, and fiber. It also contains the essential omega-3 fatty acids which provides benefits to the heart. Sounds pretty close to a perfect food, eh?

I like the texture of quinoa — it feels soft in my mouth and doesn’t taste heavy in my belly.

Ingredients

  • 3 cups water
  • 1 1/2 cups quinoa, well rinsed
  • Salt
  • 1 1/2 cups cooked or 1 (15.5 ounce) can black beans, drained and rinsed
  • 4 ripe plum tomatoes, chopped but not too small
  • 1/2 cup minced red onion
  • 1/2 cup basil
  • 1/4 cup olive oil
  • 2 tablespoons red wine vinegar
  • 1/2 teaspoons freshly ground black pepper

Directions

  1. Add the water to a large saucepan and bring it to a boil over high heat
  2. Add the quinoa, salt the water and return to a boil
  3. When it’s simmering, reduce the heat, cover the saucepan and allow the quinoa to cook through (until the water is absorbed) for about 20 minutes
  4. Once cooked, transfer the quinoa to a large bowl
  5. Add the black beans, tomatoes, onion, basil then stir it all together
  6. In a small bowl, combine the olive oil, vinegar, salt (to your taste) and pepper — this will be the dressing
  7. Pour 1/2 of the dressing over the salad and toss to combine. Taste and see if the flavor is right for you
  8. Continue adding the dressing until you feel comfortable with the taste and the consistency, ie, not too oily tasting

Serves approximately 10 as a side dish.

The recipe is from the cookbook I received as a gift, 1000 Vegan Recipes.

I made the following changes to the original recipe:

  • Used basil instead of parsley
  • Use red wine vinegar instead of sherry vinegar

The recipe says it feeds 4 but you have to eat a LOT of this salad for it to feed four. I used it as a side dish so had lots left over. I covered the leftovers with plastic and the next day the salad still tasted fine. However, like other salads I’ve made that have a dressing, my preference would be make the salad and add the dressing a few minutes before you’re ready to serve it. I find it tastes fresher that way.

Another very good recipe from my new cookbook.


Bird Spottings

They are here! The birds are back thanks to the warmer weather we’ve been experiencing.

While driving home, I noticed that the neighbor dog was a little agitated pacing back and forth while looking up at a tree on our property. Looking up, I noticed a huge yellow looking bird. Hmmm … I wonder if the falcon is back.

Running to get my camera from inside the house, I took many shots of this large bird. He stood perfectly still as I got as close as I could without disturbing him. At first, I thought it was an owl as it was so round and puffy-like. But, what a surprise I had when I looked at the pictures and found that my treasure for the day was spotting a red-shouldered hawk. I understood the concern of my furry dog friend as these hawks are carnivorous and its diet mainly consist of small mammals.

Red Shouldered Hawk

She looks a tad bit fat to me and I believe I probably took this picture shortly after she had grabbed something to eat.

Red Shouldered Hawk

While I was outside, I spotted a smaller version of this hawk which I’m pretty sure was the male. Unfortunately, the light wasn’t conducive to taking a picture of it but it sure was making a racket!